Making an External Hard Drive Tray
V1.0 CDG 12-Jan-2006
V1.1 CDG 30-Apr-2006
The plummeting cost of hard drive capacity has created a backup problem. Today even inexpensive disk drives have the same capacity as tens of DVDs or hundreds of CDs. No one is likely to make regular backups if they have to feed an endless stack of DVD to their PC. Alternatives like cheap tape drives have not kept pace.
The constantly increasing capacity of hard drives has created this problem but it also solves it by making it possible to simply buy a whole new drives and use them for backup space.
The question is how to attach new drives to your PC without having to dismantle it every time? One solution is an external enclosure that uses USB to connect to the PC. That works but you'll need to buy an enclosure for each new drive. Another solution is a drive tray system that allows hard drives to be mounted in removable trays that can be swapped in and out. But this requires a tray mount system to be added to every PC you want to backup. The ideal solution is a combination of these -- an external tray mount system. It is very cost effective for backups as the cost of the tray adds very little to the bare cost of a drive. It is also great for other tasks like capturing hours of home movies. And, here’s how I made one…
Most external enclosures are designed to fit 3.5” drives and will not accommodate a removable hard disc tray. Even the ones designed for 5.25”wide CD/DVD-drives are usually not deep enough for a tray system. If you do find an enclosure that will take a drive tray then buy it, it will save you a lot of work. Assuming you can't find a suitable enclosure, its time to brush upon you construction skills! We’ll need to take the interface electronics out of the external enclose and put them in a new box with enough space for the removable drive tray.
Warning #1 -- Never try this with an enclosure that has a direct connection to mains power or that contains a power supply! It is vital for safety that you use an enclosure that has an external power supply and that mains voltages have been reduced to a save level like 12V outside of anything you are working on. When buying an external enclosure to cannibalize make sure that it is the type that has a separate wall adapter (power cube) supplying it with a safe 12V and never, ever work on the power adapter itself.
Warning #2 – Like all DIY projects this could go wrong and you could trash a few hundred dollars worth of enclosure and disk drive and you could even trash your PC. I’ve seen two PC mother boards destroyed by plugging in a USB drive with a power short (after two PC instantly died the tech spotted a pattern and stopped plugging it in!). This project is really more a mechanical construction challenge than an electronics one but even so only you know your capabilities in this area and how much risk you are prepared to take with your PC and disk drives.
Find an USB external drive enclosure that handles the drives with interface you'd like to use. I used ATA-100 drives, but if I were starting now I'd look seriously at Serial-ATA instead. For the PC interface side I’d looks for full-speed or high-speed USB2 rather than USB1 because USB1 is slowwww. I can’t see any reason why Firewire would not work just as well, if that’s what you like.
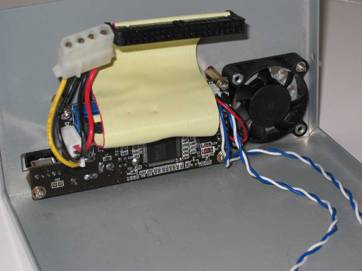
It doesn't matter if the external case is plasticy as all you want is the electronics inside. Take the enclosure apart and carefully remove the USB-to-ATA interface board, the LEDs, the fan (if there is one). Remember you'll have to re-mount and reconnect all this in a new box so make sure to keep notes on what connects where.
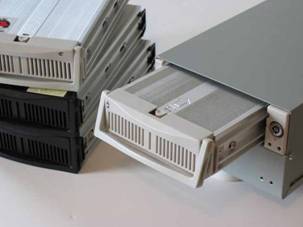
Next find a drive tray system. I like the solid aluminium trays with a fan mounted integral to the bottom of the tray. These are a little more expensive that the plastic trays but they are far more robust and keep the drive nice and cool.
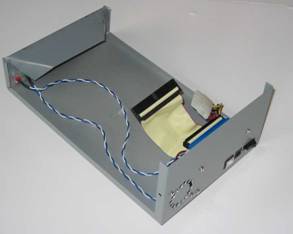
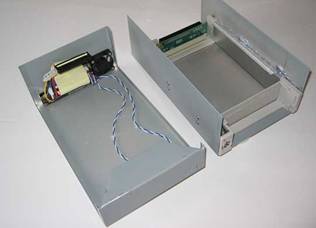
Now comes the hard part. You have to find a box in which you can mount the tray system and the USB-to-ATA electronics. It has to be the right width so that both sides of the tray are supported and long enough for the tray system to fit but no too long so the cable from USB-to-ATA electronics will reach from where it is mounted. It took a lot of searching around but eventually I managed to find one almost the right size at a local electronics shop and simply glued a few plastic strips down one sides to act as a spacer and give a nice snug fit. The case is made of mild steel so it is strong enough to support the tray system but still easy to drill and cut. A sturdy plastic case should do just as well.
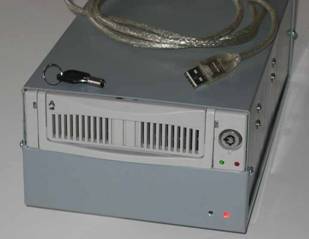
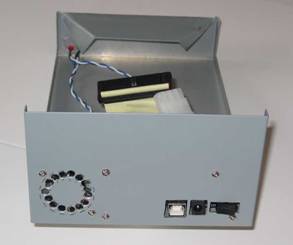
The next part is all construction work. You have to figure out how to mount the tray system, the interface electronics, the low voltage power input socket, the USB connection, the LEDs and maybe a fan as wwell. Make sure you plan how it will all hook up _before_ cutting any holes. Then all you have to do is cut the holes and file off the shap edges. Hopefully you’ll do it a little more neatly than I did.
Some final points:
- Just in case, test the system with a new empty drive before a drive with any of your data on it.
- I found I had to set the drive jumpers to fixed "Master" rather than "Bus Select" to get the interface electronics working.
- To get Windows XP to recognize the drive and format it I had to use: Control Panel->Administrative Tools-> Computer Management -> storage -> disk management
- It's worth buying a spare trays or two -- you never know when they will get discontinued in favor of a new model.
[PS. I recently found that KingWin are making an external tray system for about $44 (RS-525U-BK). This looks pretty good and will save you some elbow grease if you'd rather buy than make. ]
