I became aware of Utilikilts in Seattle, Washingon after seeing them on a PBS documentary. A camo kilt--now that's ME! Being a hands-on sort, I set out to make my own. I found several good web pages detailing how to make a traditional (tartan) kilt.
The big difference in a Utilikilt-style kilt is that because it's not a tartan, you don't have to take the care and extra material to match up the tartan pattern (known as the "sett") when doing the pleats. You can therefore make a bigger pleat with much less material.
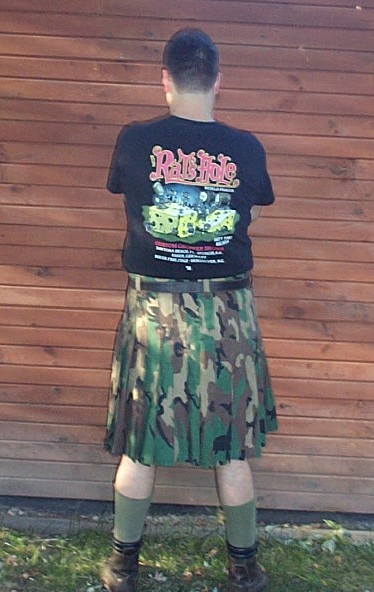
Following the tradional kilt styling,
but with bigger pleats, here is my first kilt:

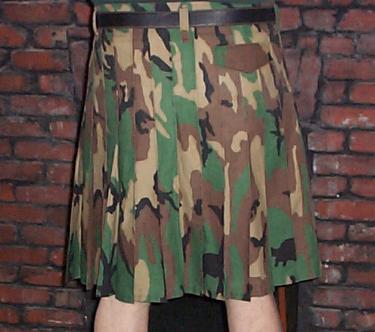
I later modified this kilt to have a smaller apron (the front, unpleated part), so it now looks more like the real Utilikilt, and I added a rear pocket with a flap. Close-up pictures of the way it looks now:

****
I salute the Utilikilt company and their founder, Steven Villegas, for
developing a great idea, and for spreading the word about kilts. If you
don't sew, then support Utilikilts
and buy a kilt from them!
Some advice if you want to make your own kilt:
Start by studying the instructions on these sites, which explain how to make a traditional kilt:
Jan Bruyndonckx's Kilt Website
You can ignore the parts about figuring out what sett you need, and just calculate what you want the pleats to measure. (I did mine 2 1/2-inches each, with 5 1/2 folded under. So that takes up 8 inches of material per pleat.)
Look at the "top-view of the pleating" picture from Jan Bruyndonckx's website. Draw one like that of your design, so you can be sure of the measurements and what it will look like.
On the traditional kilt, all the pleats run from the left all the way around to the right hip. Notice in Jan's diagram that on the right hip there is a point where the pleats change direction. On the UK, they put that right in the very back. I can tell you that on my kilt that pleat is the one that hangs the nicest, so I can see the advantage of having that in the middle back. Then again, if you want to add a right side pocket, it would be easiest to add one over that pleat. Just options to consider. (If you put it in the back, don't make it a double-size pleat).
Unlike tradional kilts, you don't have to worry about how well you press the pleats. Press them once, then run a stitch along the outside on each pleat to lock it there. Then run a stitch on the inside fold of each pleat, too. Now they are permanent!
I added a simple pocket to the front of the inner apron. Just a piece of extra material, sewn on 3 sides, open at the top. Works great. Looks a little strange when you reach inside for your wallet, but I usually accompany it my best Cleavon Little impression, "'Scuse me while I whip this out."
When adding the back pocket, the hardest part was getting the nerve to
cut straight across my beautiful pleats! Then you just sew in a simple
pocket, then add a flap. It came out great. Nothin' fancy.