We started with the 31 gallon tank from an 80 Chevy Blazer, and a universal old hitch with broken hangers. I also got the sending unit and straps from the same Blazer. I cleaned the inside of the tank and sanded the outside and primed and painted the tank. I then cleaned up the sending unit and the tank straps. Then the bed was removed from my truck and the rear 2 crossmembers were removed(the taillight harness crossmember and the spare tire leveling crossmember). We took the hitch and squared off the hangers from where they were broke. Some 2"x3" angle iron was clamped to the hitch and placed the angle on top of the frame and test fitted the hitch location so it would come out right behind the license plate bucket. The angle iron was cut so it would clear the crossmember that sits to the front of the truck from the hitch. Then the holes were drilled and the hitch bolted in place using Grade 8 bolts. The hitch now acts as the rear crossmember on the truck. The back bolt tabs that hold the bed in place were also in the way a little, so they were trimmed 1/4", and the flange to protect the taillight harness was bent up 3/4" to clear the square tube of the hitch.
Holes where then drilled on the tracking arm crossmember behind the differential to mount the straps. Angle iron tabs were then welded on the back on the hitch to hang the gas tank straps. The tank was then test fitted, but the tank could be higher by 1"(so the sending unit area clears the bed crossmembers by about 1/4". The straps then were cut and overlapped 1/2"(gaining 1" total) and the tank was then test fitted again, and it fit perfectly. Rubber was added between the straps and the tank, as they came from the factory this way.
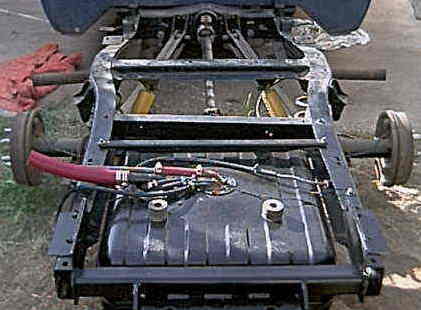
Next, a 3/8" steel gas line from an 87 Suburban was straightened in places and fits from the tank to the rear cab area. The cab tank line was disconnected and a short rubber hose was used to connect the 2 lines. The fuel guage wire was ran out the bottom of the cab and along with the taillight harness to the sending unit. The send unit ground was bolted to the frame for grounding. The fuel line was then connected to the sending unit. The 5/16" line coming from the sending unit was for a vapor canister on emissions equipped vehicles, which my truck doesn not have, so that line was capped off. The 1/4" line on the sending unit was for a return fuel line, which my truck does not have either, so the 1/4" line was run with the filler for a vent. The 5/8" EEC vent was run out past the frame, and then a metal vent line was connected to make a 90 degree turn up, and the 1 3/8" gas filler hose was connected as well.
To hold the tank down in place, the spare tire leveling crossmember was flipped over and some air conditioning rubber mounts were pushed into the channel on the crossmember. The crossmember was positioned toward the front of the tank and 1/2" nuts were placed under the crossmember edge and holes were drilled. The crossmember was bolted into place and the rubber mounts gave the tank just enough pressure to hold it in place. For the back, the same rubber mounts were glued onto the tank with gasket cement under were the bed crossmember would sit, holding the back of the tank in place.
For the filler, a 2" 90 degree exhaust pipe was used, and slightly bent towards an 80 degree angle. Then a 2" to 1 1/2" reducer was welded on and a 1 1/2" to 1 3/8" reducer was welded on. For the filler, we used a 2" filler neck from an 87 Suburban and cut it off about 4" from the filler(keeping the EEC vent line intact) and welded in the 2" exhaust pipe. I didn't want the filler on the outside of the bed and I wanted a custom look, so we took a factory driver's side saddle tank filler hose cover and modified it to fit the new filler. It was cut and laid back at the angle the filler would sit at and this filler was mounted on the inner bedside and a hole cut through the floor.
The bed was then put back on the truck, and the filler was put into place and hooked up. The tank fits very well, and only hangs approximately 6" below the bottom of the frame and still maintains plenty of ground clearance, especially with my 4" drop in the rear(and the added weight of the tank and gas, which lowers the truck another 1"). The tank can hardly be seen from the side or from behind. Approximate tank deminisions, 26" wide x 29" long x 11" tall. |