Tutorials
PARTS OF ADOBE PHOTOSHOP
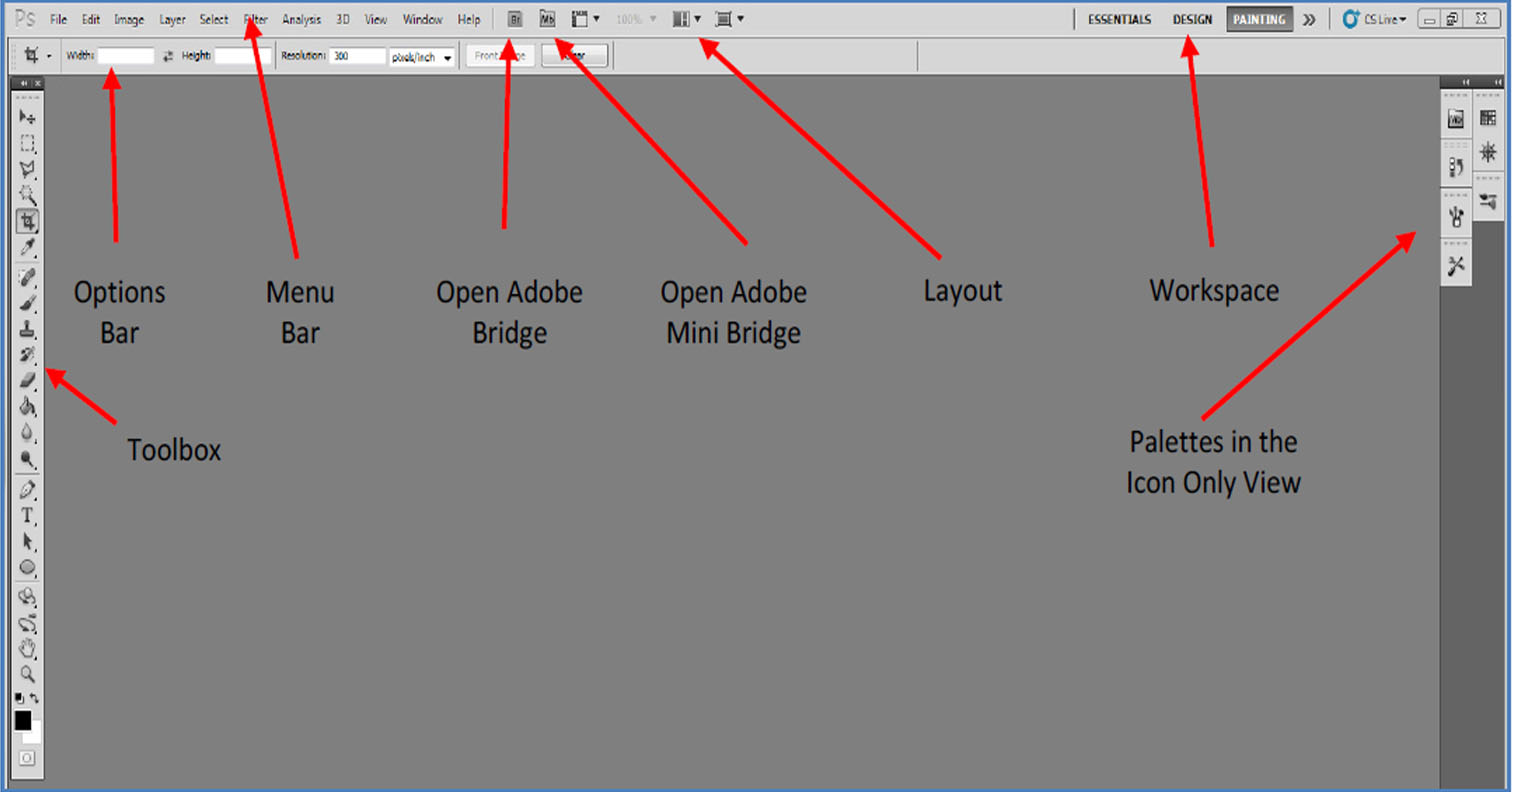
This is the working space in Adobe Photoshop. The toolbox serves as its heart because this software
will never work without it.
How to OPEN an image?
> click on File on the menu bar. To open an existing image, click on Open or Browse in Bridge then search
for your image file. Once you have located the file you want, double clicking will open the file. You
can also use the Adobe Bridge button in the Options Bar. Adobe Bridge is a separate program for searching
and organizing the image files on your computer.
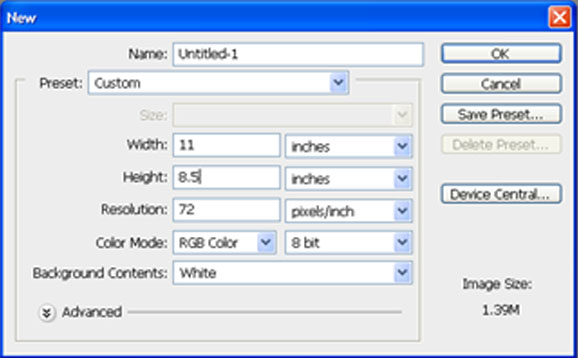
How to OPEN NEW BLANK CANVAS?
> click on New and the box below will pop up. You need to decide on What color mode should
you choose? What size canvas is needed? Should the background be transparent or a color? What
should the resolution be?
You can choose a name for your image here. You will also have the opportunity to name the file
when you save it later.
Choose the size of your document by setting the Width and Height. You can choose
from some preset sizes (click on the triangle to see the options in the drop down box) or create
custom sizes. The size can be in pixels or in inches by changing the drop down.
Resolution affects the sharpness and clarity of an image. Resolution refers to the number
of pixels per inch. If you are producing images for the web, 72 pixels per inches (ppi) is what most
computer monitors show.
The Color Mode gives the opportunity to set the color mode. Color mode tells the computer how
to identify colors. Grayscale gives 256 variations of white to black. This would be the mode to choose
for black and white images. RGB creates color from differing amounts of Red, Green and Blue. This is
good for onscreen images. CMYK is the mode to choose for images for print. This uses blends of Cyan,
Magenta, Yellow and Black.
The area labeled Background Contents is for the background of the image.The background usually
defaults to white, but you may want to set a transparent background or even a specific color for
the full background of the image.
 PARTS, PARTS,, LET'S KNOW THEM ALL:
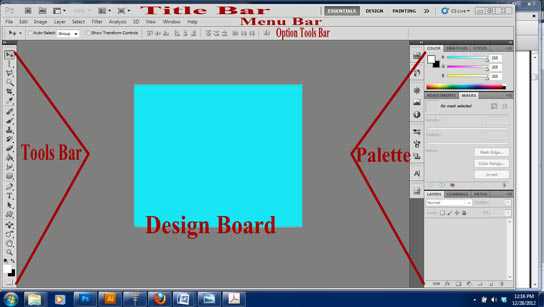
TITLE BAR
> The place where you can see the title of your work.
MENU BAR
> Organizes commands in individual menus.
> Several items have their own set of options as designated by the small black triangle. Hovering on the
item with the triangle shows the fly out menu. If you don�t see the choices you want you may have to
click Show All Menu Items at the bottom of the menu.
PARTS, PARTS,, LET'S KNOW THEM ALL:
TITLE BAR
> The place where you can see the title of your work.
MENU BAR
> Organizes commands in individual menus.
> Several items have their own set of options as designated by the small black triangle. Hovering on the
item with the triangle shows the fly out menu. If you don�t see the choices you want you may have to
click Show All Menu Items at the bottom of the menu.

MENUS
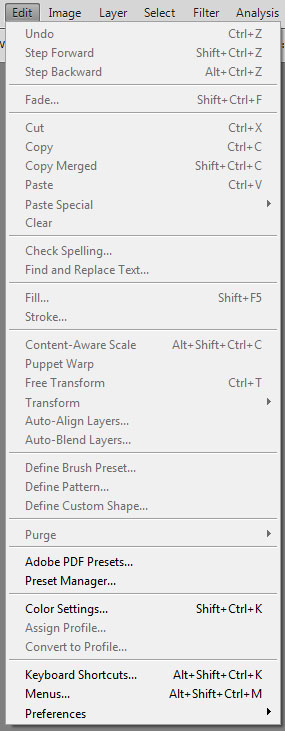
Edit Menu
Step Backward which will continue to undo actions.
Fill will fill the entire selection or layer with a color or a pattern.
Stroke will paint a colored border around a selection, layer, or path.
Free Transform will allow the manipulation of an image.
Transform allows certain set changes such as scale, rotate, skew, flip, perspective.
Preferences will allow changes to settings for general display options, file saving options, cursor
options, transparency options, and options for plug-ins and scratch disks.
View Menu
Zoom In to get closer to your image and show more detail.
Zoom Out moves away from the image and shows more of the image on screen.
Print Size shows what the printed version would look like.
Window Menu
> gives options for manipulating all open files and showing and hiding all palettes.
Select Menu
Select All selects everything on a page or an active layer.
Deselect will turn off your selection.
Inverse selects everything that is not in your selection.
Transform Selection will allow modification of an existing selection.
Save Selection will save your selection in case you may want to use it again.
Layer Menu
Layer palette allow the creation ofnew layers, duplicate layers, layers made from a selection, and
the merging of layers.
New layer will give you a blank layer.
Duplicate layer will duplicate exactly the active layer.
Adjustment layer will allow color corrections without changing content
Layer via copy will create a layer with a copy of the selection on the active layer.
Merge layers combines the layers as if they were one.
Image Menu
color mode determines the color model used to display and print images.
RGB is the best color mode when working with images to be viewed onscreen.
CMYK is best for printed images.
Grayscale is best for black and white images.
Indexed Color mode uses at most 256 colors.
Image Size
> To resize the image select Image > Image size. It allows you to set the width and height of the image.
Canvas Size
> Canvas Size dialog box allows you to scale the canvas that the image rests on, separately from the
image itself. To resize the canvas select Image > Canvas Size.
OPTION BAR
> The horizontal bar that runs underneath the Menu Bar in Photoshop. It sets the options of the
tool you are about to use.
> changes as you change your tool.
 PALETTE/PANNELS
> Small window used to verify settings and modify documents.
> Control behavior of its tools.
> Windows menu displays a list of available palettes.
> When selected, the palette will appear as a floating window on the opened workspace.
> To activate a palette click on its tab.
PALETTE/PANNELS
> Small window used to verify settings and modify documents.
> Control behavior of its tools.
> Windows menu displays a list of available palettes.
> When selected, the palette will appear as a floating window on the opened workspace.
> To activate a palette click on its tab.
COMMON PALETTES
 Color
> Displays the color values for the currently selected foreground and background colors.
Color
> Displays the color values for the currently selected foreground and background colors.
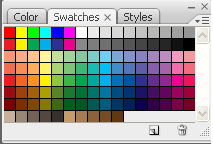 Swatches
> Displays a generic set of colors, but the true value of the Swatches palette is in its ability to
load custom swatch collections.
Swatches
> Displays a generic set of colors, but the true value of the Swatches palette is in its ability to
load custom swatch collections.
 Layers
> Displays all the layers in an image
Layers
> Displays all the layers in an image
 History
> Records and displays individual changes made to an image and allows for
changes to be undone.
DESIGN BOARD/CANVAS/WORKING SPACE
> The place where you will edit your images. You can resize it.
APPLICATION BAR
> Across the top part containing a workspace switcher, menus and other application controls.
DOCUMENT WINDOW
> Includes the entire window from the menu bar to the status bar.
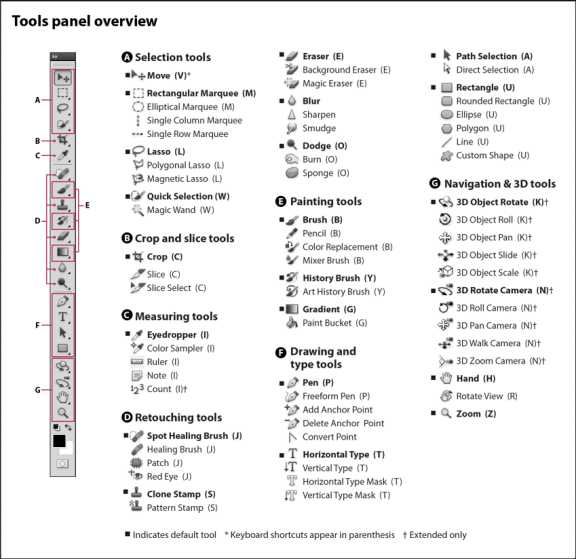
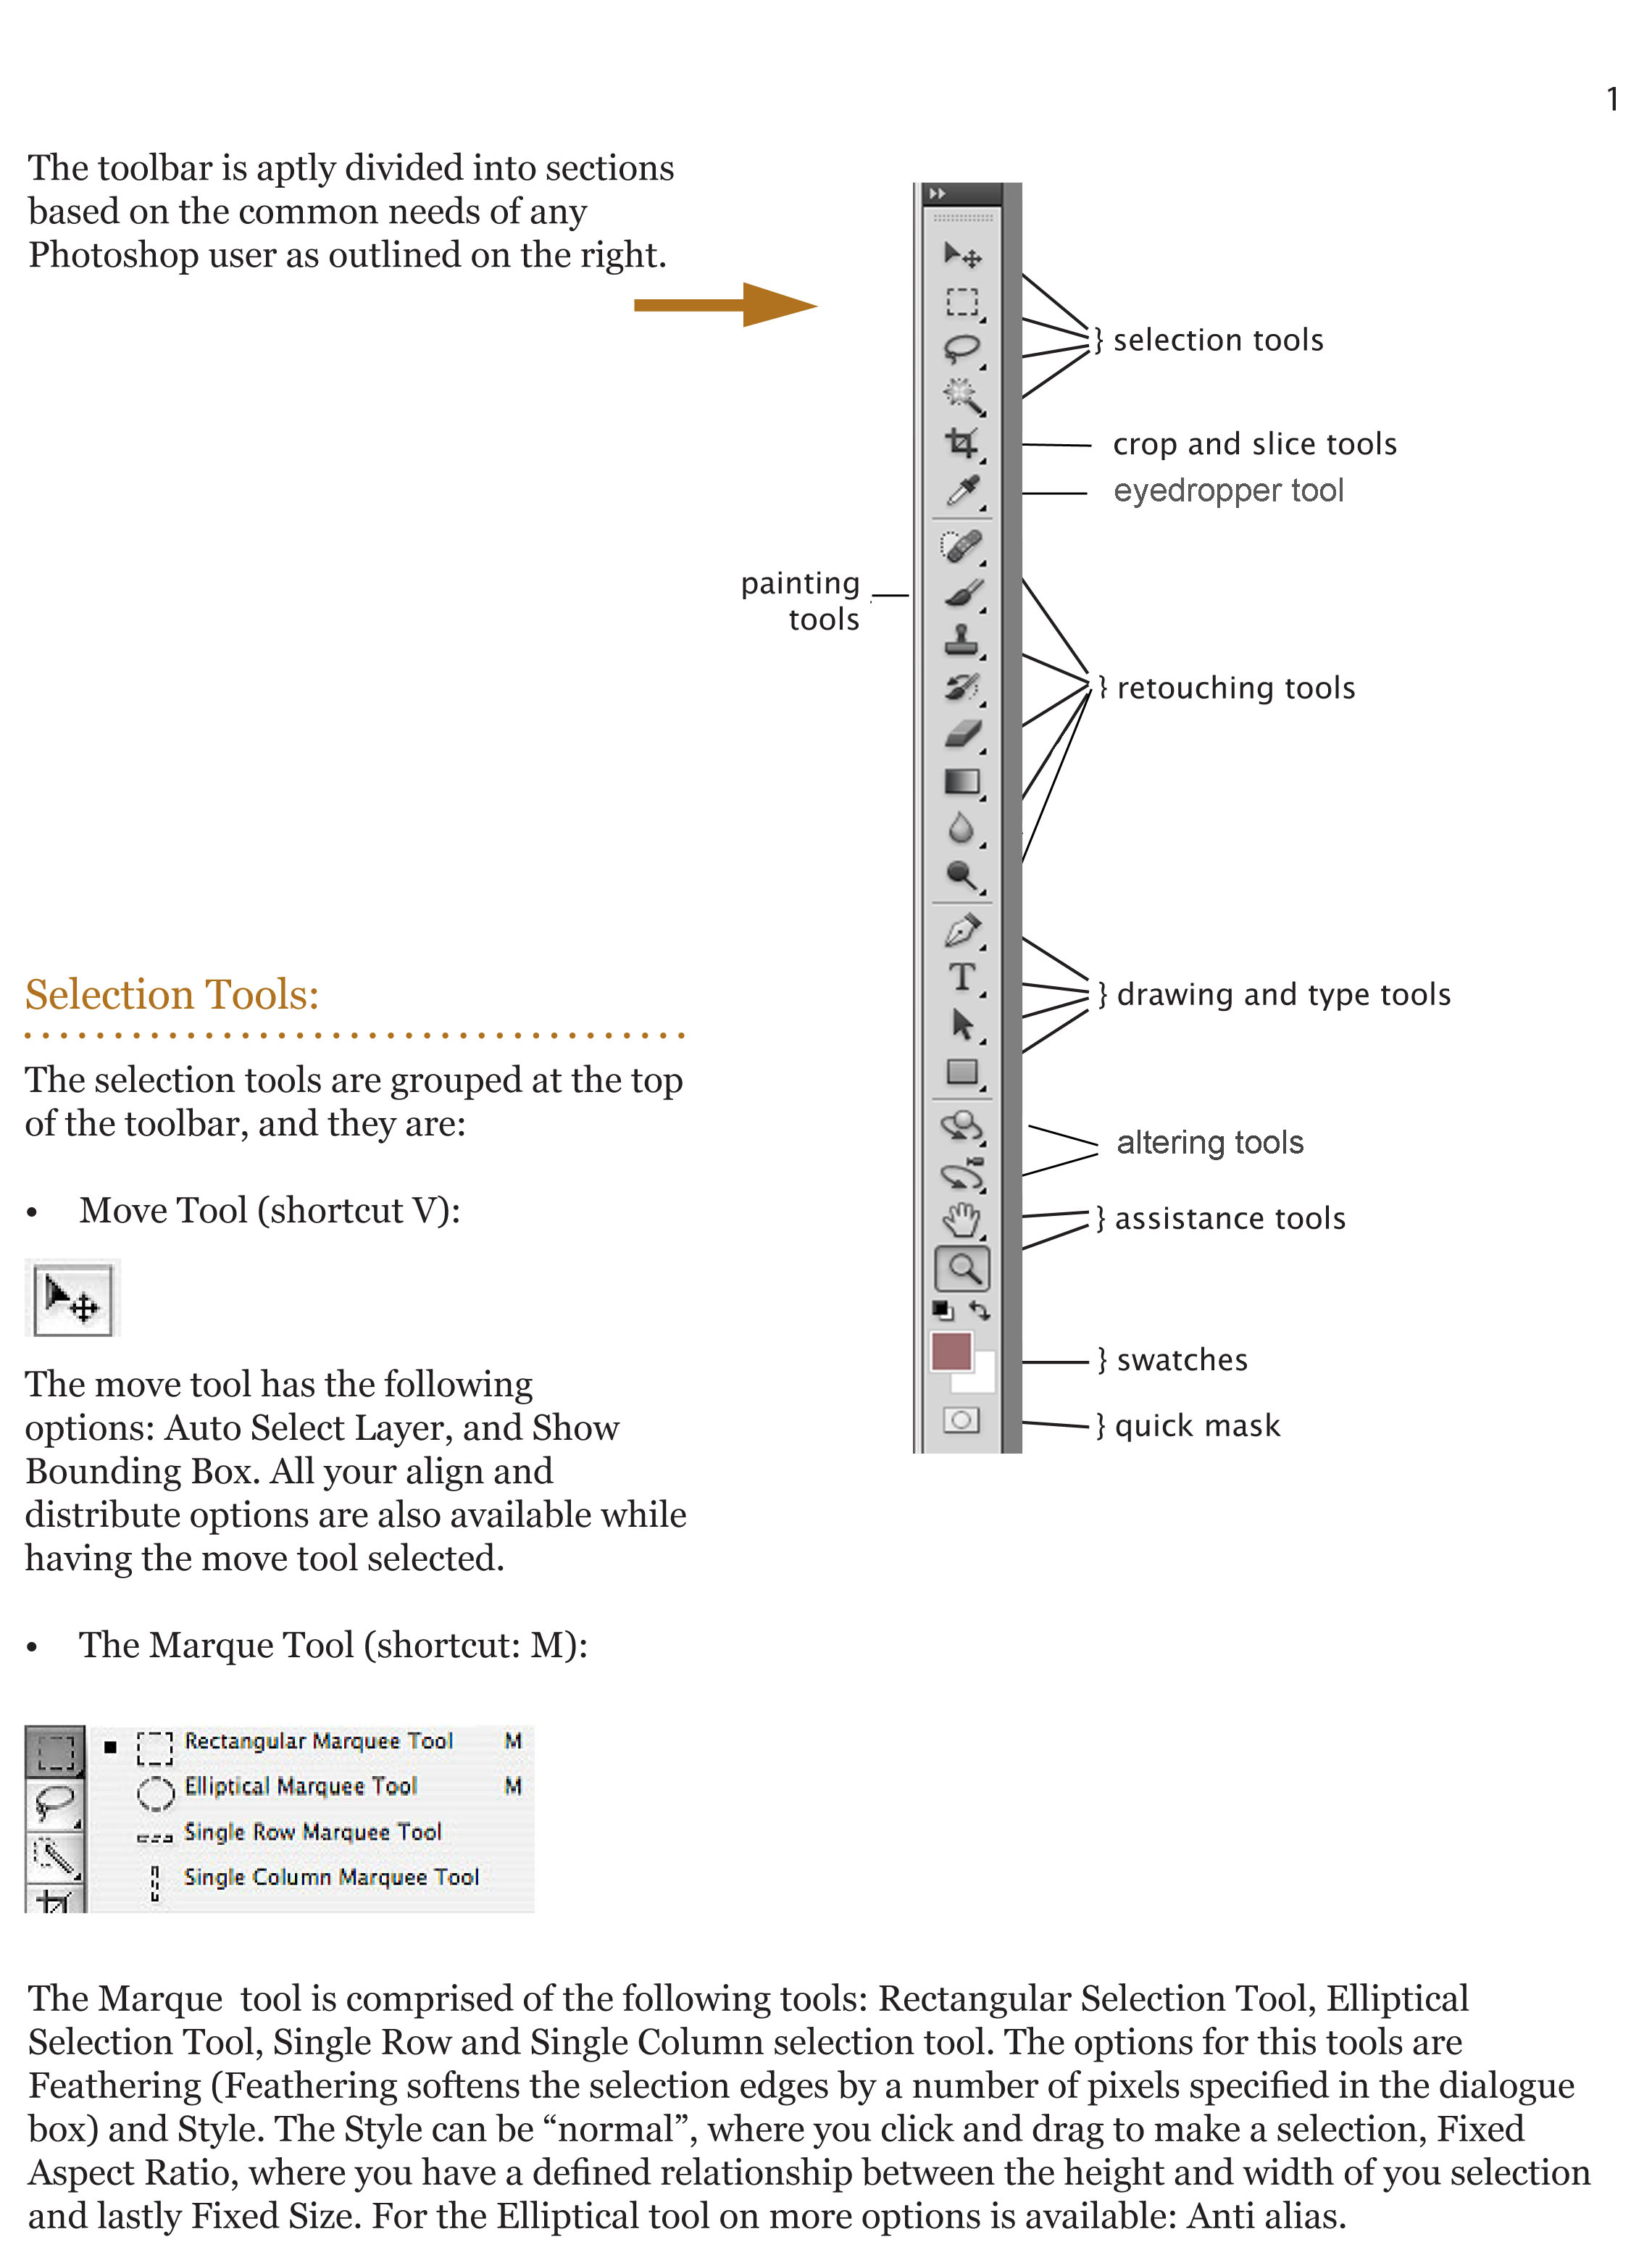
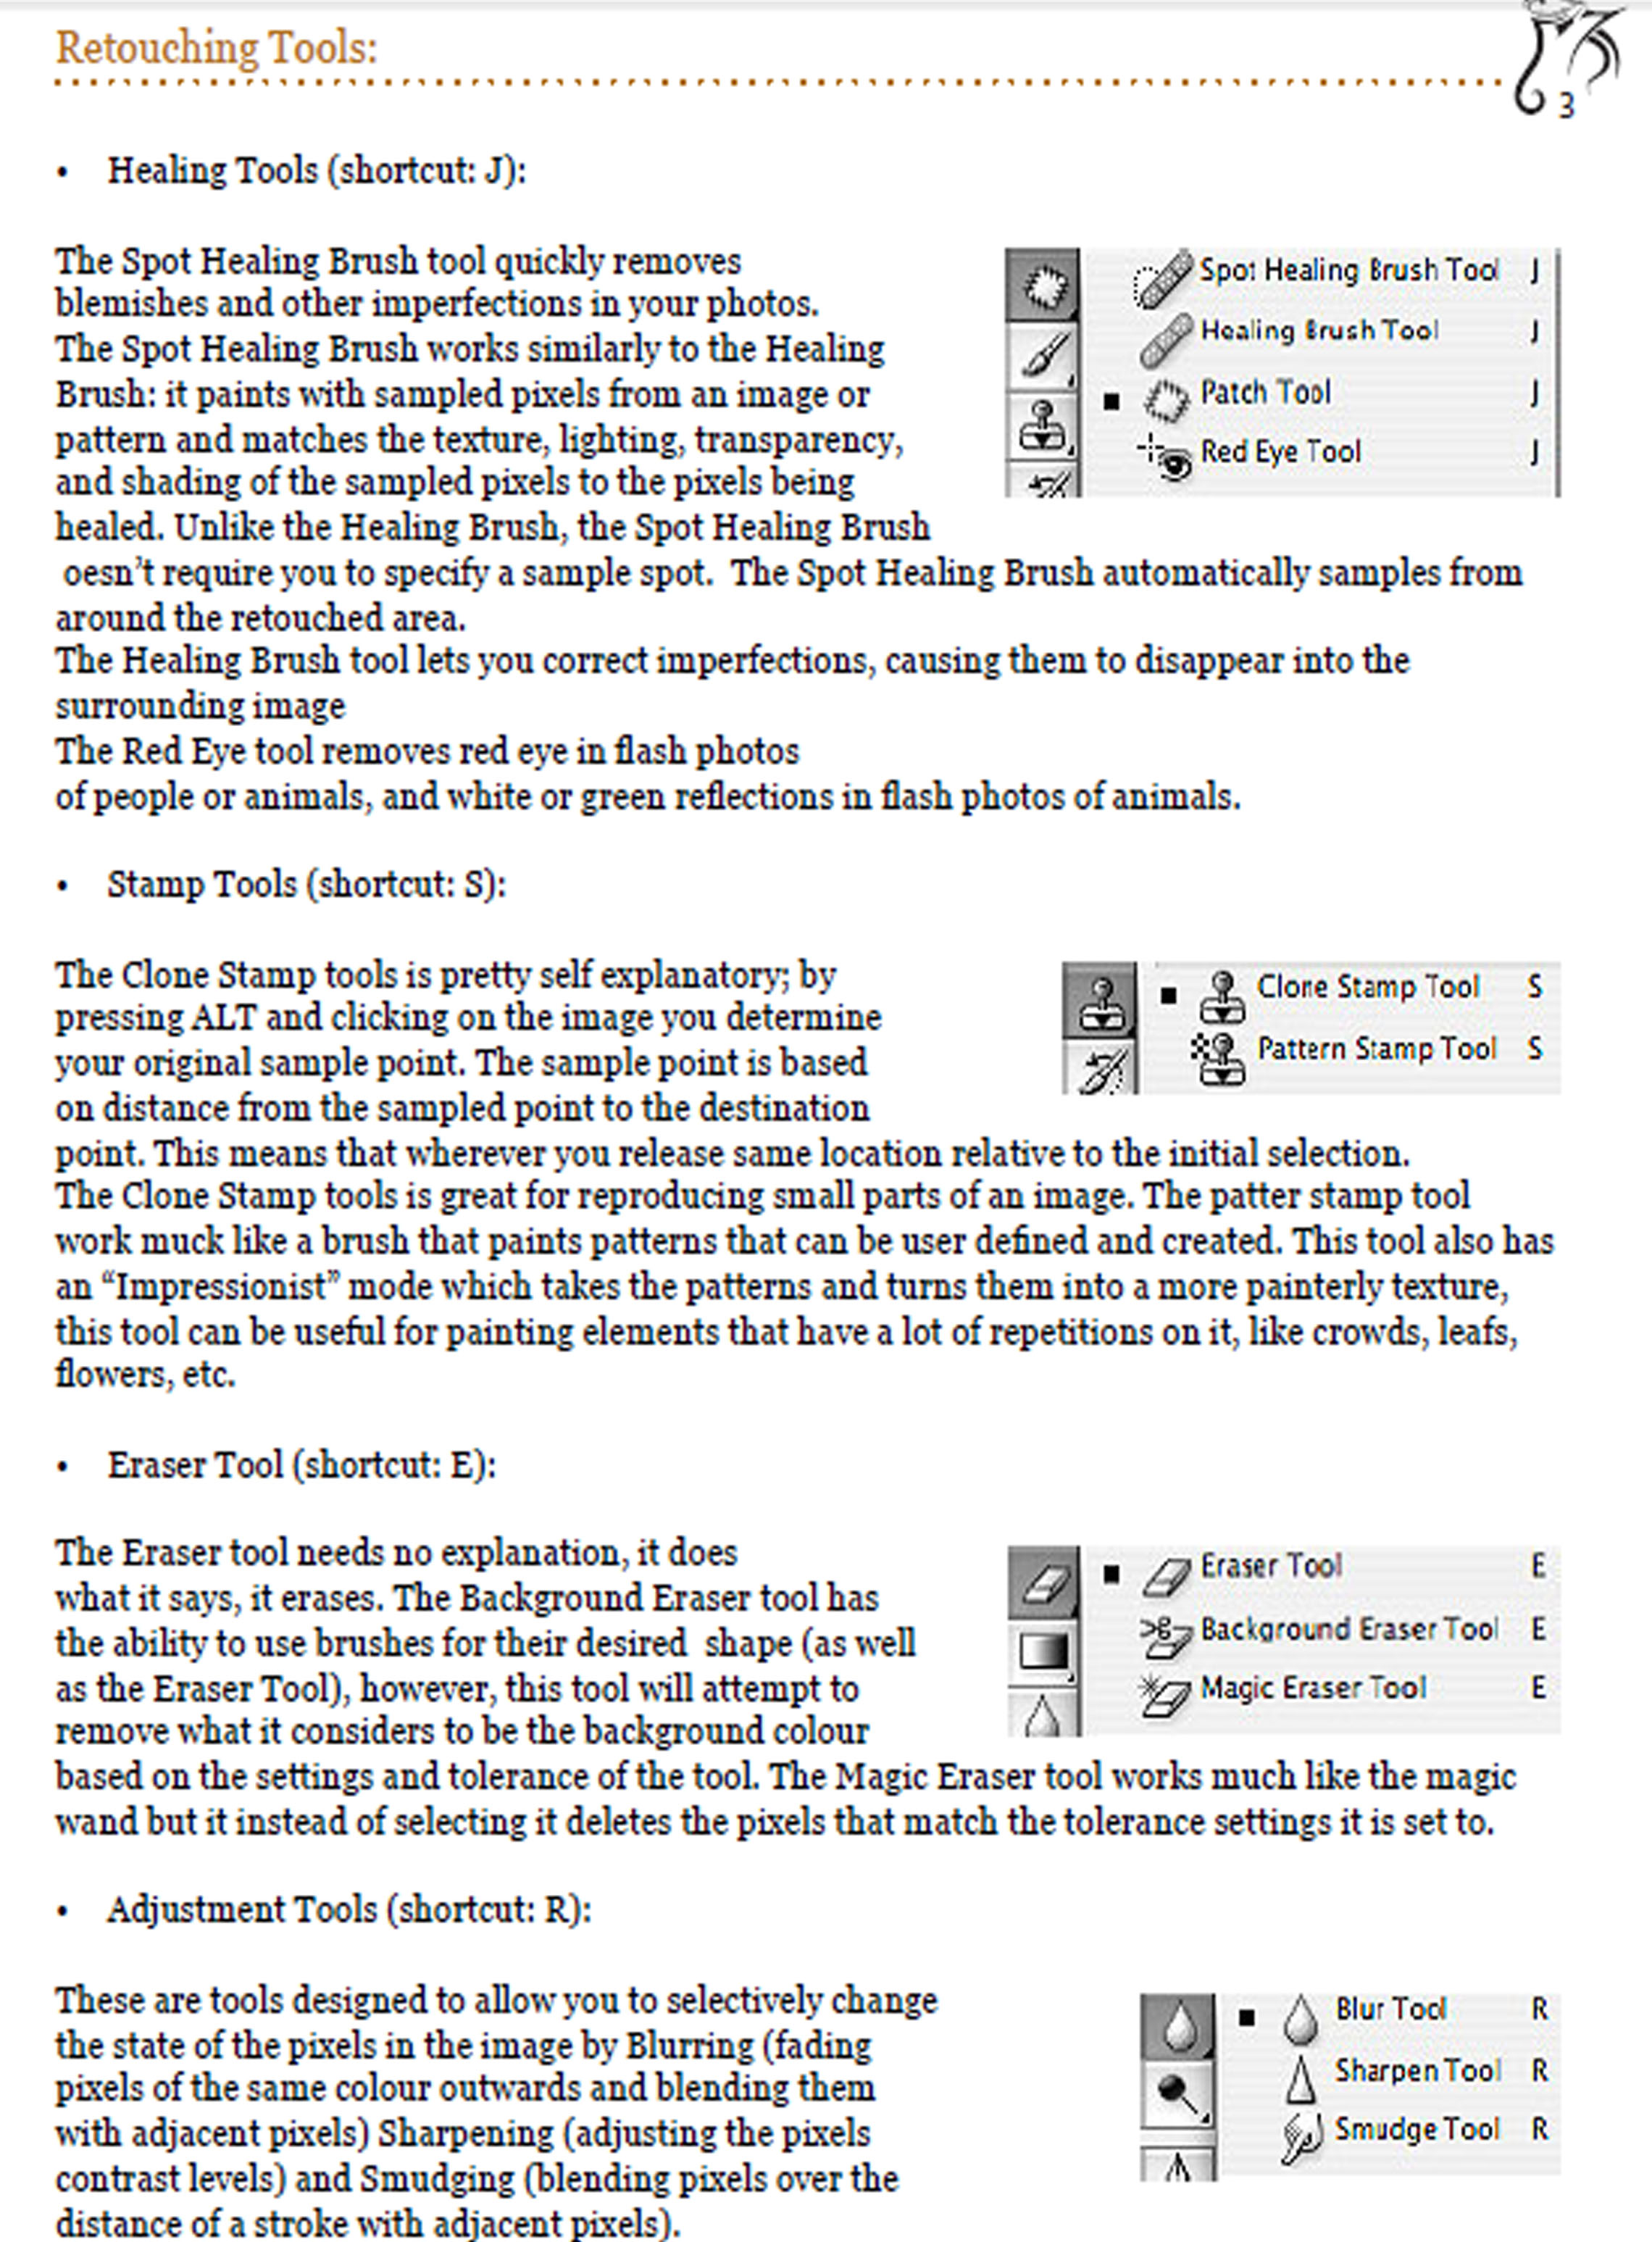
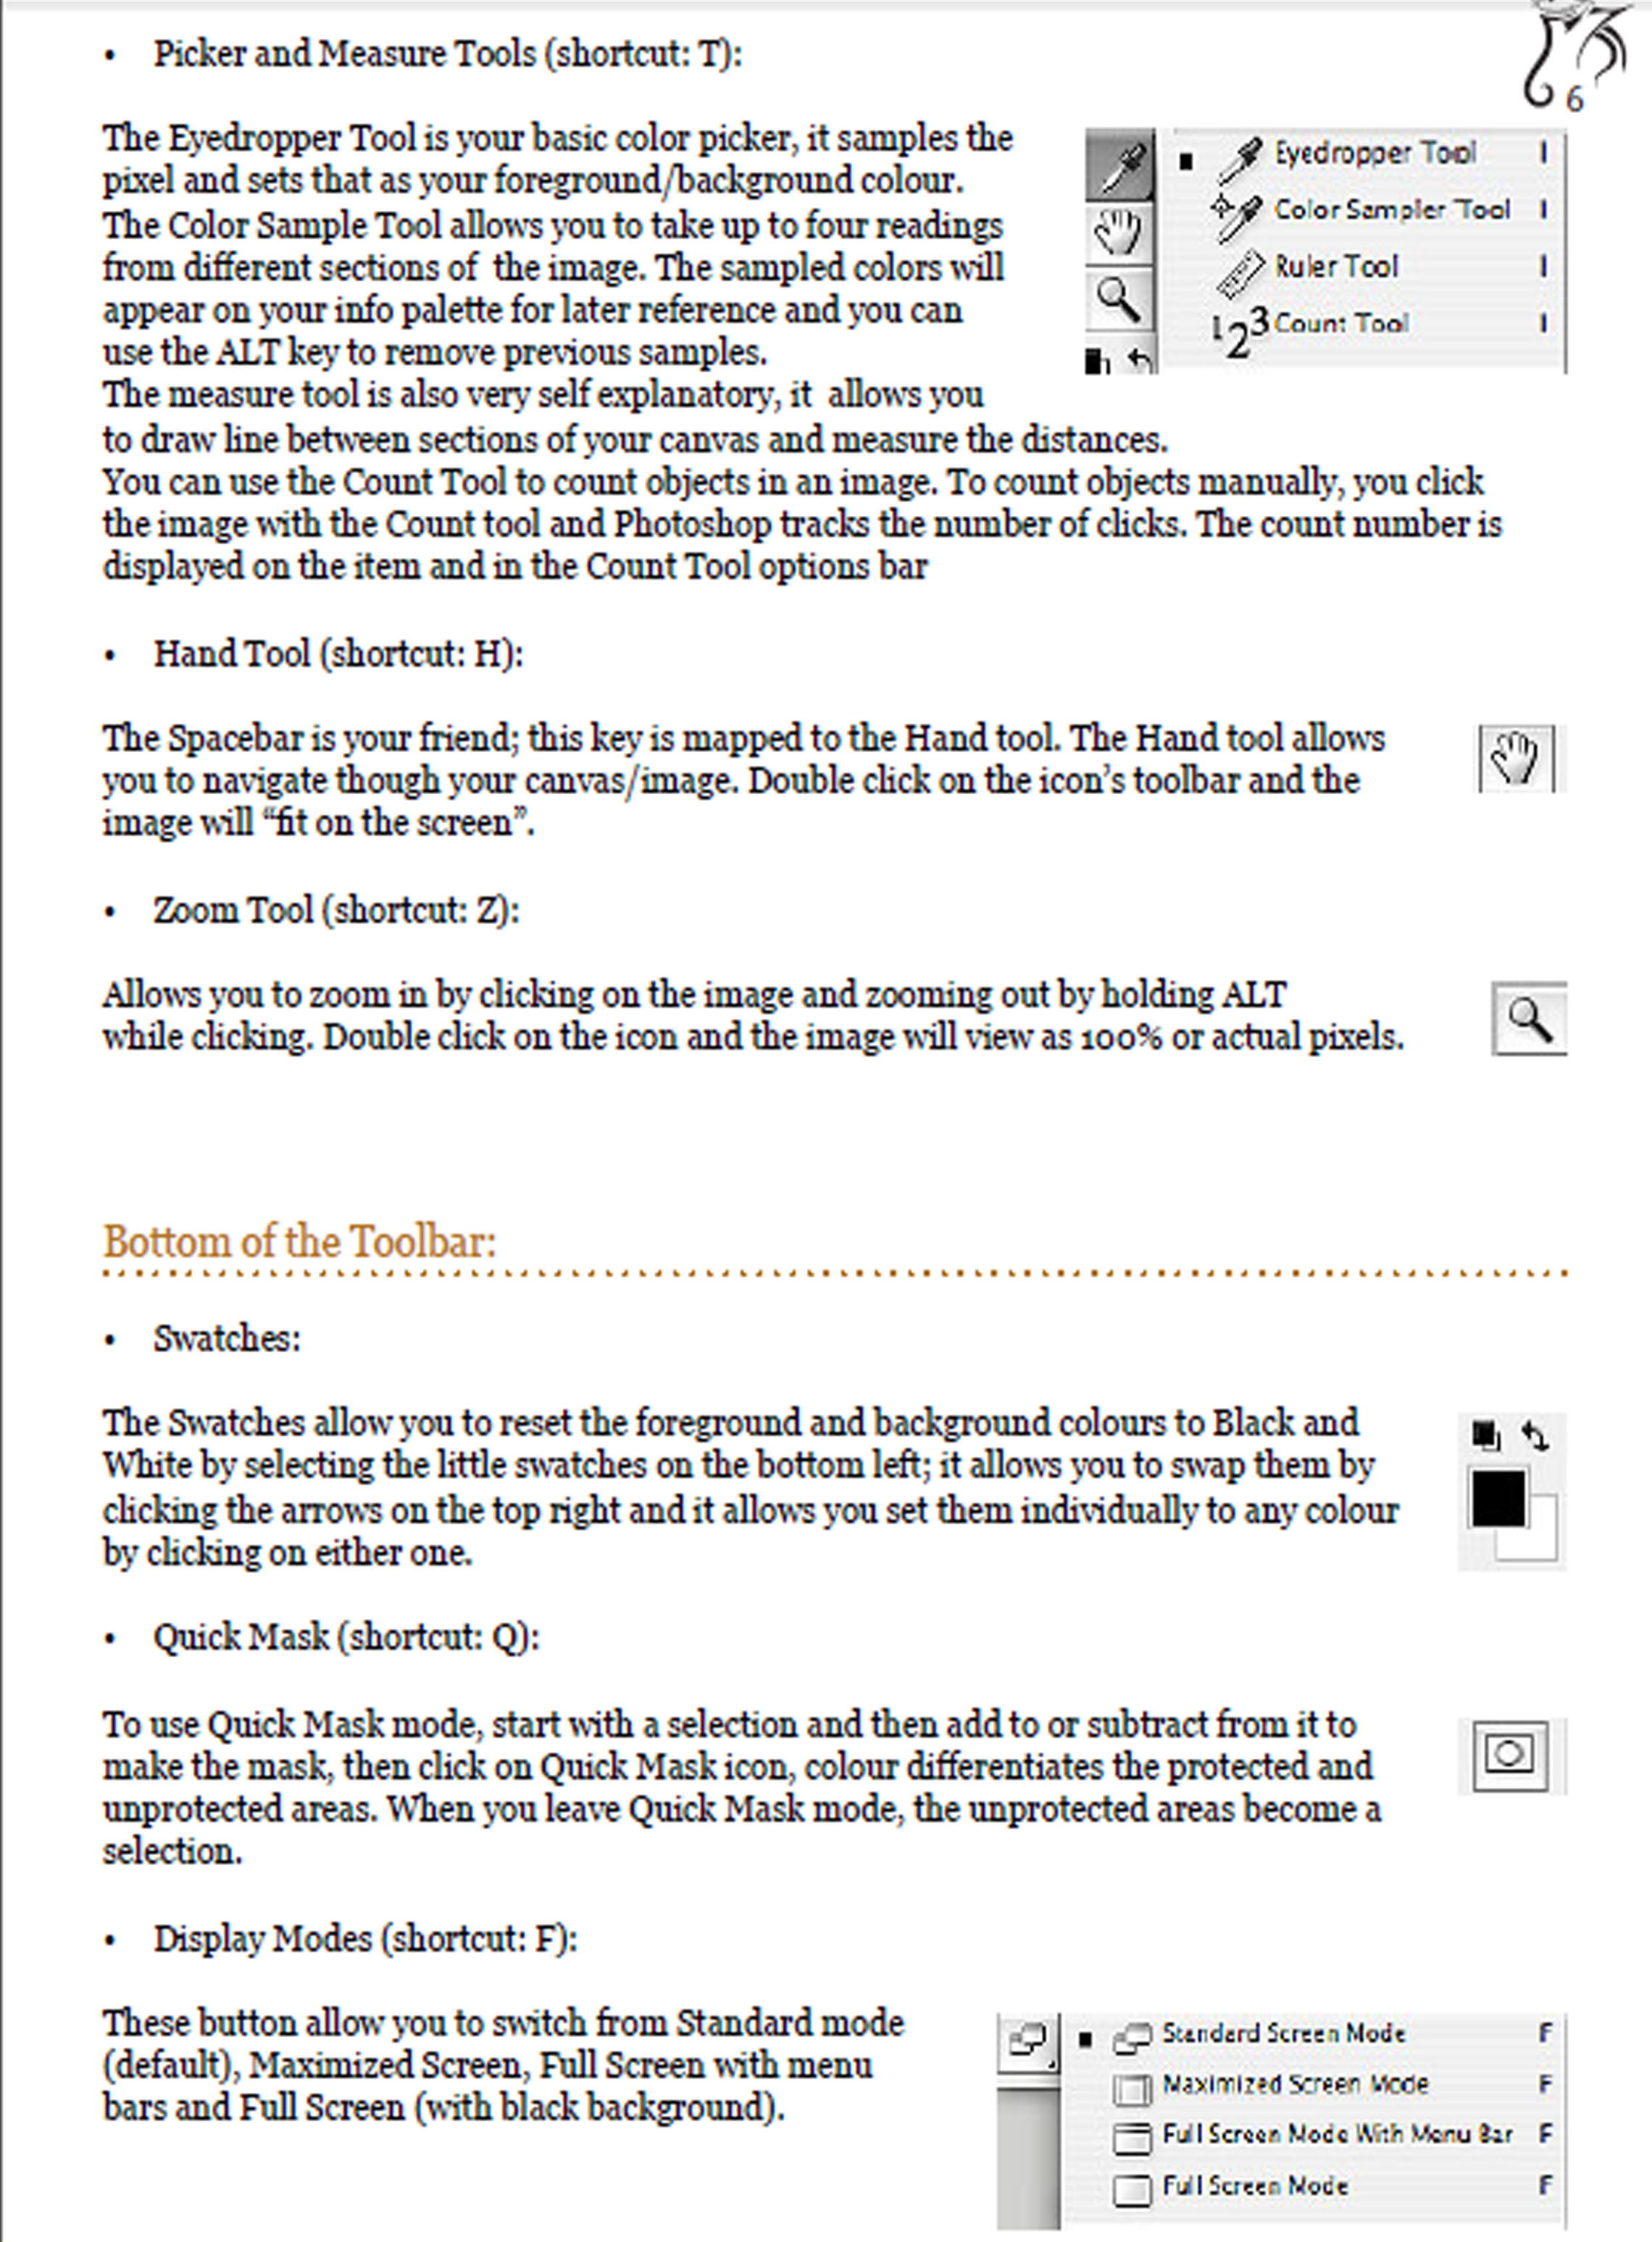
TOOL BAR
> Usually, the vertical bar where almost all the editting tools are located.
> Contains selection tools, painting and editing tools, foreground and background color selection
boxes, and viewing tools.
> A small triangle at the bottom corner of the icon indicates the presence of additional hidden
tools
History
> Records and displays individual changes made to an image and allows for
changes to be undone.
DESIGN BOARD/CANVAS/WORKING SPACE
> The place where you will edit your images. You can resize it.
APPLICATION BAR
> Across the top part containing a workspace switcher, menus and other application controls.
DOCUMENT WINDOW
> Includes the entire window from the menu bar to the status bar.
TOOL BAR
> Usually, the vertical bar where almost all the editting tools are located.
> Contains selection tools, painting and editing tools, foreground and background color selection
boxes, and viewing tools.
> A small triangle at the bottom corner of the icon indicates the presence of additional hidden
tools


 TRY TO DISCOVER OTHER EFFECTS THAT CAN BE
FOUND IN ADOBE PHOTOSHOP. EXPLORE THE PHOTOSHOP'S WORLD BY YOUR OWN
Click now the exercises button to face some exercises.
These exerccises will examine if you really understood the tutorialS.
TOP ^
TRY TO DISCOVER OTHER EFFECTS THAT CAN BE
FOUND IN ADOBE PHOTOSHOP. EXPLORE THE PHOTOSHOP'S WORLD BY YOUR OWN
Click now the exercises button to face some exercises.
These exerccises will examine if you really understood the tutorialS.
TOP ^