Blender interface tutorial
Section
1: Render Buttons
This is not really a tutorial, more like a Faq. Ill go over the interface, and hot keys as I know them and how to use them.
This is what Blender will look like when you first start it up.

This is the 3d window, it is where you models, and scenes will be as you work on them
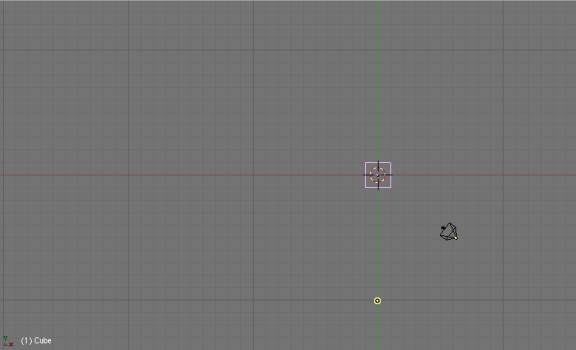
currently the only thing in there is a Cube, and Camera and a Lamp
the pink is the cube. The Yellow dot is the lamp and the black thing is the camera.
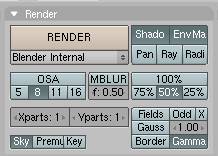
This is where most of your options will be
Currently is is in the Render buttons window.

![]()
you can switch to different windows by click on the little square buttons here.
We are in the Render section at the moment, as you can tell by the little box that is on the left beside the square with 4 yellow dots at the corners.
Here is the main buttons in the render window
the big Render button there will make your current picture according to what the camera is looking at. So if you press it now, this is what you would see
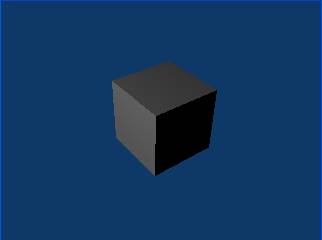
there is the cube that is in the 3d window
menu under the render button is what method or engine I guess you would say you will use to render you picture. Currently is it set for Blenders Internal renderer.
If you downloaded and installed Yafray from www.yafray.org you can use it too.
Under that, is a button that says OSA. That is for Antialasing. When press you have the option of 5, 8, 11, or 16, that will take the jagged edges off you objects in your rendered pictures.
I don’t know the stuff below it, or the MBLUR. So I’ll go to the buttons to the right of render. To have shadows you need the Shado button presses, if you want a panoramic view you can press the Pan button, for Raytracing you need to press the Ray button. Ive never used the Radio, and I just leave the Envmap on.
Now on to the Animation and Format buttons.
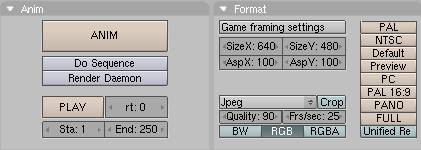
To render the animation of your scene if you have set one up you press the Anim button.
I think the do sequence and Render Daemon have something to do with Network rendering, don’t know for sure.
The Play button will play back the Animation you just renderd. The RT button has something to do with debugging.
The STA and End are you Start and End Frames. By default it is set on 1 and 250
Just drag left and right on thoughs to adjust or click on the numbers to type in manually.
Now to format buttons. I don’t now about the Game settings. Or the stuff just below it. But I think you can adjust how big to render your scene there. Another way, and the way I use because it works just fine for me, is the tan buttons on the right of that. You can press one of those for different screen sizes.
![]() these
buttons in the Render settings tab also have to do with screen size.
these
buttons in the Render settings tab also have to do with screen size.
You pick what size you want with the Tan buttons and choose to render 25%,50%,75%, or 100% of that size with these buttons by default it is one 50%.
To the left of that here:
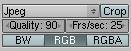 you
can choose what format you want to use, what quality, the Frame per second for
animations, and you can choose to render in Black and White, RGB and RGBA.
you
can choose what format you want to use, what quality, the Frame per second for
animations, and you can choose to render in Black and White, RGB and RGBA.
Output Tab
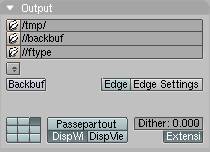
the /tmp/ is where you animation will go. Check that folder if you ever play with the animations buttons, cus if you have your pictures to render as a JPEG and you press the animation button, then you will have a bunch of pictures in that folder. I didn’t know that when I first started and had a good many pictures there.
Its is located in Windows at C:\Tmp\ for Linux I assume it is in the Tmp folder in your Root directory, and I don’t know anything about Mac to say, but it would most likely be similar
The stuff below that I don’t know about, any of it really, The edge buttons can make outlines around your object I do know that but that’s it.