On redefining the buttonhole...
The regular boring buttonhole is great as a functional closing device - there's no messin' about that fact - but... does it have to be so boring in appearance? Two beads with closures at each end?..Nope sirree Bob, you betcha it can be spruced up! What? haven't got your attention yet? So feast your eyes on this one... and startup your trusty 1630... we're goin' to town!
Part II (For the software empowered!
See what I mean? Yip - just simply "tart" it up.
Now for the "software challenged" amongst us - here cometh the lesson on how to do it (for the software owners - that is the "time-challenged" ones - ain't that lovely PC speak for lazy! - scroll to the bottom and download the file (buttonh.isd) and sew away.
For all others, so doeth the Stitch Designer....
The good news is that you only do a quarter of the design!
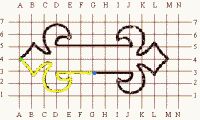
Start at the blue dot and click away up to the green dot (ok, ok, if you wanna start at the green dot and work the other way it's fine by me, but I gotta warn you - the end results may not link up so well, and cannot be cheated (as you can if you go MY way...errrr... the Stitch Designer way).
Once you've done the yellow line, simply click on the top/bottom mirror function, place the dashed line on 4 and mirror. Now the design looks like this:

The brown part was added with no sweat! Pooo!... that was easy - and if you agree... wait for the last half! (Gasp!... all in one go? Yip!)
Click on the left/right mirror, place the vertical dashed line on the blue dot (no silly!...of course YOU don't have a blue dot on the Stitch Designer... but you have the SAME place on your screen...errr.. the 1630's screen!). And click away! Now the piccie looks like this:
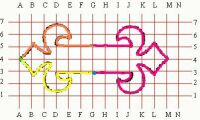
Yip - all of the pink appears on one click! So? What are you waiting for? Click on the transfer function to get it on the left side, and set pattern end function = 1 and step on it, hit the pedal to the metal and sew away. Afterwards place a button hole (yip, you guessed, the boring buttonhole in the middle and voila (oh-la-la me parlez vouz francais!!).
For the software guys and girls... click here.
And just to wet your appetite.... grab an idea full this...:-)))
Ahhh, no!!! There you go again.. ok, enough already! I used ordinary pivotal stitches with E1/1(look elsewhere on this website) to do the above "redefinition"!!!
Buttonhole thingies for the Software empowered only!!
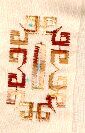
And for the member who asked for the Paisley pattern button hole decoration..... here you go:
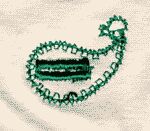
The folks with the software... click here!
I felt so bad about the above attempt, that I struggled some more and came up with something closer to the real McCoy! Refa, this time it's really for you!

Once again, this is only for the software folks, click here!
And here's Gina's chainstitch (originally for the SD) now taking a bow as the latest in Software fashion.... (VBG!)
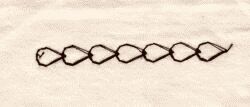
Down load the .isd file here!
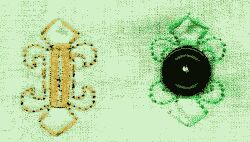
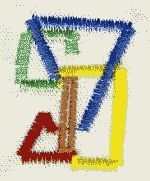
I had thought that the "fleur de lis" would end up being the piece de resistence! Ba!... well... so much water under the bridge...but if you know my pages by now... you'll know the best is kept for last.. so the fleur de lis being at the start, means there's better to come..:-)))
Click on the image to download the *.isd file (it's in zipped format!)

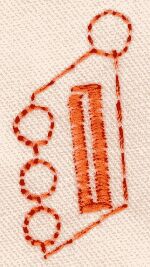
Now the one below is for the "techno-kids!.... I am rather partial to it myself and I will have to make a blouse for Liza (my daughter) in white cotton to use it.... she likes it....!!! You may (of course!) sew it out in one colour only!
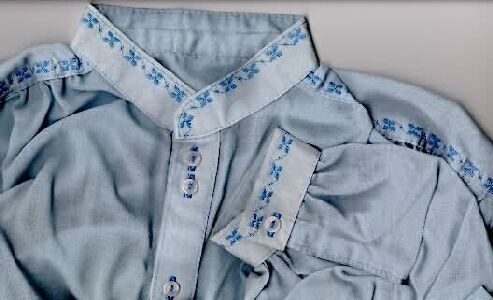
The "double buttonhole", a personal favourite of mine from the days of the "boring buttonhole"! Now I can really spruce them up!.. note that this was the very first attempt at sewing out the design and so some things went a little astray! Stabilize very well - and take it slow on that speed pedal!!! Have a look at the shirt I did which would have been very nice if I had invented these at the time!!
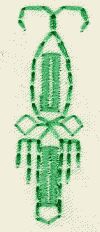
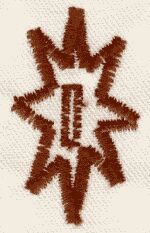
And here comes... the piece de resistence... I call it the "Eye of Horus"!....

...news from South Africa.... (Stop press!!!!)
We now make a cotton thread in this country that changes colour at the precise point on the design where you want it, the only catch is that you need an upgrade on your 1630 that costs $99 999.99 (Yeah, I know, a bit pricey....) But check out what it does for the Eye of Horus!!!

NO!.. it's not a trick scan... the Eye of Horus was done with 2 separate and different colours. How did I do it? Trick thread? In this country? (where we can't even get the firefly or sun-activated threads!... you gotta be joking!!!!
Here beginneth the lesson:
Note that the eye has 6 whiskers, 3 above and 3 below. After the 5th one go SLOW!!! as soon as you start reversing on the 6th one count the stitches, one, two, three, now STOP!!!! Cut the thread, (leave the presser foot down, and change colour (OOOoopsss.... ok, for da yanks!...color!) and continue. The buttonhole is done afterwards, as soon as you press the return button, stop, change color, and continue until buttonhole is done!...
And some more additions:

The above is a "pivotal" stitch, switch on your needle stop down, and pattern end = 1.
What can I say... your 1630 can do very good circles!

This star (above) come in two variations: the above in straight triple stitch, and below, a more "robust" version in zig-zag. Both are pivotals.
..and the last one, is for your teenage daughter's going out blouse - yip, ya wanna provide some protection /warning to prowlin' hands!!! (VBG!) Oh -no!.. it's the dreaded "No Entry" sign!!!

I must admit - the sewing out was done rather lousily - it's a pivotal, and I was in too much of a hurry!
 |