Windows Communication Foundation – A beginner’s guide
Definition from MSDN: WCF is a set of .NET technologies for building and running connected systems. It is a new communications infrastructure built around the Web services architecture. Advanced Web services support in WCF provides secure, reliable, and transacted messaging along with interoperability. The service-oriented programming model of WCF is built on the Microsoft .NET Framework and simplifies development of connected systems. It unifies a broad array of distributed systems capabilities in a composable and extensible architecture, spanning transports, security systems, messaging patterns, encodings, network topologies, and hosting models. WCF will be available for Windows Vista as well as for Windows XP and Windows Server 2003.
What it actually means to you: It is a new library which helps in creating Web Services. Clients, which would consume these services, can be .Net based, Java based or anything else. You need not worry about services already created using .Net remoting, MSMQ, ASMX, .Net Enterprise Services etc., They will be compatible with your services as SOAP (Simple Object Access Protocol) is used to pass messages and data between the services. Services have a WSDL interface, which any WCF client can use to consume the service. In short, WCF is a new communication subsystem to enable applications, in one machine or across multiple machines connected by a network, to communicate. WCF applications can be developed in any language which can target the .NET runtime.
When you should use it:
- When your business logic has to interact with a variety of client applications.
- When client apps, which are going to use your service, may be written in Java or .Net.
- You and your end user have the SOA (Service Oriented Architecture) in mind.
- You are targeting a distributed computing architecture.
What software you need to create a WCF service:
- Visual studio 2005 (I’ve been using the free express editions and it has worked fine for me).
- . Net Framework 3.0
- Microsoft Windows Software Development Kit (SDK)
- Visual studio extensions for WCF and WPF
Note1: Install available updates from the web after you install each of the prerequisites mentioned above. That’ll help you solve a lot of installation problems J. Also ensure that your machine has quite a bit of hard disk space and at least 1 GB RAM. If you’ve got a lesser amount of RAM, it would not pose a problem, but the more the merrier.
Note2: You can find all the above prerequisite software on the web. Install them in the same order as shown above as you would not encounter any bugging message boxes asking for the prerequisites.
What you need to know to write a WCF service:
- C#
- Basic knowledge of Visual Studio 2005
Known advantages:
- Makes UI programming a piece of cake.
- Makes distributed programming a piece of cake too.
- Helps us talk to various applications written in various languages with ease which means more probable revenues as various applications can start using your core services with ease.
- Helps us forget about interoperability between various underlying web service technologies in the past, present and future.
Potential disadvantages:
- Slow in performance (My assumption is that performance can be bettered with the use of a service pool keeping your critical services alive and kicking always.)
How WCF fits in the architecture of .Net 3.0:
Take a look at the following diagram. As you can see, Microsoft has introduced 4 new sub systems in the framework namely: 1) WCF (Windows Communication Foundation), 2) WPF (Windows Presentation Foundation), WCS (Windows Card Space) and 4) WWF (Windows Workflow Foundation)
In this article, we are going to take a look at WCF alone as each of these systems would need an individual article to explain their basics alone.

What we actually need to know from the diagram is that WCF has become an integral part of the .Net framework and that’s the way for us to go. That is assuming we want to survive in this ever-changing technological spectrum.
Lets now see how to practically create a service and use it. Our service is a very simple one, which would just take 2 numbers and return the sum of the numbers back to the client. Our service would also be hosted on IIS so that we can write a client on a different machine and test our service.
Step 1: Creating a service using WCF
Open Visual Web Developer 2005. If you’ve got a professional edition of Visual Studio installed on your system, you can use it or else, download the free express edition and you can start your study using it.
Create a “New Web Site” from the File menu.
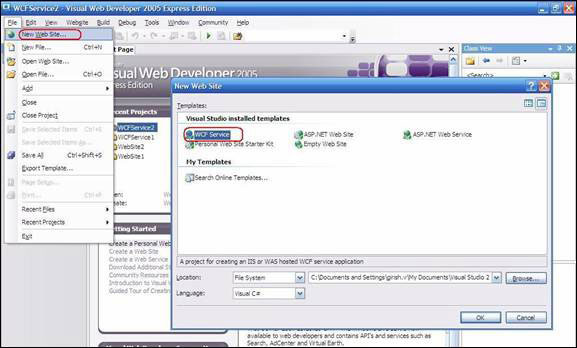
Select “WCF Service” when you are prompted for the type of project you want to create. This option would not be available unless you’ve installed “Visual Studio Extensions for WCF and WPF”. As you can see here, I’ve chosen Visual C# as language of my choice for implementing the service.
Starting a new Web service project creates skeleton code for what Visual Studio calls data contracts, fault contracts, service contracts and service implementation interfaces. There are different types of contracts known as
- Data contract,
- Operation contract,
- Fault contract and
- Service contract.
A data contract describes exactly the data items that will be exchanged in messages and can be generated from an existing XML Schema, or from an existing data type defined in a C# class.
- Operation contracts describe the functions you are going to expose from your service to your client applications.
- A fault contract describes what kind of exceptions would be thrown from your service.
- A service contract describes what your service is going to do and how.
To make it simple, you can assume that the operation contracts are the methods, which you are going to expose from your service. It is something similar to having public methods in a class. Think of the data contracts as public member variables and the fault contracts as user exceptions. Service contracts define what mode of transport you are going to use (HTTP, HTTPS, TCP etc,. ) and what kind of authentication you are planning to use.
After you have created the project, you can see the skeleton code needed for your service, which is available in the “App_Code” sub folder under the name of Service.cs. I’ve changed the function names to suit our needs (addition of 2 numbers and returning the value). The modified code is outline in red below.

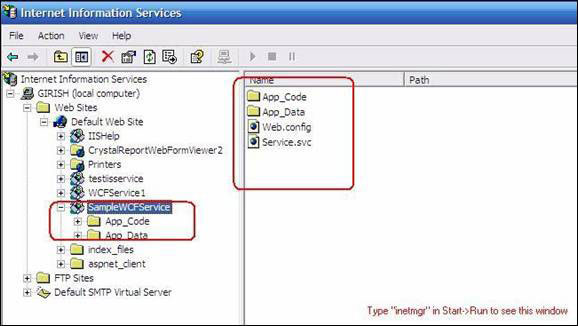
On building the project, you can see that visual studio has generated a list of files and folders as shown below:

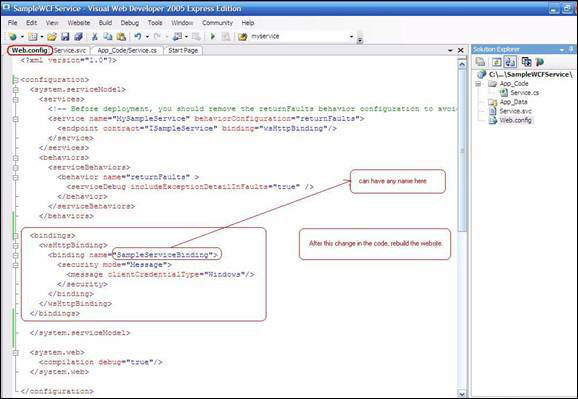
When you open the “web.config” file, which has already been generated for you, you can see the following details:
- The name of your service
- The name of the interface which your service is going to implement (Service contract) and
- The endpoint and binding you are going to choose for your service. Endpoints refer to the type of message transportation you want to choose (TCP, HTTP, HTTPS etc,) and binding refers to the authentication you want to use. There are several types of bindings. For example, you can choose windows authentication which would mean that a client application which is going to use your service should have valid windows username/password combination to the machine you are going to host your service on.
A WCF client connects to a WCF service via an endpoint.
Each Service exposes its Contract via one or more endpoints. An endpoint has an address, which is a URL specifying where the endpoint can be accessed, and binding properties that specify how the data will be transferred.
The mnemonic "ABC" can be used to remember Address / Binding / Contract. Binding specifies what communication protocols are used to access the service, whether security mechanisms are to be used, and the like. WCF includes predefined bindings for most common communication protocols such as SOAP over HTTP, SOAP over TCP, and SOAP over Message Queues etc.
When a client wants to access the service via an endpoint, it not only needs to know the Contract, but it also has to adhere to the binding specified by the endpoint. Client and server must have thus, compatible endpoints. The comparison between endpoint types is shown in the figure below:

You can play around with the highlighted values with the table above as a reference to suit your needs.

In addition to the web.config file, you can also see a file named “service.svc” generated for you.
This file describes the language you are going to use, the name of your service and the code behind. This is the file, which you would actually call to interact with your service from the client application. The exact way to use the svc file has been described later on in the article. For now, just bear in mind that this is the file you are going to interact with. I’ve made a modification to change the name of the service and the project would have to be rebuild after making any changes to this file.

Voila!!! We have created our first service!!!!!
On building the project, our service is ready for use. It is as simple as this to create a service.
Step 2: Hosting the service in IIS:
Open the folder containing your service. If you’ve not changed the default path, it would be available at
C:\Documents and Settings\your user name\My Documents\Visual Studio 2005\WebSites\. Right click on the folder, select the “Web Sharing” tab, and select the “Share this folder” option. You can choose an alias name for your service if you want to or just leave it alone.

To confirm the hosting of your service in IIS, fire up the IIS manager. You can do it by typing “inetmgr.exe” from the prompt when you select Start->Run . When you expand the “Default Web Site” from inetmgr, you can see that the service that you’ve created has been mapped here.
To verify that your service has been created properly, right click on the .svc file generated for you and choose the “Browse” option.

On clicking the Browse button, your default web browser would open up and show an error similar to the one below. The reason you see this error is because we have not specified “Windows authentication” which we have planned to use.

To enable the type of authentication we need, we’d have to modify the web.config file. In our case, since we want to use “Windows authentication”, the following piece of code can be added to your web.config file.
Code:
<behaviors>
<serviceBehaviors>
<behavior name="SampleServiceTypeBehaviors" >
<serviceMetadata httpGetEnabled="true" />
</behavior>
</serviceBehaviors>
</behaviors>
<bindings>
<wsHttpBinding>
<binding name="SampleServiceBinding">
<security mode="Message">
<message clientCredentialType="Windows"/>
</security>
</binding>
</wsHttpBinding>
</bindings>
The modified web.config file would now look like the one shown in the snapshot below.
After making the needed changes, close the web.config file and rebuild the website.
Note: There seems to be a bug that the project is not built properly if you do not close the web.config file before building the project.

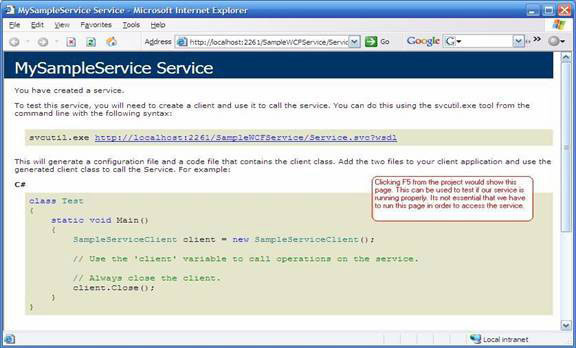
After rebuilding your project, you can go back to inetmgr and select the “Browse” option again. This time no error would be thrown. Instead, a page would be displayed as shown below. Display of this page means that your service is now ready without any deployment errors. Sample code to use your service from a client application is also shown in the page. This step is used to verify that our service is running correctly and it is not essential that we have to leave this page running in order to use our service.You can either press F5 from your project to perform this step or you can use the inetmgr’s Browse option.
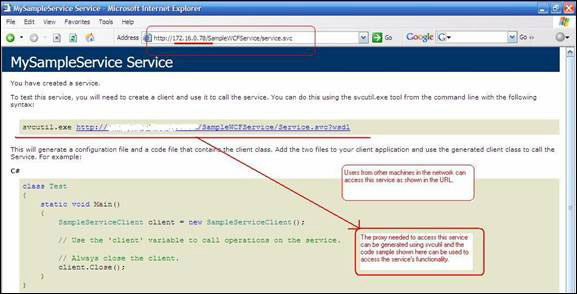
Now that your service has successfully been hosted in IIS, any user from the network can now access your service as http://xxx.xxx.xxx.xxx/MyService.svc where xxx.xxx.xxx.xxx denotes the IP address of the machine where your service has been hosted.

Step 3: Consuming a service from a client application:
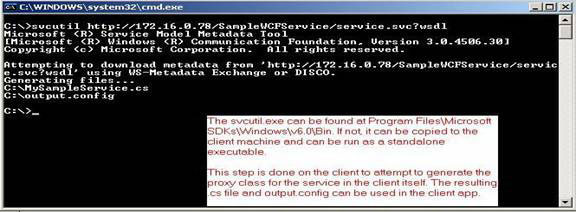
To verify that the service is running, we can use either the IP address or the host name of the machine where the service is running. As shown in the page displayed in the browser, you can use the “svcutil.exe” file to automatically generate the code you can use to access the service from the client.
The svcutil.exe is available if you have the Microsoft Windows Software Development Kit (SDK) installed on your machine as mentioned in the prerequisites. If not, you can just copy that file to your machine from any other system where it is available and it would work just fine J. This auto-generated code is known as the “proxy class” or proxy in short. We would just need to add the generated code to our client application and call its methods. It would in turn take care of communicating with the actual service and use its functionality.

The code for the proxy class can be generated from the command line as shown below. Additionally, a ouput.config file has been generated for you. Change its name to “app.config” and add it to your project.
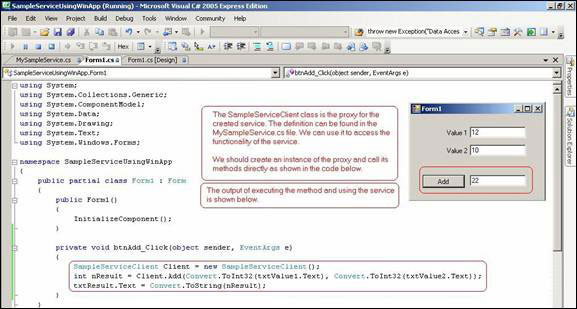
Creating a client application:

For the test, I’ve chosen a “Windows Application” as my client application to use the service.Add the generated proxy class to your project. You would also need to add the reference “System.ServiceModel” to your project in order to use the proxy. As you can see, the app.config file, which was generated using svcutil.exe has also been added to the project. Now that we’ve added the necessary files, create your UI and we can start using our service with a few simple lines of code.

To use our service’s methods, I’ve added the following code to our client application:
Code:
SampleServiceClient Client = new SampleServiceClient();
int nResult = Client.Add(Convert.ToInt32(txtValue1.Text), Convert.ToInt32(txtValue2.Text));
txtResult.Text = Convert.ToString(nResult);
Compile and run the project. That’s it. We’ve a client application, which can use the service we’ve created.
Note: The first time you use a service from the client, it would seem like an eternity to get the response back from the service. My assumption is that the service would be terminated on the server if no clients were connected to it. Hence, the delay to instantiate the service first and then uses it. To avoid this performance issue, we can create a service pool, which would keep a list of essential services alive so that it would be a tradeoff between memory management and performance.
That’s it folks. We’ve now seen how to create a service using the Visual Web Developer, host it in IIS and consume it from a Windows application. |