The Rock’n Robots Experience
We hope you enjoy your visit to Youngstown State University, and we will do all we can to make your visit both pleasant and enlightening. The experiments that are scheduled for this morning will offer you the opportunities to work in a team and learn about the field of electrical engineering. Teams will be formed with between four and six members per team, and each team will be given a robot to wire up and program. We will act as your robot assistants, so if you have any questions feel free to ask us.
Objective: To participate in hands-on experiments in the discipline of electrical engineering.
Equiptment: Robot Kit, Computer with “BASIC stamp editor” software loaded.
Procedure: For the first few minutes of this activity we suggest that the teams split up so that they can move along through this activity in a timely fashion. Half of the group can wire up the touch sensors on the robot while the other half enters the program that tests the sensors. After these few minutes the group should unite to achieve their common goal.
Electronics: Step 1. Wiring up the touch Sensors
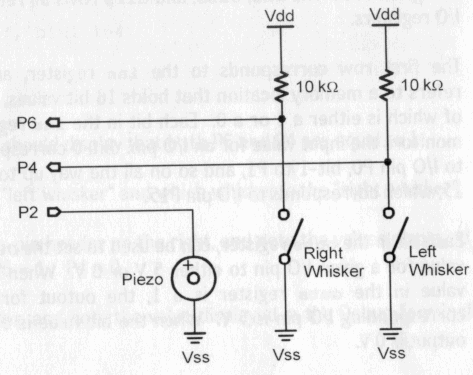
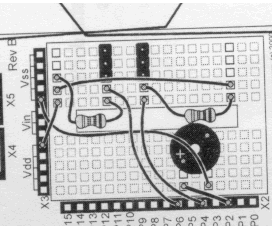
Wiring the robot will only take a few minutes. Listen to the advice of your robot assistant on how to wire a breadboard. Then look at the schematic diagram on the previous page to wire up the touch sensors (or whiskers). You will use two wires, two 3-pin headers, and two 10K resistors (Use the color chart below to find the stripe pattern on the 10K resistor, HINT—Brown-Black-Orange). If you are still having problems ask your robot assistant for help.
|
Common
Resistor |
|
||||||||||||||||||||||||||||||||||||

Programming
Step 2.
Programming to Test the Touch Sensors
To program the robot BASIC is used. Open up the "BASIC Stamp Editor" on your computer. The first program that needs to be entered tests the touch sensors (or whiskers). Enter the Program below. For more information on how this program works refer to the ROBOTICS STUDENT WORKBOOK pages 77-79.
' Robitics!
v1.5, test
' {$Stamp bs2}
loop:
debug home, "P6 + ", bin1 in6,
" P4 = ", bin1 in4
pause 50
goto loop
Notice that the program above uses a continuous loop since it at the end of the "loop" routine the program says to "goto loop" again.
Step 3. Testing
the Sensors
Your group should now unite to test the touch sensors. Plug you robot into the COM port of your computer, and plug the power into your robot (if the robot has power the green indicator LED will be illuminated). Then with the above program on your editor run your program by clicking on the arrow at the top of editor. Press your touch sensors and notice the result. Do your sensors work? If you need help ask your robot assistant.
Step 4. Your Task
Your task is to program the robot to go through the amazing maze. You will need to know about BASIC to do this. BASIC is a language that is used frequently in math, engineering, and computer programming. Listen to the advice of your robot assistance, look over the following information and then begin to program.
Your Task Part A—Initialization
First, you will also need to initialize your robot with the following syntax:
' Robitics! v1.5, initialize task
' {$Stamp bs2}
output 2
freqout 2,
2000, 3000
low 12
low 13
Your Task Part B—Declarations
You will also need to declare the variable x with this statement:
x var word
Your task Part C—Making
Routines, adding statements and commands to the routines
Make Routines
Then you will need to make a primary routine and secondary routines. Your first routine is your primary routine and it will point to secondary routines either through an If…Then statement or the goto commands at the end of the routine. The secondary routines can point to other routines or back to the primary in the same manner. The name of the routine followed by a colon indicates the beginning of a routine and the goto statement indicates the end of the routine as shown below. If the goto statement points to the same routine this creates a continuous loop.
routinename:
……………commands and statements…………………
goto nextroutine
If …Then Statements
If…Then statements are important.
These can be used to point to a subroutine as shown
If……condition……then……routine
For example when the left sensor is pushed in6=0 and when the right sensor is pushed in4=0. Therefore the following syntax can be used to call a subroutine if the specified set of circumstances is met.
if in6 = 0 and in4 = 0 then routine
if in6 = 0 and in4 = 1
then routine
if in6 = 1 and in4 = 0
then routine
For…Next loops
Additionally, You will need to use a For…Next loop.
The For…Next loop takes the for shown below:
for x =1 to
10………………command…………………next
The For…Next loop will repeat a certain operation a certain amount of times. This number of times is specified by the x range that is stated after the "for". In the above example the operation will repeat 10 times.
Commands
There four main commands that can be used are shown below followed by their syntax.
' Travel Forward
pulsout 12,
500
pulsout 13, 1000
pause 20
' Travel backward
pulsout 12,
1000
pulsout 13, 500
pause 20
' Turn right
pulsout 12,
1000
pulsout 13, 1000
pause 20
' Turn left
pulsout 12,
500
pulsout 13, 500
pause 20
For more information read the ROBOTICS STUDENT WORKBOOK or talk to your robot assistant.