INTRODUCTION: BRAILLE IN STEREOCOPY DIAGRAMS
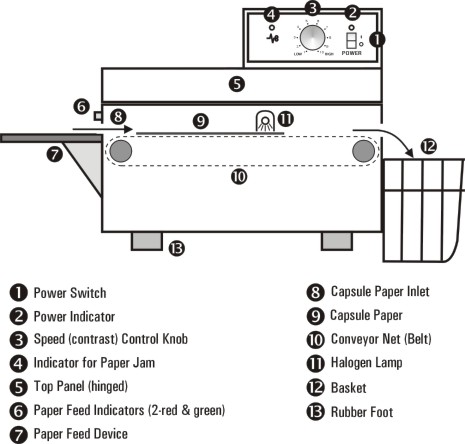
Since 1987 The CNIB Library for the Blind has been using the Stereocopy process in producing tactile graphics as well as braille. In the stereocopy process, braille becomes tactual at the same time as the blackline images (maps, graphs, etc.) are developed in the stereocopy developing unit (Figure 1). The solid black braille dots are raised by the (halogen) heat lamp in the machine. Some transcribers have tried to create the braille dots by hand but the results are usually uneven. The Duxbury Braille Translator or DBT (with Duxbury Braille Font) has been used by the CNIB Library for several years translating electronic text (E-text) into simple braille.
Figure 1: Stereocopy Developing Unit (Minolta Corporation)
? is id1l = /]eocopy
This is ideal for stereocopy
diagrams created on the computer using a graphics program since the braille
can be copied and pasted in the graphics file. If the braille is done with
a program not compatible with most graphics programs, the computer braille
can be printed out and cut & pasted onto the paper diagram printout
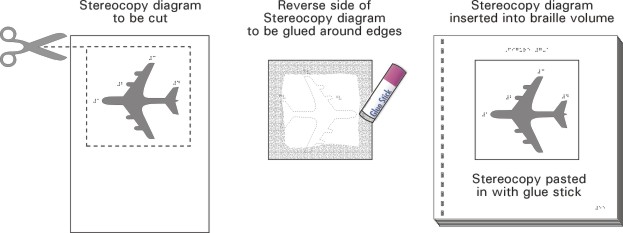
(Figure 2). This method was used at the CNIB Library until 1994 therefore,
about half of our masters are hard copies.
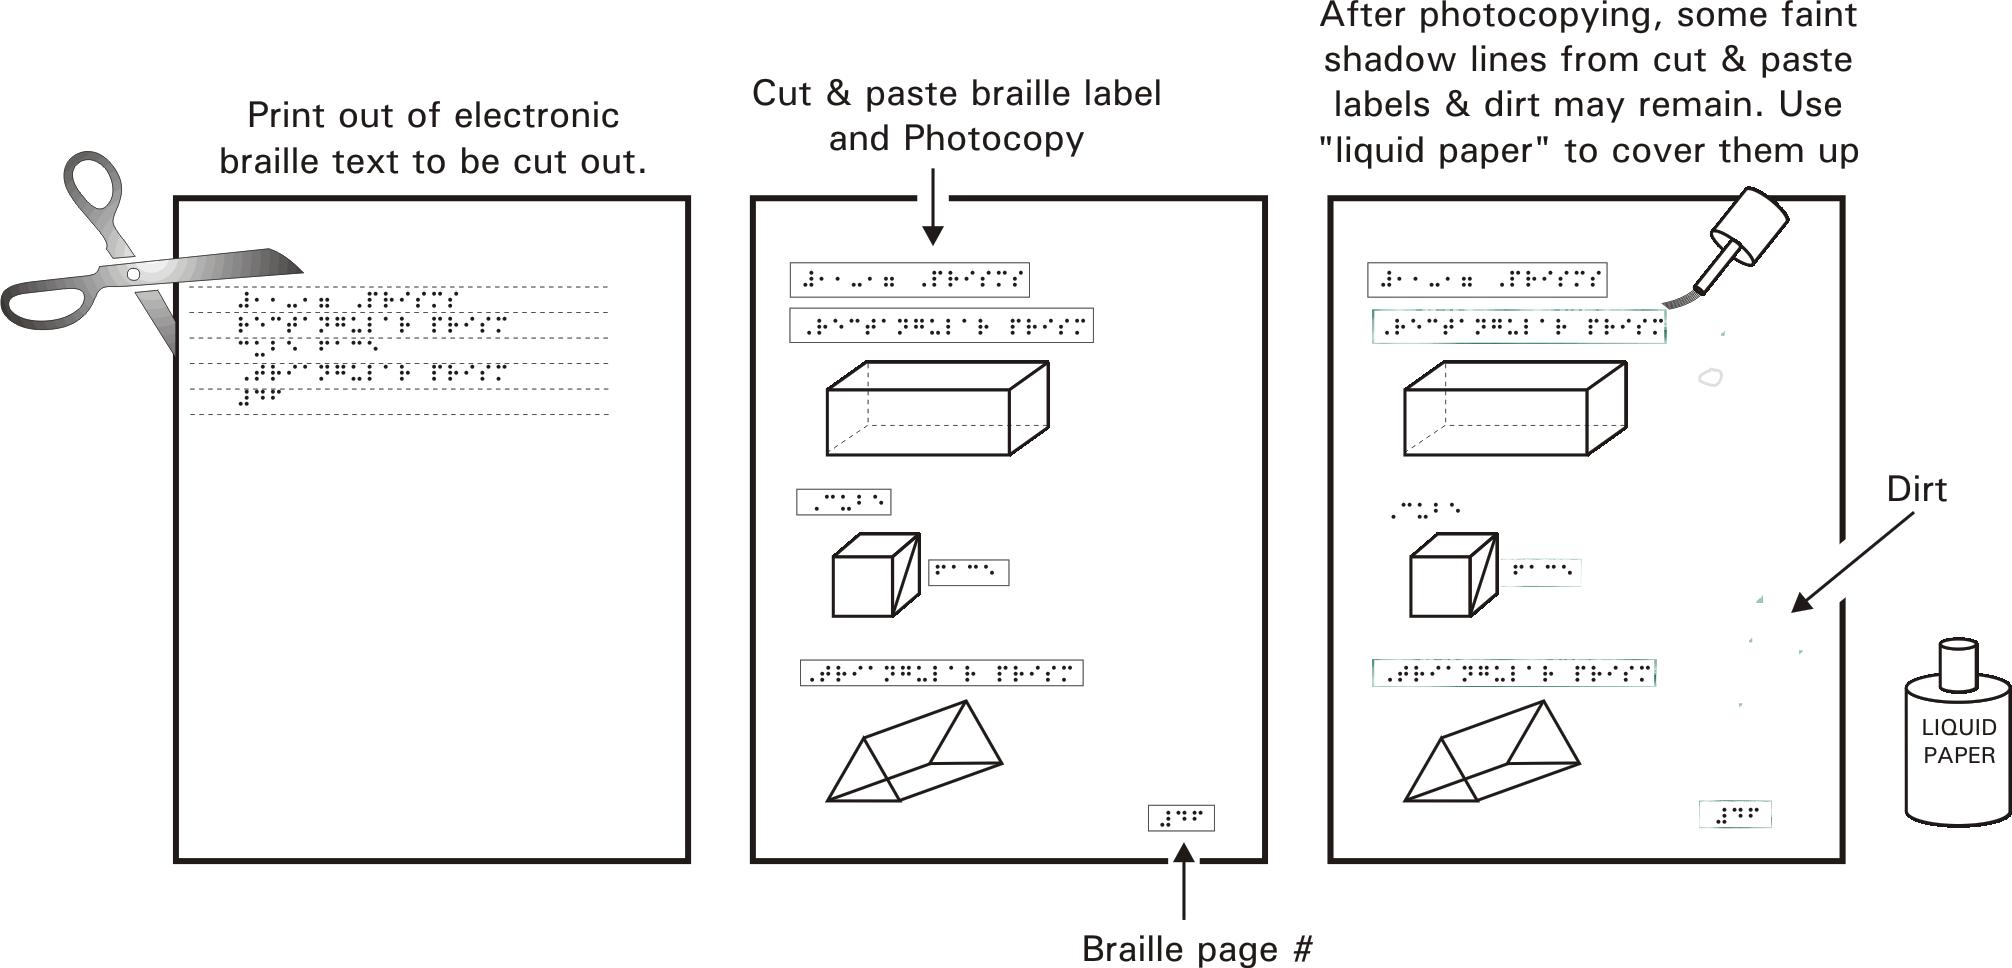
Figure 2: Cut & pasted braille by hand
Step 1: Print out of electronic
braille text to be cut out.
Step 2: Cut & paste
braille label and Photocopy.
Step 3: After photocopying,
some faint shadow lines from cut & paste labels & dirt may remain.
Use "liquid paper" to cover them up.
E-TEXT KEY FILES
When formatting a book (the formatter should be the braillist and/or tactilist assigned to the book), the diagrams chosen for stereocopy production are numbered or referred to by the print page number. If they are already numbered in the print then those numbers are used for consistency. If not, then they are given consecutive numbers by the formatter. After formatting, a decision must be made between the tactilist and the braillist about any Transcriber's Notes (TN), diagram keys and explanations whether they are in the Braille volume or the stereocopy supplement. Photocopies are made of the diagrams and the figure and keys are written on them. These are called mark-ups (Figure 3).
The titles of the diagrams should be placed in the braille volume stating i.e."Figure #2-4 The Middle East" unless otherwise agreed upon. In the braille volume, a TN should say "see supplement" instead of "see supplement 3" since the number of supplements may change for a project after the initial estimate.
Figure 3: Marked-up print copy.
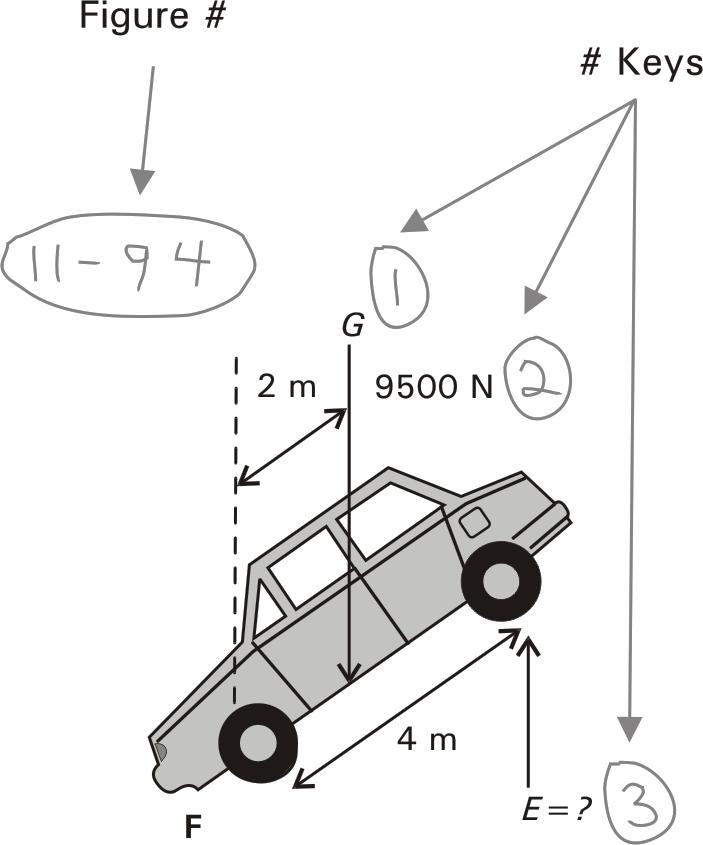
A print page (pp4) or figure number (i.e. 2.1 or 2-1) is best for diagram identification in the stereocopy supplement.
From Print Book On Stereocopy Diagram Page
Figure 3.47
,fig4 #c.dg
Fig. 3.47
,fig4 #c.dg
Figure 3-47
,fig4 #c-dg
Page 45
pp4 #de
(pp4 means
print page)
1-23 (number given by braillist)
#1-23
(Nemeth Braille)
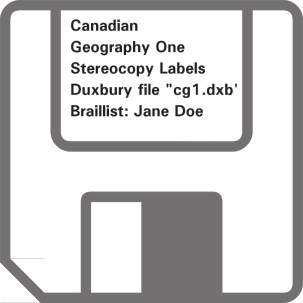
The braille labels should be done in sequence with a standard order for TN's, legend and keys (Figure 3). There should be a blank line left between each figure number in the ".brf" file. The lines should never be double spaced. If submitting the file on diskette, it should be appropriately marked with the exact book title, chapters involved, name of file(s), braillist name, date including year, format used (ascii, Wordperfect, Duxbury etc...).
This procedure is very helpful
to the tactilist since all he has to do is cut and paste the braille into
the CorelDraw file.
Figure 4: Sample of braille E-text file.
Book title ,,CANADIAN ,,GEOGRAPHY ,,"O26 cells wideChapter heading ,*APT] #A
Figure or Page # ,FIG4 #A.A
Legend ,',LEG5D3
,NOR? POLE
,POLITICAL B.D>Y
#CGJ KM 7#BJJ
NAUTICAL MILES7
,L& 7UNRAIS$7
,WAT]Key ,ALPHABETIC KEY3
>O ,>CTIC ,OC1N
AK ,ALASKA
AL ,ALB]TA
AO ,ATLANTIC ,OC1N
BC ,BRITI% ,COLUMBIA
D5 ,D5EDEH 7FUTURE T]R-
ITORY Z ( #AIID7
HN ,HUDSON ,BAY
MN ,MANITOBA
NB ,NEW ,BRUNSWICK
NF ,NEWF.DL& & ,LABRADOR
NS ,NOVA ,SCOTIA
NT ,NOR?WE/ ,T]RITORIES
NU ,NUNAVUT 7FUTURE T]R-
ITORY Z ( #AIID7
ON ,ONT>IO
PE ,PR9CE ,$W>D ,ISL&
PO ,PACIFIC ,OC1N
QU ,QU@EBEC
SK ,SASKAT*EWAN
YT ,YUKON ,T]RITORY,'2 cell key symbols & >O AK AL AO BC D5 HN MN NB
spelled out labels NF NS NT NU ON PE PO QU SK
for "cut & paste" YT GRE5L& UNIT$ /ATES
,CANADA #AIID
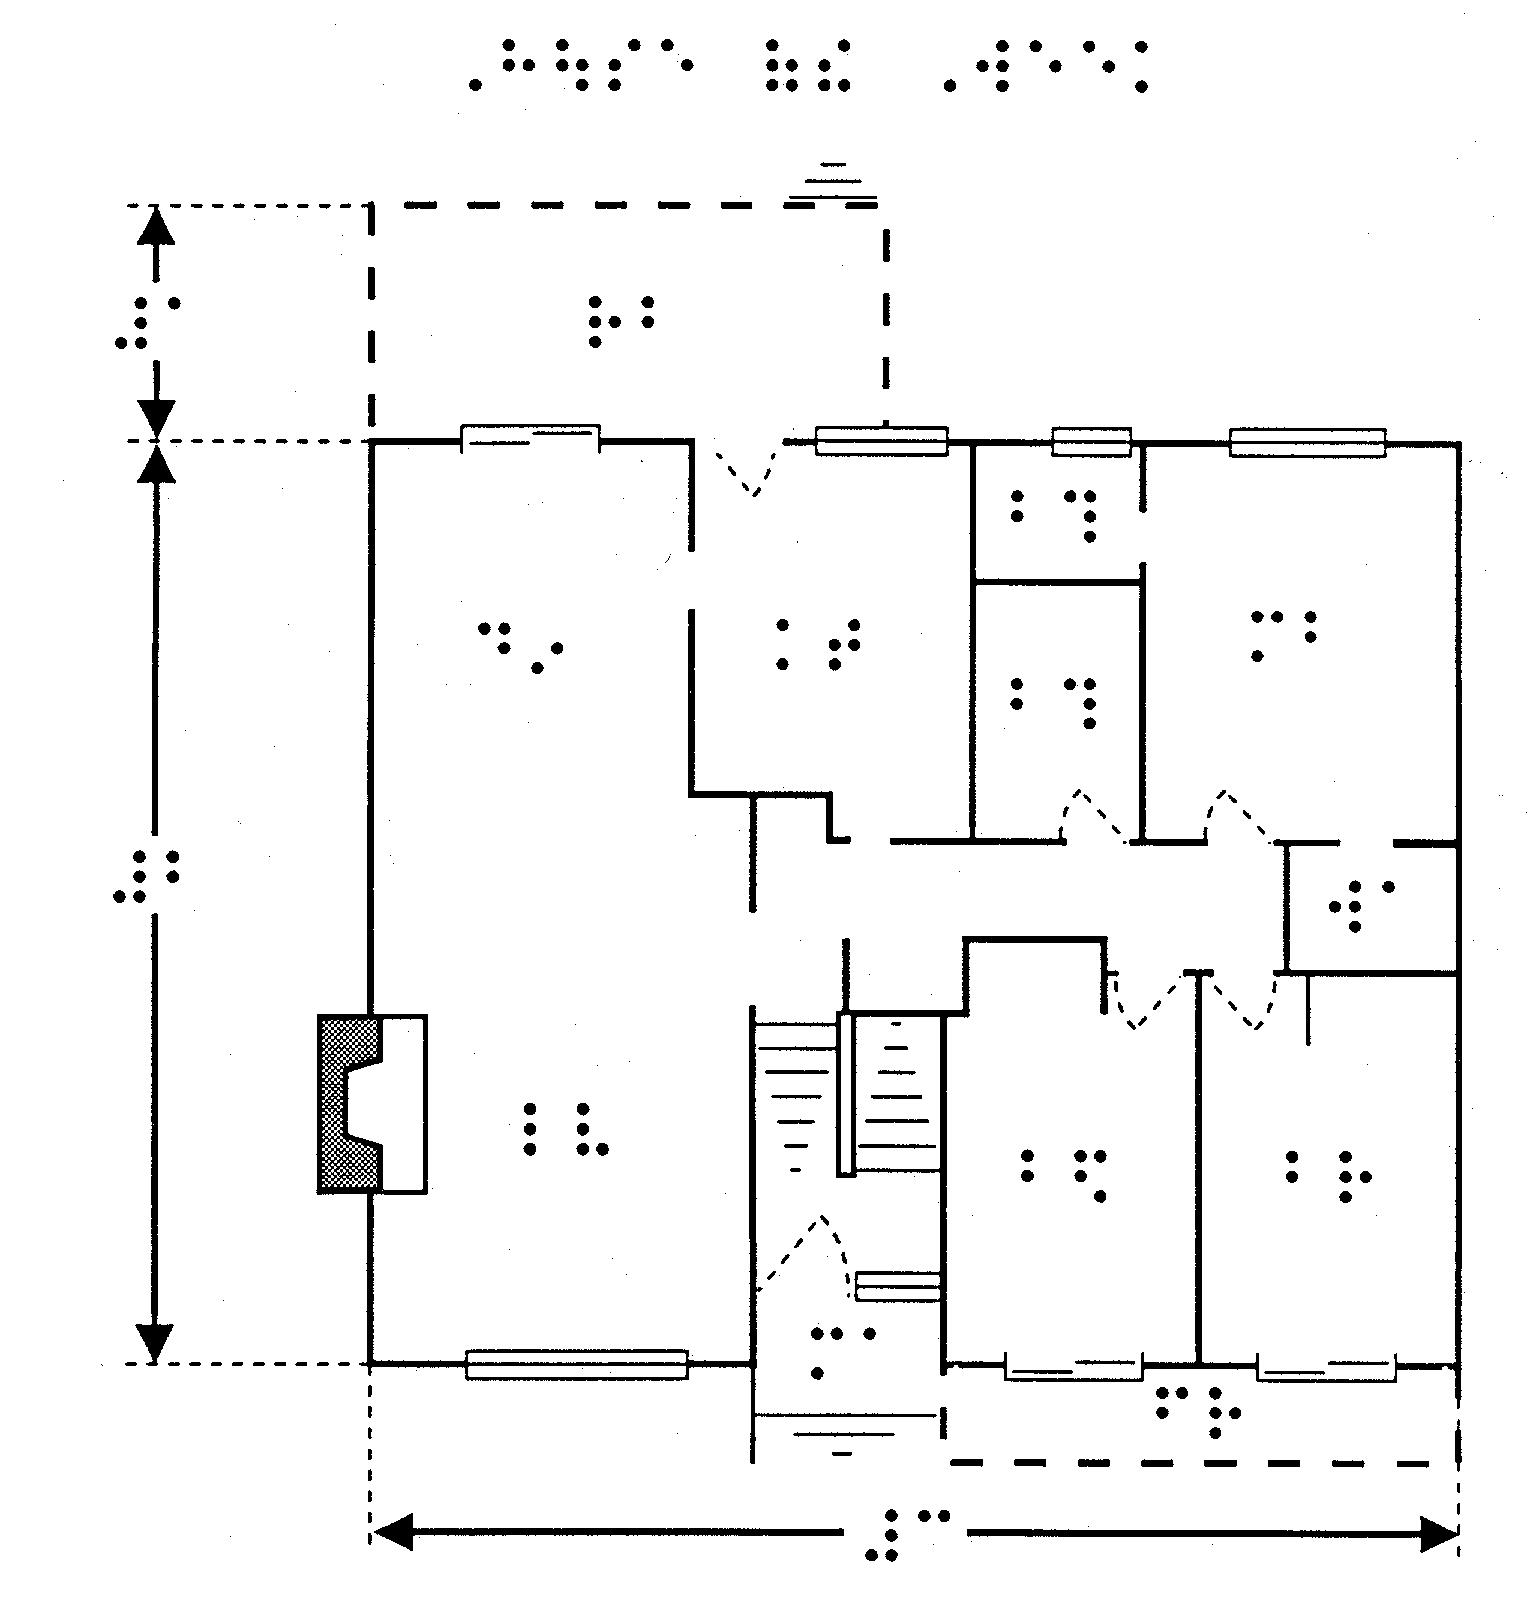
The standard stereo page (Figure 5) is limited to 26 cells per line (maximum 30) and approximately 24 lines of Braille. The format for labels should be done to this width.
Figure 5: Stereocopy page layout for A4 size paper.
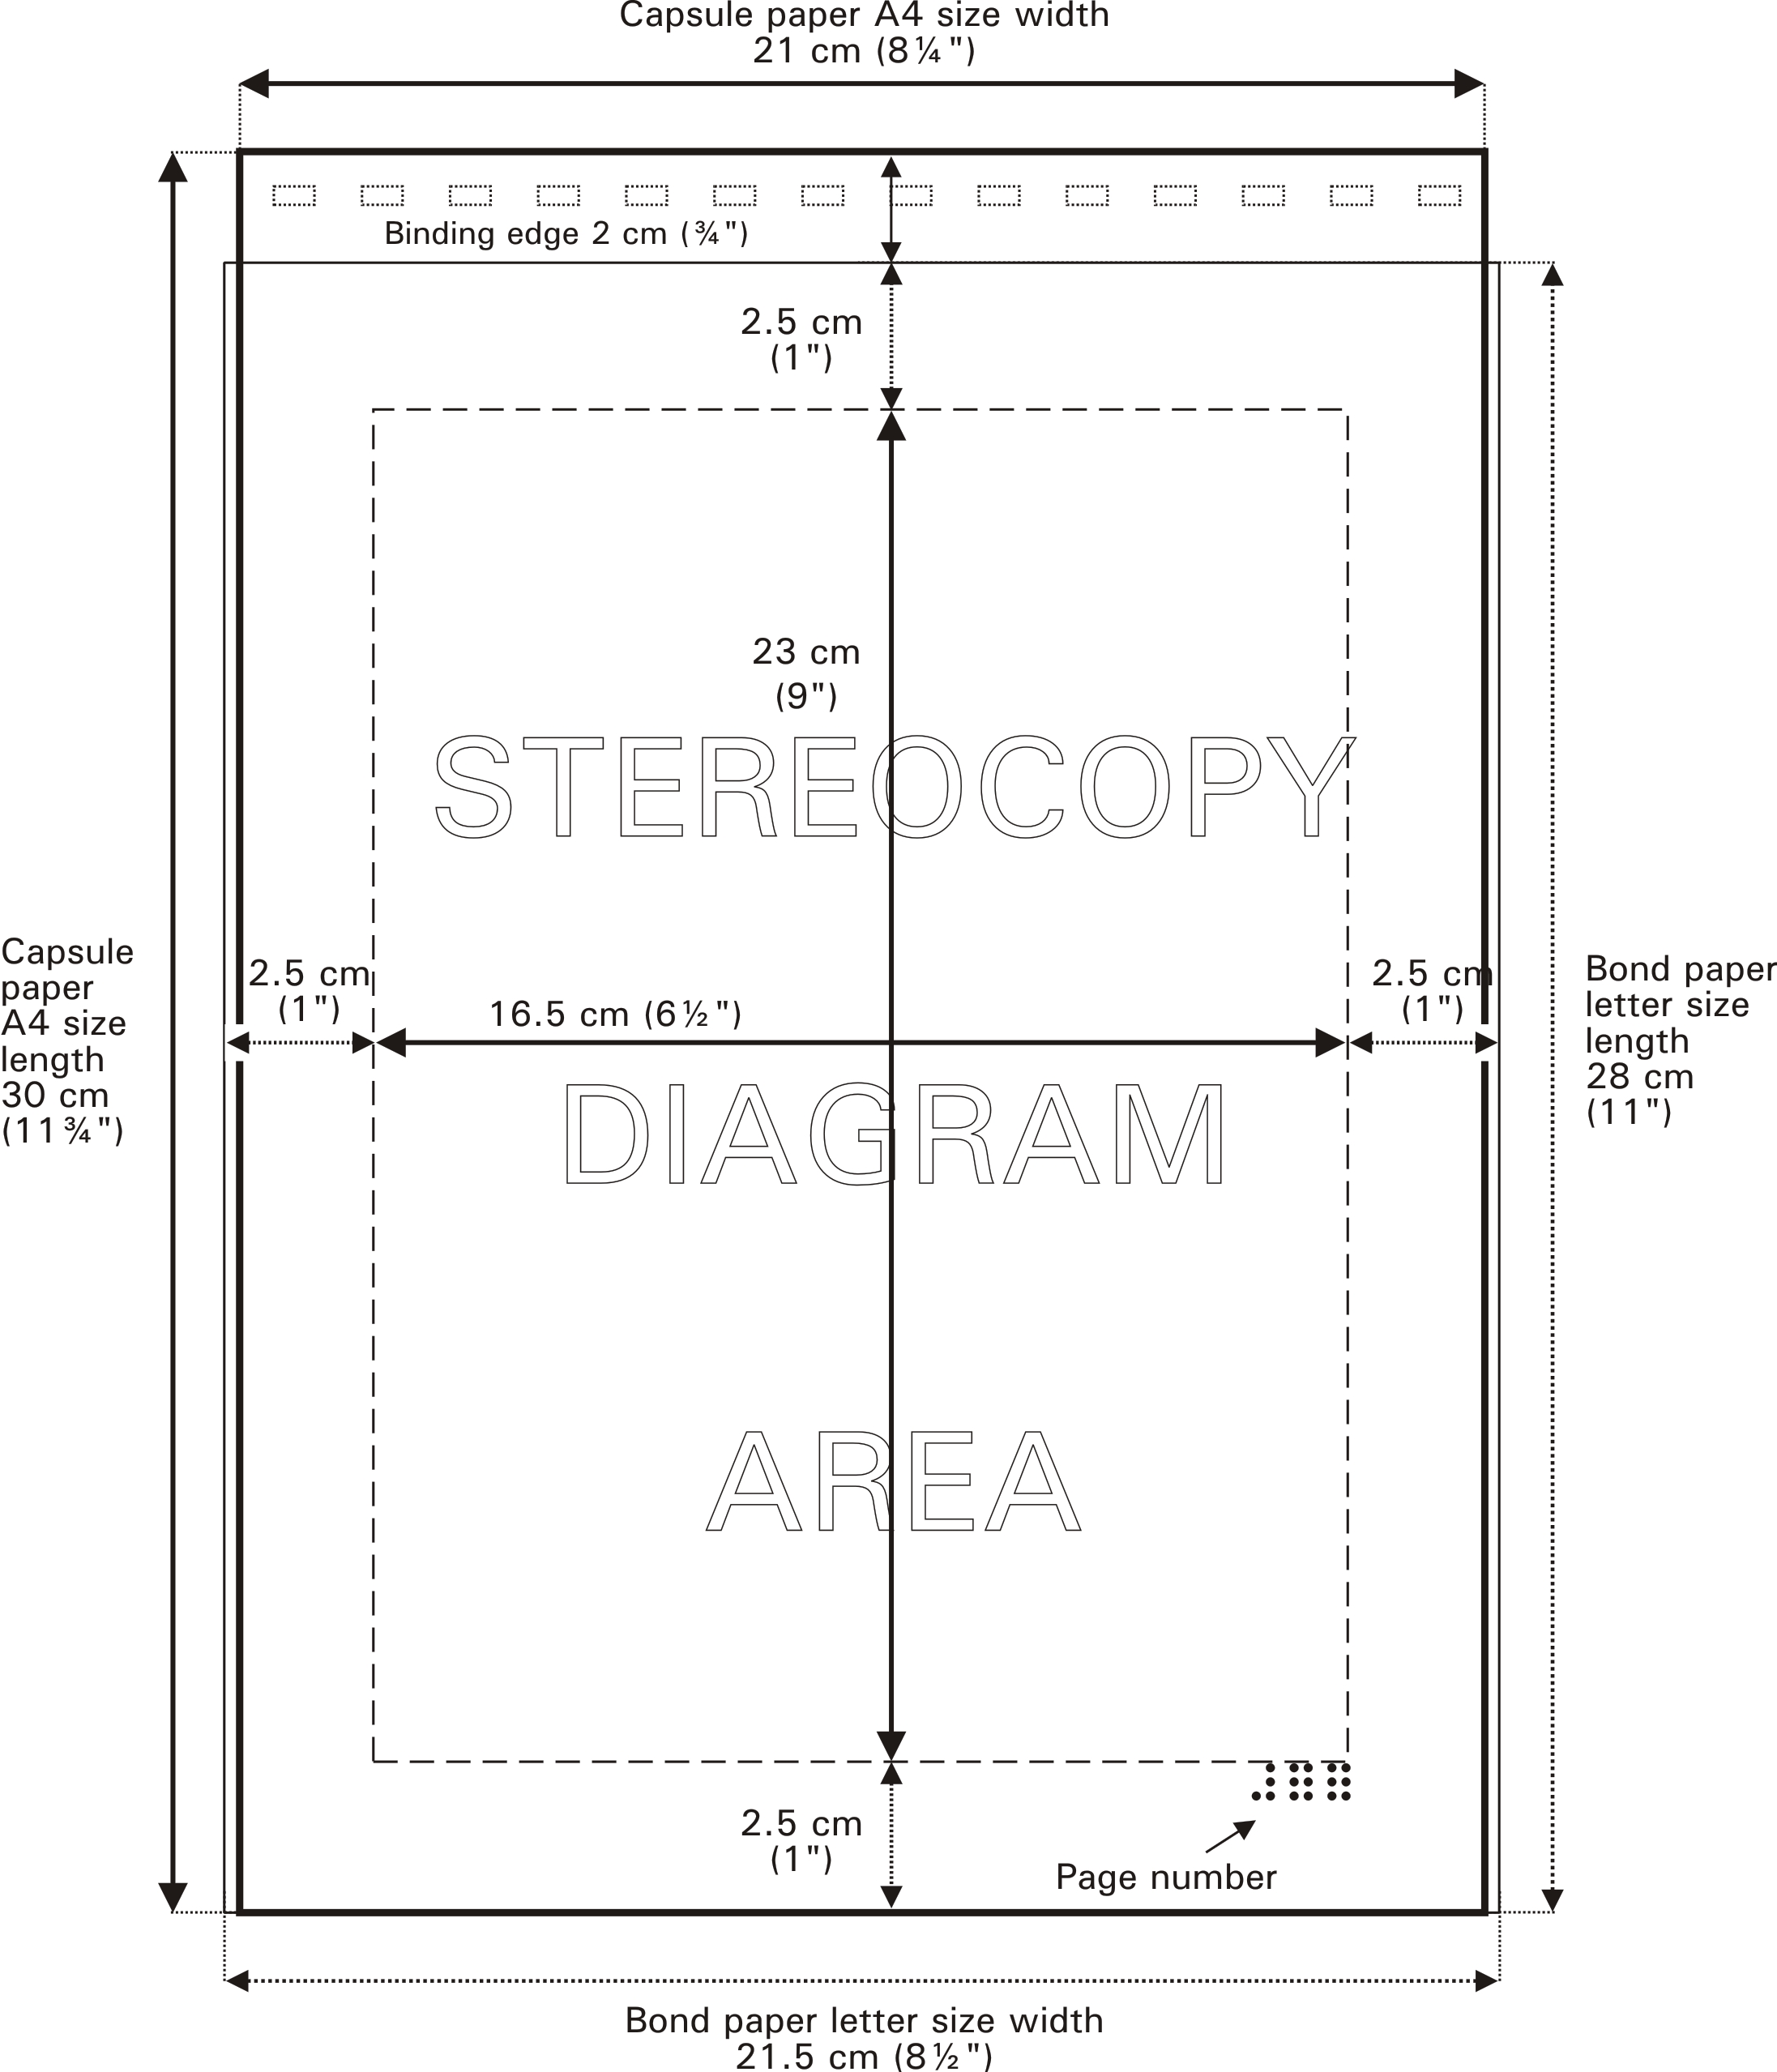
Figure 6a: Page 1, key page with legend (ascii text from Figure 3, after it has been cut & pasted onto diagram with braille font).
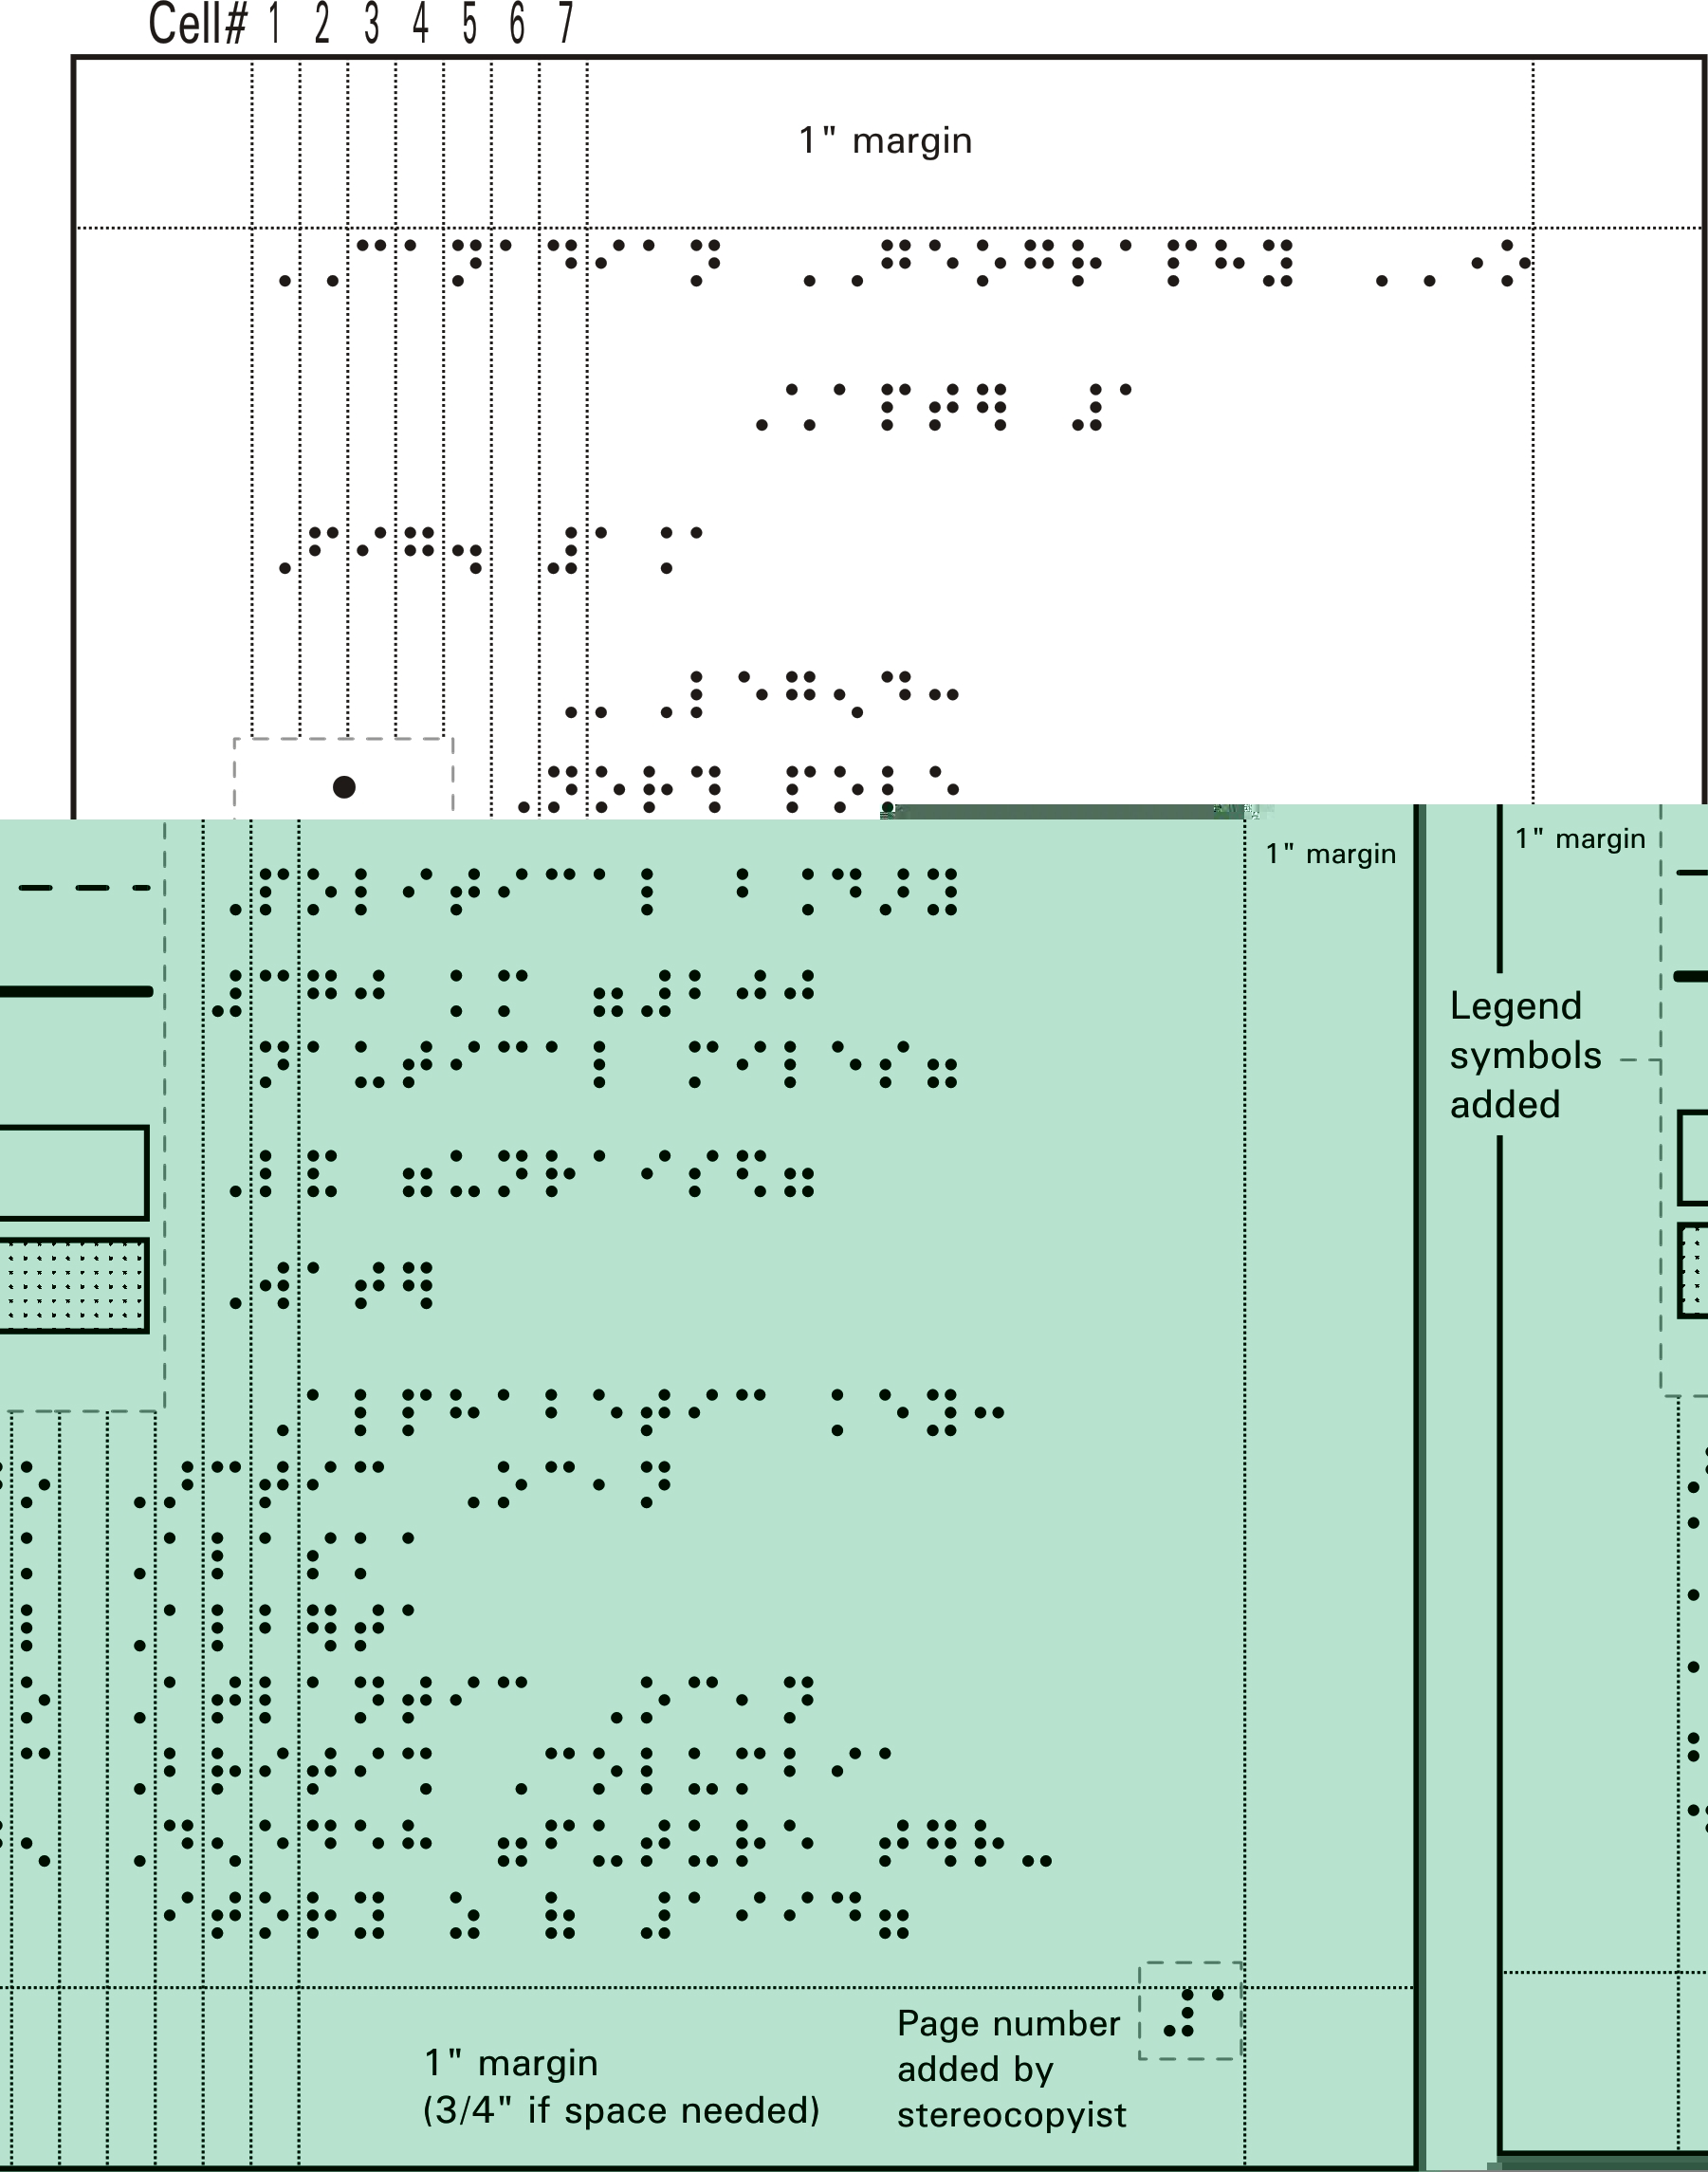
Figure 6b: Key page 2 (if there is no room for the graphic, then start a new page).
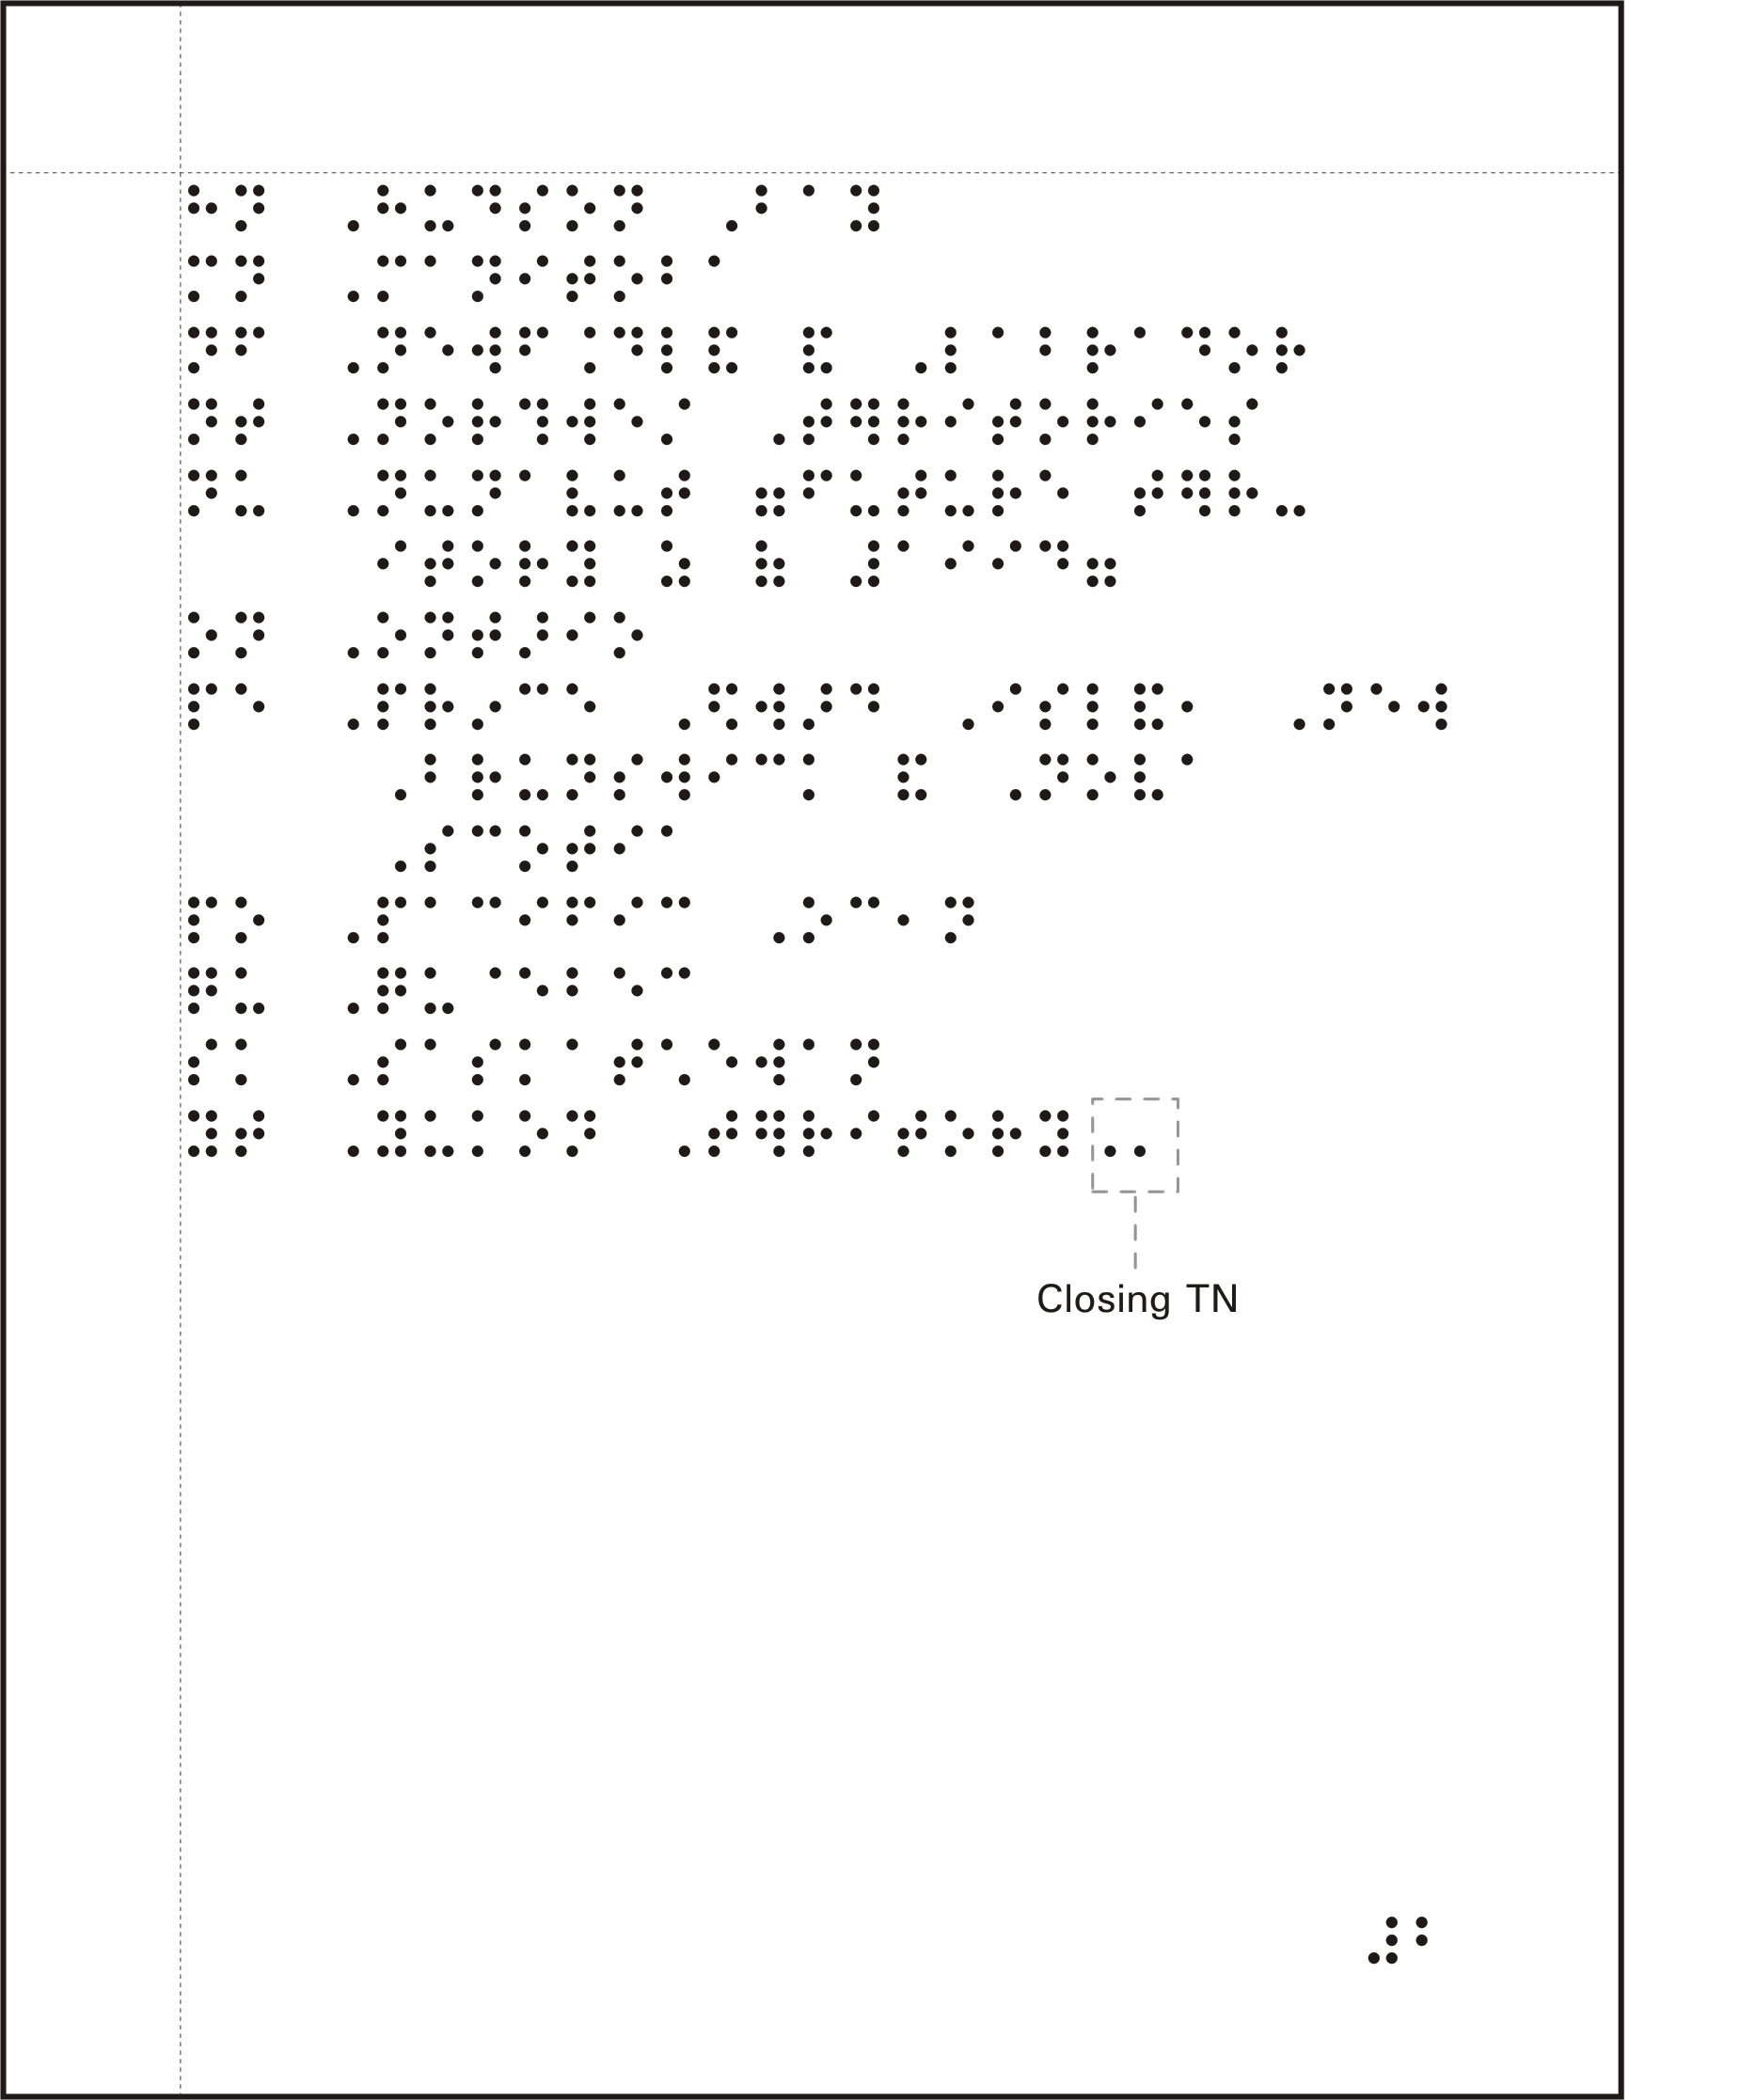
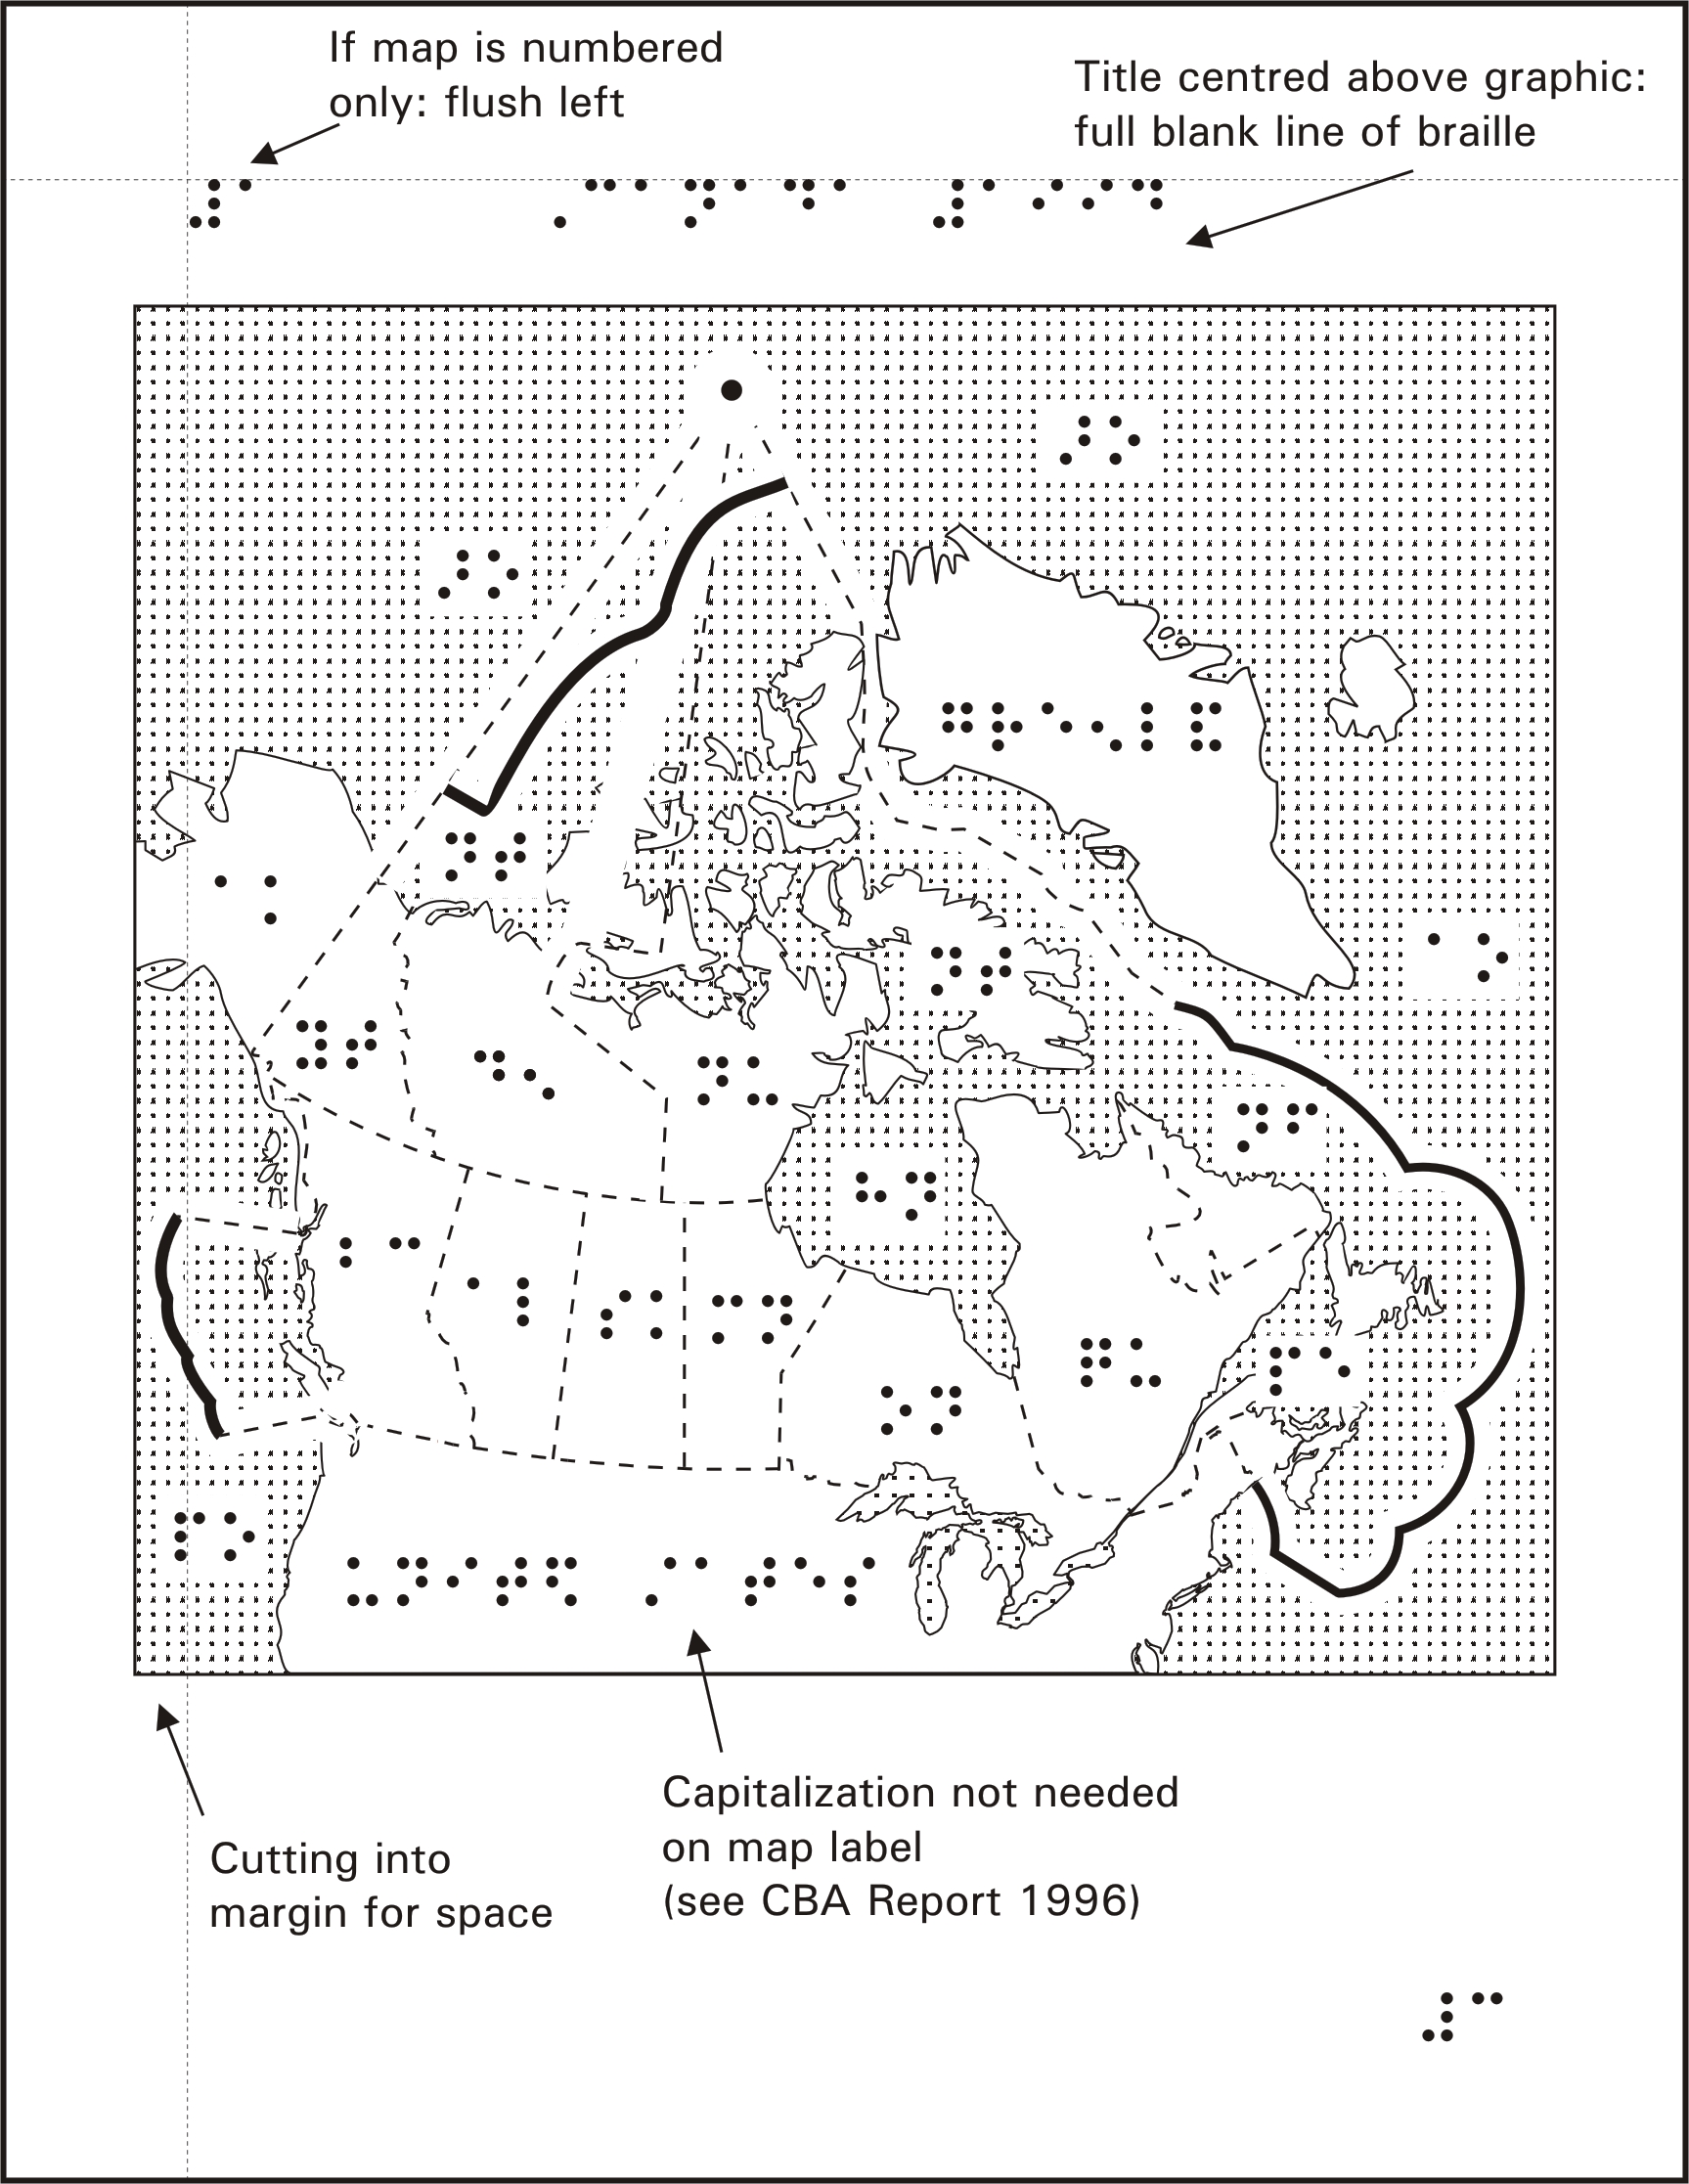
Figure 6c: Page 3, Graphic image with braille keys and labels added.
KEY EXPLANATIONS IN BRAILLE VOLUME vs THE SUPPLEMENT
There are different reasons for placing the key explanations in the supplement or the braille volume:
Advantages of key explanations appearing in the braille volume:
1. Saves space in the supplement,
especially for books with a few hundred diagrams.
2. Braille paper is less
expensive than stereo paper, therefore cost is less.
3. Stereo braille is not
as crisp as computer or Perkins braille.
4. Cutting and pasting braille
text into the supplement takes longer than including it in the volume.
5. If the diagram(s) consist
of more text then graphics.
6. Lets the braillist deal
with most of the braille.
7. There are no braille
formatting features in CorelDraw making centring and indenting more labourous
than in DBT.
Advantages of key explanations appearing in the supplement:
1. Legend, key and diagram
are together.
2. If there is going to
be more pages of diagrams than braille text. (I.e. an Atlas)
3. Changes can be made in
the supplement without affecting the braille volume.
4. One person can format
the diagram keys.
5. Easily made compatable
with either braille or audio versions.
SUPPLEMENTS vs INSERTED DIAGRAMS
When a book contains many
diagrams, stereocopy inserts are avoided as a rule because it would be
very time consuming to format and insert individual diagrams throughout
a braille volume. Also, the standard stereo page (A4 size) is thinner and
longer than an 11" x 11" braille page. However, if a book contains fewer
than 10 pages of illustrations, the diagrams are usually inserted (Figure
7). A blank page or space for each diagram should be left for pasting.
For interpoint volumes (double sided braille) it should be two pages (1
sheet).This will ensure that the diagram starts on the right hand side.
A supplement should be at least 15 pages but not more than 75-80 (90 maximum
limit) due to binding restrictions. Supplements should be separated by
Chapter, Unit, Lesson number or some other logical grouping.
Figure 7: Inserted Stereocopy diagram.
WHEN TO SPELL OUT AND WHEN TO KEY
During formatting, it is very difficult to know how much room there is for 2-cell keys or spelled out labels on a diagram since it usually hasn't been produced at this stage. Minor headings do not have to be keyed since they would have space above the diagram. A map of Canada often has room to spell out the "United States" and "Greenland" (Figure 6c). In Grade Two Braille, some words can be contracted as only 1,2,3 or 4 cells making keying such words often unnecessary, (Figure 8).
Print word Grade Two Braille version
"knowledge" k
"time" "t
"China" *9a
"distance"
4t.e
Figure 8: Two examples of keyed vs. spelled out.
Keyed Spelled Out
Keyed Spelled Out
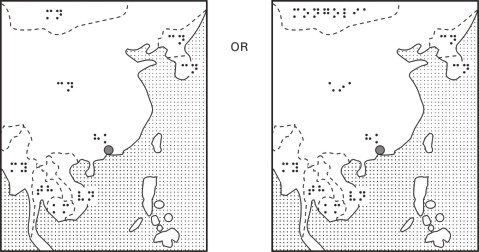
Using contractions help to maximize braille key understandability. For example, it's better to use "chi" (*i) as a key for "China" (*9a) than "cn" (cn) because the "chi" sounds more like the original word. The same could be said for "us" for United States instead of using "un" since it is the common slang term for U.S.A. Note: for Nemeth braille, you cannot use Grade Two contracted braille in the keys as they will be confused with some Nemeth braille symbols.
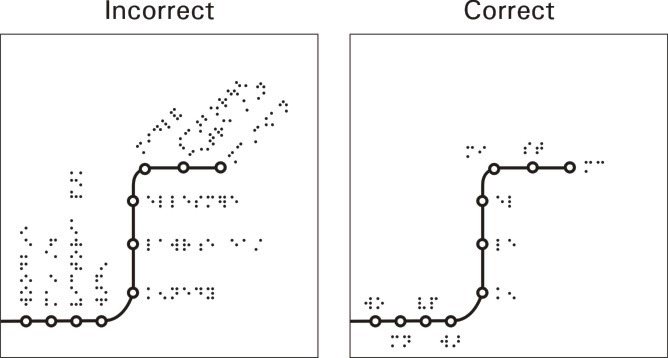
Even if there is room, if
spelling out will clutter the page or overwhelm the object (Figure 9) (like
a point on a line or a city symbol or a series of points) then it is better
to key.
Figure 9: Labelling points on a line
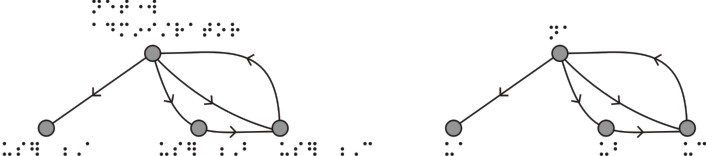
COMBINING
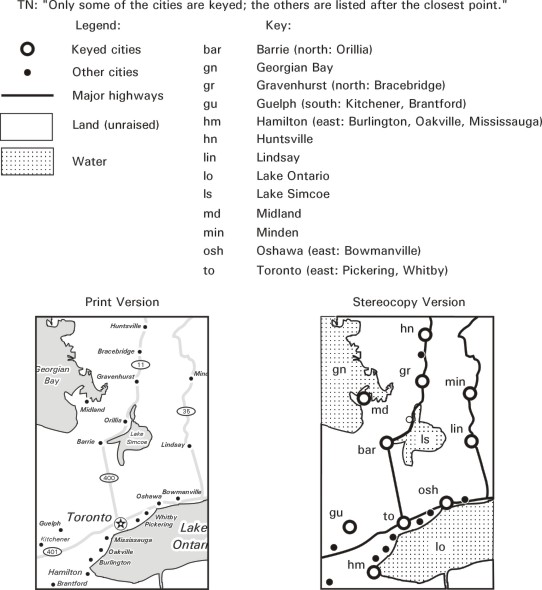
Use one key for two or more closely spaced items (i.e. "to" for Toronto, Mississauga, Pickering & Richmond Hill) and indicate direction (from east to west).
Figure 10: Closely spaced items.
Also when more than one piece of information is pertaining to the same object then combine the information into one key.
Figure 11: Combining information in keys.
Original Print Image
Tactile Stereocopy Versions
DISTORTION AND ENLARGING
Braille can only be read horizontally. Unlike the printed word, it cannot be put on sideways (90 degrees) or even at a slight angle (however, an entire page can be turned 90 degrees or "landscape" within a supplement because all the braille on that page is oriented the same way).
Figure 12: Horizontal Braille.
If there is no room for braille or braille keys or if there are too many labels or keys, then enlarging part or all of the diagram may solve the problem. It is not recommended, however, to enlarge or shrink a diagram that needs to be done to scale. If you can't enlarge it enough to accommodate braille, then split the diagram into sections or layers.
Figure 13: Enlarging part of diagram to fit braille key.

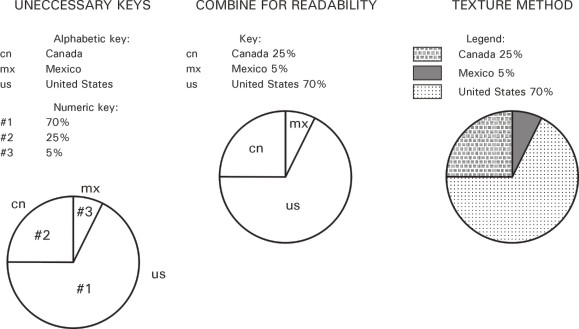
NUMBER AND LETTER KEYS
There are two kinds of keys used, letter and number. Letter keys sound more like the information being shown whereas number keys are better for sequential information or for numeric values. Number keys should be used for blocks of text that have no promonent word or when the letter keys would be too similar. Number keys can also be more than 2 cells but should not be more than 4. In Nemeth braille, a number key uses the literary braille numbers or "upper" ones for distinction. Some diagrams will combine both kinds of keys requiring two sets of explanations.
Figure 14: Diagram with letter and number keys.
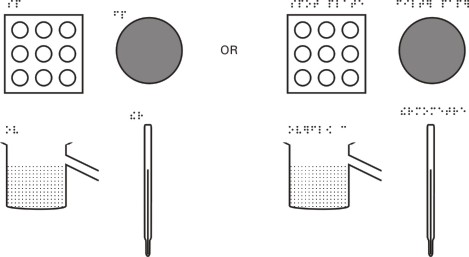
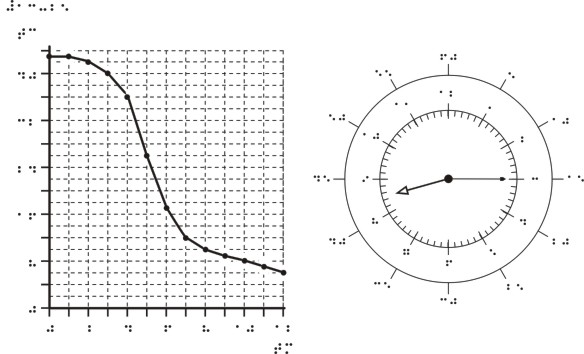
NUMBERIC INDICATOR OMITTED
Using The Nemeth Braille Code For Mathematics and Science Notation 1972 Revision, number signs can be dropped from graphs, clocks and thermometres to save space.
Figure 15: No numeric indicator
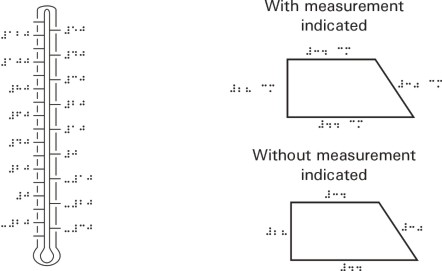
TRANSCRIBER'S NOTES
Transcriber's Notes can remedy all kinds of situations. They can save space on diagrams or explain changes made etc...
Figure 16: Transcribers note: No degree sign (Literary braille: must keep number sign).
Figure 17: Measurement indicated or not indicated (Nemeth).
Figure 16 Figure 17
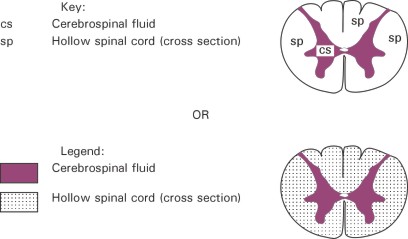
TEXTURES
It may be better to use an area texture rather than a key if an area is too small. Also, texture would better suit a large or complex area rather than a key symbol.
Figure 18: Keys or texture.
When keyed items fall within a textured area, harsh textures should be avoided because the texture may hamper braille reading. A dead zone (or white zone since white does not rise) is used to give braille reading space within the texture.
Figure 19: Braille on harsh textures are difficult to read.

PRELIMINARY PAGES
The Preliminary Title pages
(prelims) are the Title page (p1), Transcriber's Notes page (p2) and Table
of Contents page (p3-?). The title page contains the title, author(s),
publisher, ISBN, transcriber and supplement information. The Contents page
shows where each diagram is in the supplement. For mathematics books, we
only put the location of the first diagram of a new chapter since there
usually are too many diagrams to identify.
FOREIGN LANGUAGE MATERIALS
The CNIB Library produced
stereocopy materials for French, Spanish and German textbooks between 1995
and 2000. The braille used is uncontracted and uses the special braille
symbols pertaining to the language being used.
CBA REPORT ON TACTILE GRAPHICS
SUB-COMMITTEE:
PART II INTERIM MEASURES
In 1996, The Canadian Braille
Authority (CBA) released their REPORT ON TACTILE GRAPHICS SUB-COMMITTEE:
PART II INTERIM MEASURES.This report contains the standards adopted by
CNIB Library for the Blind for Tactile graphics production. Although advances
in technology and techniques are constantly being modified, this report
is an ideal guide to produce tactile diagrams. It can be purchased from
the CBA via the CNIB Library.
Workshop notes written by:
Wayne Schaper, Tactile Technician CNIB
Edited by:
Constance Craig, Tactile Supervisor CNIB
&
Hope Bergeron, Tactile Volunteer CNIB
CNIB Library for the Blind ©2001.
www.cnib.ca