 |
|
|
|
|
|
|
|
|
|
|
|
|
|
|
|
|
|
|
|
|
|
|
|
|
|
|
|
|
|
|
|
|
 |
|
|
|
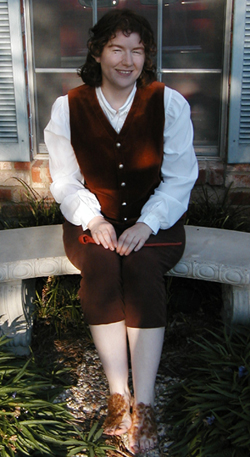
Hair, Ears and Feet |
|
|
|
|
|
After getting the attire together, I next had to make myself look more Hobbit like. For this, I had to depend a lot on good friends who know more than I do!
One of my friends is really awesome with hair. My real hair is shoulder length, has no bangs and is red. I asked my friend if she could try and curl my hair and give me bangs. We had a practice session and it looked awesome! |
|
|
|
|
|
She pulled up some of the front strands of my hair to make the bangs and then used rollars and a curling iron to give me tons of curls. After that it was all the use of bobby pins to pull my hair back and move it where we wanted it. I reccomend that your hair be a bit damp when you curl it; it will hold better that way. I also had to put tons of hairspray on. After curling my hair, we then had to change its color. (No, I didn't dye it!) I went to a beauty supply store and bought a hair coloring spray called Streaks 'N Tips. It is a bit like spray paint. It doesn't harm your hair at all and it washes right out. I used the color Burnt Brown. What was nice about doing my hair this way was that it felt comfortable (no wig!) and it looked natural. Thanks, Sarah! |
|
|
|
I next had to go to another friend for the ears. I have seen on many sites that people suggest using the plastic ears you can buy, but that is expensive and it doesn't look real. This next friend is an artist extrodinaire! She used a natural clay (natural, earthy clay will stick to your skin) and formed Hobbit ears from a picture, then stuck the addition onto my ears with only water. The clay adheres quickly. Then she mixed some acryllic paint together to match my skin tone and painted the clay and my ear. Thus, you get a natural extension of your ears that looks real and not store bought. Thanks, Laura! |
|
|
|
My Hobbit feet were the easiest part of the costume. If you want big feet, you'll have to buy some unless you have naturally large feet! I just used my own regular sized feet, with a little adornment. I bought some theatrical hair, spirit gum and spirit gum remover at a local costume shop. I cut the theatrical hair into small bits and spread it onto my feet after putting spirit gum on them. To make the dirty looking toes I used a dark brown eyebrow pencil around my nails. The spirit gum remover is important, because if you ever want normal feet again it is the only thing that will take all that sticky gum off! |
|
|
|
 |
|
|
|
|
|
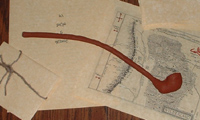
Pipe and Ring on Chain |
|
|
|
Props came next. The pipe I made out of terra cotta colored scupley clay. Sculpey is a polymer clay that is easy to mold and is oven baked. I rolled the stem and to form the bowl, I used a banana! I have no art aptitude, so I formed the bowl around the end of a banana and then went from there. It isn't the most accurate pipe, but it looked good if you didn't look too close!
All I did for the Ring was use a silver necklace chain and put a Ring on it I had taken off a Lord of the Rings bookmark. Easy and cheap! |
|
|
 |
|
|
|
|
|
|
 |
|
|
|
Well, I hope this may have been some help to those who are looking to be more like Hobbits on the outside and reflect their inside. I wish you all the best in becoming more and more Hobbit-like! Long live the Shirefolk! |
|
|
|
|
|
 |
|
|
|
 |
|
|
|
|
|
To "Hobbit at Heart" Home |
|
|
To view links to some of my Hobbit friends and their LOTR costumes! |
|
|
|
|