Equipment Modification:
A Better Pack and A Better Racking Harness
Cameron McPherson Smith
April 2000
Of the many tool-using animals on the planet, none are more dependent on their creations than humans. This becomes very evident when we consider the consequences of equipment failure in, for example, spacesuits, computers or scuba gear. A mountaineers equipment is only slightly less relied upon for survival. Perfecting your equipment is an important part of mountaineering; not as important as having a strong will, or a strong body, but nearly so.
An example: you buy a climbing pack with what seem to be good, strong zippers. The zipper pulls are the usual metal tabs. Now youre on a mountain. A storm moves in. Your hands are cold. You need to open your backpack, but between cold, stiff fingers and heavy gloves, its hard to grab the slippery, small, metal zipper pulls. When you do finally get hold of one, it infuriatingly snags as you try to pull it more than an inch from the closed position. Try as you might, you cant get the zipper past a place where freezing rain has seeped between the zipper teeth and frozen solid. In desperation, you pull off a glove to get a better grip. No use, and now your hand is frost-nipped. Glove back on, you finally thrash the zipper open violently, jerking the pack unexpectedly. The headlamp you were trying to get to flies out of the pack, and tumbles down the cliff. Now its dark, your headlamp is gone, your fingers are frozen, you have lost your headlamp, and more gear is falling out of your pack because you broke the zipper trying to get it open. All this because of a crummy zipper, and dinky zipper pulls Believe me, there are countless stories of this nature. Some have good endings. Others lead to disaster. And many unresolved cases of mountaineering wipe-outs probably have their origins in such mundane details as stiff zippers, fiddly belay devices, or the like.
Clearly, your equipment has to be simple to use, robust, lightweight and versatile. This article introduces some ways to achieving these goals in two pieces of climbing paraphernalia: the backpack and the equipment rack. You may find some of these methods bordering on mania, but keep in mind the extended consequences of minor flaws. Stack the odds in your favor by perfecting your gear!
Blueprint for A Better Alpine Pack
The best alpine climbing pack (be it for alpine rock or alpine snow/ice/rock climbing) has few features: a single compartment for the sleeping system, food, etc., a pair of shoulder straps with minimal padding, a chest strap to connect the two shoulder straps across the chest (prevents pack slipping off arms while climbing), a light hip belt with minimal padding (you will not be carrying heavy loads), an infinite-extendable top lid (more on this below), a snow collar to keep out spindrift and wind-driven water, an ice axe tube or loops, and attachment points for crampons, a sleeping pad and helmet. An insulated back panel is also good, as the pack may serve as an insulated seat in desperate situations. Things to avoid on such a pack: heavy waist belt and shoulder padding, compression straps to reduce pack size when not fully loaded (it will always be fully loaded and the straps are just a nuisance anyway) and multiple compartments (e.g. an upper and a lower what for?).
A pack with a single front lid clasp is better than one with two clasps. These usually descend from the front corners of the pack lid. They may be replaced by a single lid clasp; cut them away with a hot knife or scissors, and seal the incision. The replacement lid clasp can be a large fastex buckle, attached to the lid by sewing on a tab of 1 * or 1 * inch flat webbing. See Figure 1.

(Click to enlarge)
Now you only have to fiddle with one clasp, rather than two, and, more importantly, youve eliminated that second strap, and second step in the process of opening or closing the pack, with no loss of functionality.
The infinite extendible lid is one of the most useful equipment modifications Ive ever made. I heard about the method some years ago in California. The idea is to completely sever the lid from your pack and re-attach it with adjustable straps so that it can be raised high above the pack. Under the lid, then, you can pack extra food for the approach and base camp, extra clothing, gear, and rope; anything, in short, that you would otherwise carry in a larger pack. The idea is to extend the pack for your approach hike, then tighten it up for the climb, the whole adventure requiring not two packs (an approach pack an a climb pack) but a single, versatile pack. Everything is made simpler with only one pack. Closely examine Figure 1. Use sharp scissors to cleanly cut the lid from your expensive new pack. Very carefully sew up the wound. You can also seal the wound with seam-grip. Any stray pack cloth left ragged with begin to unravel, so be careful about this. Now, attach the three fastex buckles via flat tape straps (Figure 1A). Where the straps fasten to the back pane of the pack, sew all the way through. Use a heavy needle. Be sure to sew on the buckles so that to tighten, you pull down on the strap. I tried two straps at first, but it seemed necessary to add a third, in the middle, and now my rig is perfected. Be sure to sew very good, strong connections between strap and pack. Use the box-and-x stitching pattern seen in Figure 2G. Sew with dental floss, not ordinary thread. If you must use thread, sew with it tripled or at least doubled, and sew again and again you dont want these straps blowing out. Dont use cotton thread; it will rot and the seams will blow. Synthetic only (dental floss has yet to fail me). Sew until the fusion of strap and pack cloth is a stiff plate of nylon. Make sure the flat straps you use are very long, long enough to put a tower of gear under the lid thats the whole point! If someone barks that you are violating the balance of the pack, or some other rubbish, point out that they are woefully mistaken you are improving your pack immeasurably. Detail all ragged ends with a razor blade, precision sewing, and seam-grip. Test the rig to be sure the tape-pack cloth fusions are strong. Youre done, an a step closer to swift, efficient movement in the alpine.
If your pack did not have a snow collar, youll need one now to protect anything you load under the infinite lid. A waterproof sheet of nylon arranged in a tube to the dimensions of your pack top opening is all you need. Sew it to the pack rim, with great precision and care. Sew two times, then seal with seam-grip. Make a hem at the top, inserting a cord for cinching the whole assembly together (Figure 1C). Reinforce the hem just at the opening where the sealing cord is exposed, so that the hem does not start to rip away. Youre done.
If you have ice axe loops, and dont like them, the rig in Figure 1D is an alternative. Cut off the loops. Replace them with a single loop of flat or tubular nylon as in the illustration. Again, sew with zeal; if you lose your axes well, its not pretty to think about. Once the loop is secure, attach to its front a strap with a fastex buckle, as in the illustration. Below this, another strap leading to the pack-cloth some inches below the tube; not too far, not too close. In the illustration I have omitted ice axe straps for clarity. These however should be racked so that the loop runs down the axe as in use, but then both are slipped down between the two axes. Pull tight, wedging them between the axe shafts. Youre done.
A small, further pack improvement. Although I mention above that zipper pulls should be easy to grab, some companies have gone overboard and added very large tabs as pulls. These tabs are folded over and sewn, doubling their weight. Cut them away. Replace them with a knotted perlon loop (not big enough for a biener to grab) or just a perlon tail that is easily grabbed with a heavy glove. All zips should have this feature. Use a light color of perlon different from the color of the pack, so that the tabs are easy to see at night and stand out from the pack-cloth. Figure 1(E) shows such an addition to your pack.
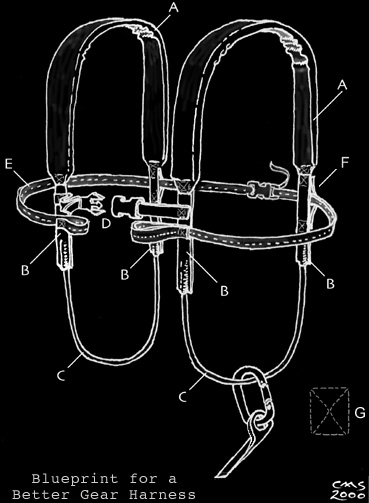
Blueprint for a Better Alpine Racking Harness
The racking harness I made from scrap parts (Figure 2) is on par with the infinite lid as the best of my gear modifications. I started climbing, like many people, with a gear sling made of a simple, tied loop of tubular 1-inch webbing. As I gained more gear, I had to add a shoulder pad. Finally I had to reinvent the whole setup as I ventured onto larger walls and started lugging more equipment. Its not just the load of gear that the double-rack handles better, by distributing it over two shoulders rather than one. An added advantage is that there is more room to rack gear, making it easier to keep organized. You may know that one of the most wretched situations of a climber is being stemmed out on some flaky crux move, losing power and battling a rising fear because you cant find the right piece of hardware, or wrench it off the gear sling. Save yourself this horror. Make the gear harness I describe below. Youll love it. If not, send it to me. Ill send you something in return.
(Click to enlarge)
The first thing you need is a pair of shoulder pads, as you find on a cheap daypack. If you dont have one, pick one up at the local Goodwill for a few bucks. The main thing to look for in these is a decent grade of cloth through which you will sew to attach the gear loops, at the upper ends of the straps marked B on Figure 2. Next, get four pieces of tubular webbing, all the same length (to your taste). Attach them to the bottom ends of the pack straps with very heavy sewing using the box-and-x technique. Again, use dental floss, or at least doubled nylon thread, a heavy needle, and forget cotton. When these are sewn on, again, there should be a heavy plate of rather inflexible nylon at the joint.
Figure 2C indicates the lengths of 7or 8mm perlon you will attach to the tabs you just sewed to the pack straps. The perlon, again, is to be of a length to your taste; drape the rig on your shoulders and see what you think. I find the best length to bring the lower edge of the arc of perlon to just about the upper edge of my hipbone. That may seem high, but remember the perlon will sag as gear is loaded. Now, to attach the perlon to the tabs (Figure 2B), you slip the perlon up into the tubular webbing of Figure 2B and begin sewing. Sew all the way through the tubing and the perlon. Sew again and again and again. Spend a few nights on this whole project just put on some good music and go at this like a master crafts-person obsessed with perfection of their paraphernalia. Be proud of your work! Sew the perlon into the webbing so that there is no give or sound when you pull on it very hard.
The next step is to connect the two independent halves of the harness as it has been completed. One attachment is a chest-fastening, as on a pack, so that the straps dont have a tendency to slip off your arms as you tilt one way or another. Just use a fastex buckle thats large enough to operate with gloves. I find this buckle gets a lot of heavy abrasion against rock and ice, so use a pretty heavy buckle. Add a small loop so that you can tuck in the extra strap when it is cinched tight, otherwise it will be tickling your chin and driving you crazy.
Although I have not shown it in the illustration, another attachment identical to this, on the rear of the straps (that is, at your back), is advisable for security. On the back-strap, you may choose to forego the buckle, but then keep in mind the setup is not adjustable and may not fit your partner (bigger or smaller) and you may have trouble with heavy clothing. Plan carefully.
The next strap, Figure 2E, goes all the way around the harness, under your armpits, basically (but not too near them at all, or you will be constricted). This loop should move freely through guide tabs (Figure 2F) lightly sewn onto the tubular tabs of Figure 2B. This is because this loop is not a simple connection between the gear loops, but an improvised chest harness for use while jumaring. Note that this sling terminates in two loops, sewn back on themselves, in the area of the chest buckle. This is so that when jumaring, you can clip through these two loops with one biener, which is attached to your upper jumar (if you have not jumared, take my word for it, a clip-in to your chest is well worth it to save energy and discomfort). The load is taken on these loops and the strap connecting them. For this reason you may wish to skip the fastex buckle connecting them, though again this will lessen the harness adjustability for different body sizes. Because of the stress put on this loop, be extra-robust in your sewing the loops here. But dont fret too much I was able to sew this with dental floss so that even after many seasons of heavy use, the seams have yet to blow.
Once its all together, rack up, jump up and down to be sure its all secure, and go climbing! As with any gear hand-over, be sure you get an OK or Got it from your partner before letting go of the rack. Test the jumar loop, and be sure the rack fits you and your partner. You can add more gear loops, plastic stiffeners, etc., as you see fit.
These are only a few of the sorts of modifications and inventions you
can employ to hone you climbing gear to perfection. Think towards
efficiency, lightweight and versatility. Prepare your gear, head
for the mountains, and (properly equipped) follow you dreams.
Back to Cameron's Climbing Pages