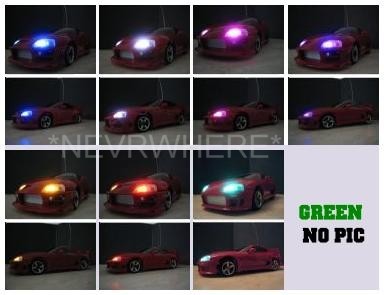
BLUE - WHITE - PINK - UV/PURPLE - AMBER - ORANGE - OCEAN GREEN - GREEN
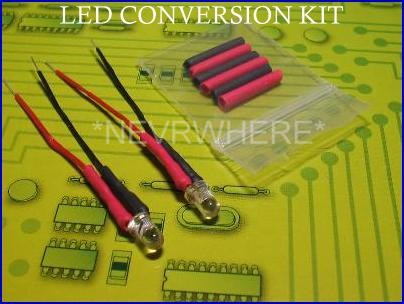
| LED CONVERSION KIT | ||||||||||||||||||||||||||||||||||||||||||||||||||||||
|
||||||||||||||||||||||||||||||||||||||||||||||||||||||
|
||||||||||||||||||||||||||||||||||||||||||||||||||||||
| OVERVIEW | ||||||||||||||||||||||||||||||||||||||||||||||||||||||
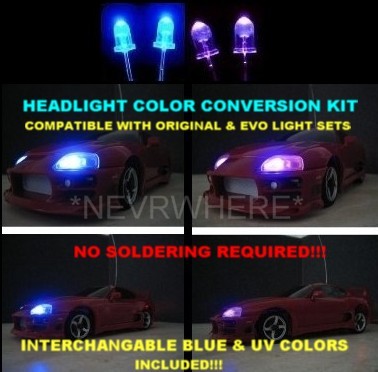
| The Led Conversion Kit will allow you to change the color of your command logic lights with the leds included in your kit. | ||||||||||||||||||||||||||||||||||||||||||||||||||||||
| INSTRUCTIONS | ||||||||||||||||||||||||||||||||||||||||||||||||||||||
| Before you begin you will need the following: Xmods Command Logic Light Set, wire strippers or anything that will allow you to strip the insulation off wires, scissors, heatgun or hairdryer, and of course the conversion kit. | ||||||||||||||||||||||||||||||||||||||||||||||||||||||
|
||||||||||||||||||||||||||||||||||||||||||||||||||||||
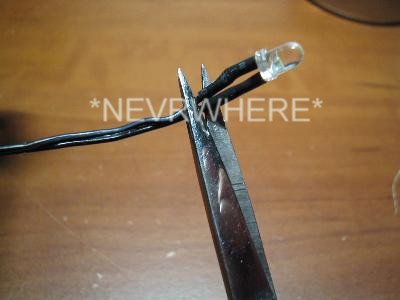
| 1. Locate the black headlight wires on your light set. (EVO will be the black and white wires) You will first want to remove the leds. You can just simply cut the wires just underneath the heatshrink tubing covering the legs of the leds I actually suggest cutting it further down, between 1-2 inches. This will allow you to splice in the white leds later if you decide to go back to white headlights.. | ||||||||||||||||||||||||||||||||||||||||||||||||||||||
|
||||||||||||||||||||||||||||||||||||||||||||||||||||||
|
||||||||||||||||||||||||||||||||||||||||||||||||||||||
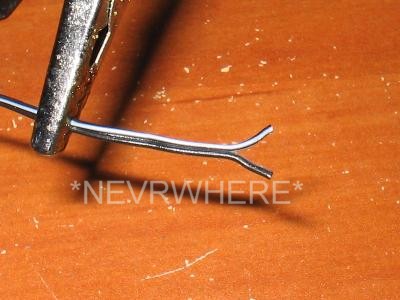
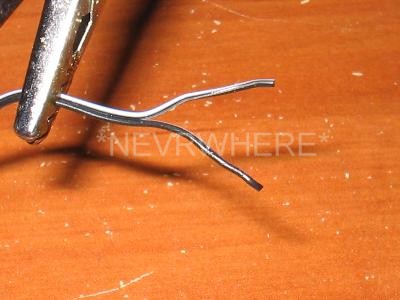
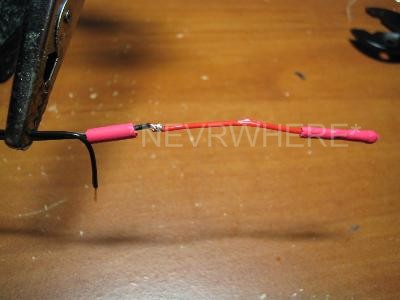
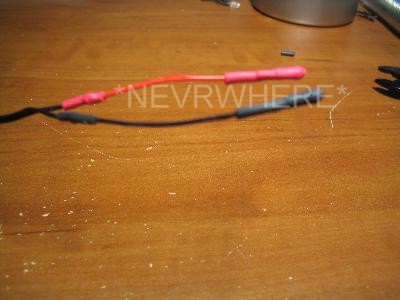
| 2. You should have an end that looks like this. Basically 2 wires connected together. Look closely at the wires. You will notice one wire is solid black and the other has a thin white line running along side of it. (If you have a EVO LIGHT SET, instead of a black wire with a white line, it will be a the white wire.) | ||||||||||||||||||||||||||||||||||||||||||||||||||||||
| 3. You will want to pull the wires apart slightly as shown in the picture. | ||||||||||||||||||||||||||||||||||||||||||||||||||||||
|
||||||||||||||||||||||||||||||||||||||||||||||||||||||
|
||||||||||||||||||||||||||||||||||||||||||||||||||||||
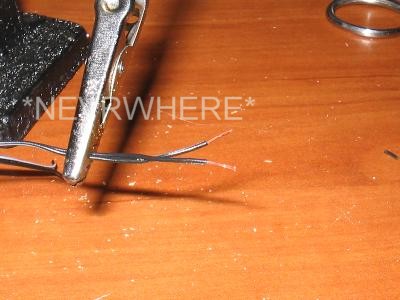
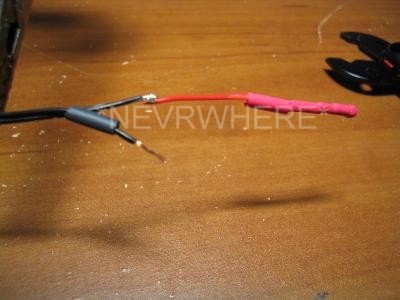
| 4. Now strip aproximately a quarter inch of insulation off the tips. | ||||||||||||||||||||||||||||||||||||||||||||||||||||||
| 5. Grab a piece of pre-cut red heatshrink tubing from your kit and slide it over the wire with the white line running along side of it. (EVO LIGHT SET - the wire will be white) | ||||||||||||||||||||||||||||||||||||||||||||||||||||||
|
||||||||||||||||||||||||||||||||||||||||||||||||||||||
|
||||||||||||||||||||||||||||||||||||||||||||||||||||||
| 6. Get one of the red wire ends from your kit. | ||||||||||||||||||||||||||||||||||||||||||||||||||||||
| 7. Now twist the uninsulated end of the black wire with the white line (the white wire on EVO LIGHT SETS) running along side of it with the red end wire. | ||||||||||||||||||||||||||||||||||||||||||||||||||||||
|
||||||||||||||||||||||||||||||||||||||||||||||||||||||
|
||||||||||||||||||||||||||||||||||||||||||||||||||||||
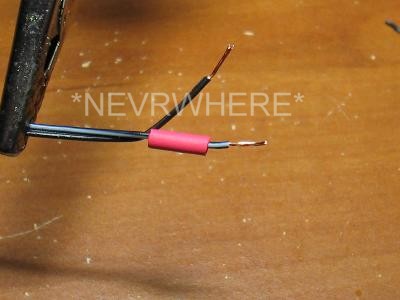
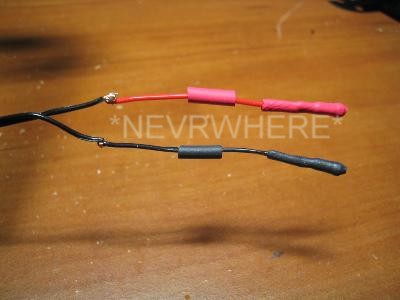
| 8. Grab a piece of pre-cut black heatshrink tubing from your kit and slide it over the solid black wire. | ||||||||||||||||||||||||||||||||||||||||||||||||||||||
| 9. Get one of the black wire ends from your kit and twist the uninsulated ends toghether as you did with the red wire. | ||||||||||||||||||||||||||||||||||||||||||||||||||||||
| At this point, if you want you can add solder, but it is optional. As long as you twist the wires tightly together, you should not need to add solder. | ||||||||||||||||||||||||||||||||||||||||||||||||||||||
|
||||||||||||||||||||||||||||||||||||||||||||||||||||||
| 10. Slide the red and black heatshrink tubing over the twisted connections. | ||||||||||||||||||||||||||||||||||||||||||||||||||||||
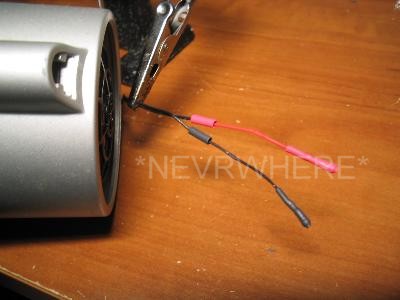
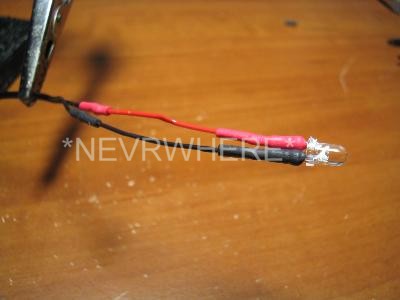
| 11. At this point I would recommend plugging in your led as described below and plug the light kit into your car and test it to make sure the led lights up. | ||||||||||||||||||||||||||||||||||||||||||||||||||||||
|
||||||||||||||||||||||||||||||||||||||||||||||||||||||
|
||||||||||||||||||||||||||||||||||||||||||||||||||||||
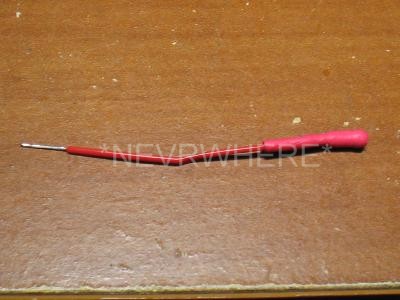
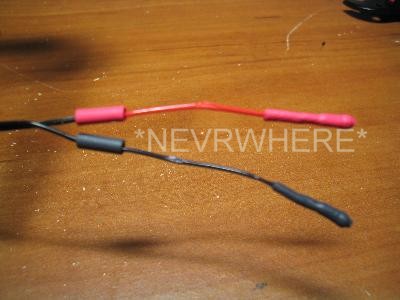
| 12. After you test to make sure it is wired correctly and that your led lights up it is time to reinforce and protect the connection. Simply use a heatgun or hairdryer and blow hot air onto the heatshrink until it shrinks around the connection. | ||||||||||||||||||||||||||||||||||||||||||||||||||||||
| 13. The heatshrink will shrink around the twisted connection to reinforce and protect it. | ||||||||||||||||||||||||||||||||||||||||||||||||||||||
|
||||||||||||||||||||||||||||||||||||||||||||||||||||||
| REPEAT STEPS WITH THE OTHER SIDE | ||||||||||||||||||||||||||||||||||||||||||||||||||||||
|
||||||||||||||||||||||||||||||||||||||||||||||||||||||
| Plug in the led. You will notice that one leg of the led is silver and the other red. Plug the red leg into the red tip and the silver leg into the black tip. | ||||||||||||||||||||||||||||||||||||||||||||||||||||||
|
||||||||||||||||||||||||||||||||||||||||||||||||||||||
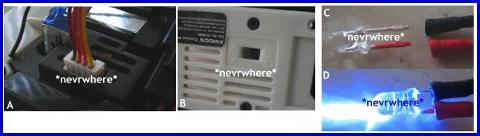
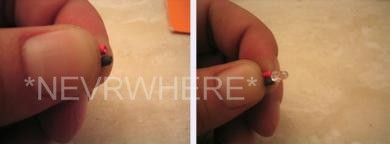
| When plugging in or unplugging leds, always hold the tips of the sockets firmly as shown. | ||||||||||||||||||||||||||||||||||||||||||||||||||||||
| When testing the light set, make sure you have fresh or well charged batteries. Plug in the light set to the car. Turn car and controller on. Then pull the throttle trigger. I recommend taping down the wires to keep them in place and out of the way of moving parts. | ||||||||||||||||||||||||||||||||||||||||||||||||||||||
|
||||||||||||||||||||||||||||||||||||||||||||||||||||||
| Different colors available. Please contact me if you wish a different color kit or leds. BLUE - WHITE - PINK - UV/PURPLE - AMBER - ORANGE - OCEAN GREEN - GREEN |
||||||||||||||||||||||||||||||||||||||||||||||||||||||
| CLICK HERE TO VIEW MY EBAY AUCTIONS | ||||||||||||||||||||||||||||||||||||||||||||||||||||||
| If you have questions, please contact me at [email protected] | ||||||||||||||||||||||||||||||||||||||||||||||||||||||