SERVICING

Timing Belt Snapped ? Well, you'll need to know how to remove the crankshaft bolt then - it's damn tight.

If you don't know what I'm talking about you will once you've attempted the job! This happened to me about 2 weeks after I'd bought my landrover - just pulling off a roundabout and Bang! I knew straight away what it was, and so after a tow to my brothers house (cheers bruv), it was time to start stripping it down.

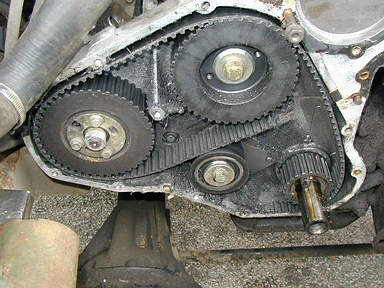
However, the glorious sight you see here doesn't appear before many an hour cursing, and many bolts being snapped, sheared, and drilled out !

I hope that some of the information here will help you tackle the job, if like me you're at home without official tools.
After initial attempts to hold the crankshaft still by putting the thing in gear with the brakes on, (no good because the clutch started slipping), I tried to put a bar between bolts screwed back into the crankshaft, after removing the pulley. (Undo the four small bolts inside the pulley to get it out the way).

However, the Bolt (you will soon start refering to it rather like God), is so tight that these puny bolts snap off. (You may hear the Bolt laugh at your pathetic attempts at this point).

See pic on left for how many times I tried this before my little brain began to realise what I was dealing with.
Next I made up a bracket to hold the crankshaft still, using the power steering pump. Great, I thought. This is nice and straight and should transfer the stress no sweat, without the bar bending.

However, the whole steering pump started to flex, and things were not looking good. Since I didn't want that to suddenly snap I stopped.

I was finally learning from previous mistakes !
OK. This called for some more serious metalwork to hold the Bolt, so some 1/4" steel was found to do the job.

This was ground using an angle grinder (please use goggles), so it would follow the curve of the washer which surrounds the Bolt.

It was made to be a nice snug fit against the washer. - I used a piece of cardboard originally to get the right shape, and then finished it off by repeatedly offering it up.
Next I drilled two holes in the correct position to bolt it securely to the crankshaft.

The bar was also cut to the correct length so that as the crankshaft rotates, it comes up against the chassis member.

This really was now rock solid, and ready to try !
Another view of the bar connected.

A view of the bar reaching across to the chassis member, ready to take the strain.

It lays nicely just behind the steering box. I also used another metal plate inserted to protect the chassis member from damage.
This was the shredded belt that met me when I finally cracked the Bolt off. Use a big bar and a 6 - sided socket - not a multi-hex socket. You don't want to round it off or I don't know what you'd do.

You really would be crying if you did that.
At last all cleaned up and ready to go.

Make sure you time it up properly - find the dots indented on the sprockets.

Hosted by www.Geocities.ws

1