How to Build a 1950s Spaceship Model
By Free Trader
Copyright © 1999, 2002, 2008 by Free Trader. All rights reserved. No reproduction other than for personal use permitted.
I’ve had an interest in science fiction in general and space travel in particular since childhood. I was born a little too late (1954) for the early network television space operas such as Space Patrol and Tom Corbett, but I was lucky enough to catch episodes of the syndicated series Rocky Jones Space Ranger on Big Bill’s Matinee in the late 50s. In my young mind, Rocky’s Orbit Jet and George Pal’s Luna from the movie Destination Moon (1953) were what spaceships were supposed to look like. I couldn’t understand why the Project Mercury capsules were so ugly looking or see the reason for throwing away a perfectly good rocket after only one flight! Robert A. Heinlein’s early novels reinforced my concept of the spaceship as being a fully reusable, streamlined craft that took off and landed on its tail fins without the need for launching pads, runways or complex infrastructure. I believe that future spaceships will have to operate like the Orbit Jet and Heinlein's Rolling Stone if costs are ever to be lowered to the point that space travel becomes commonplace. We finally seem to be moving in the right direction, albeit too slowly for this graying wannabe astronaut. In the early 1990s McDonnell Douglas successfully test flew a sub-scale prototype of a fully reusable single-stage-to-orbit space vehicle called the "DC-X Delta Clipper". Although the "DC-X Delta Clipper" is a far cry from the Orbit Jet, it did take off and land on its tail like a proper spaceship. So maybe Tom Corbett and Rocky Jones were simply too far ahead of their time?
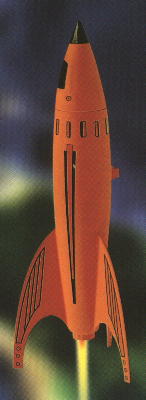
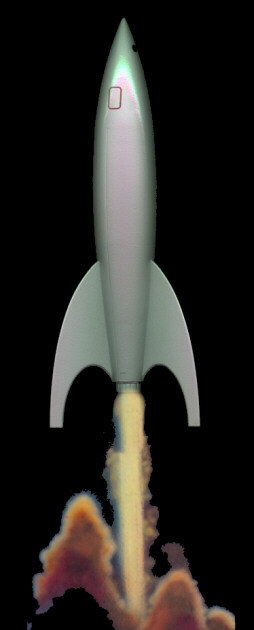
But I’m drifting off course here. The subject of this humble little web page is How to Build a 1950s Spaceship Model, specifically a sleek, silver dart like the ones that flashed across movie and television screens in the early 1950s – and until recently were so conspicuously absent as subject matter for plastic model kits. The nice thing about my instructions is that you don’t have to be an "expert" model builder to turn out your very-own customized spaceship; the folks at Estes Industries have issued an all-plastic, nine inch long flying model rocket (pictured at right) that can easily be transformed into a beautiful static 1950s spaceship model without too much effort. So fasten you seatbelts and prepare for blast-off!
Materials Needed:
- Estes Moondogtm model rocket (available wherever model rockets are sold)
- Superglue
- Coping saw
- Small file
- Model putty
- Sandpaper (assorted grit)
- Gray plastic model primer spray paint
- Silver plastic model spray paint
- Clear gloss model spray paint
Directions:
Carefully remove the model rocket from its package.
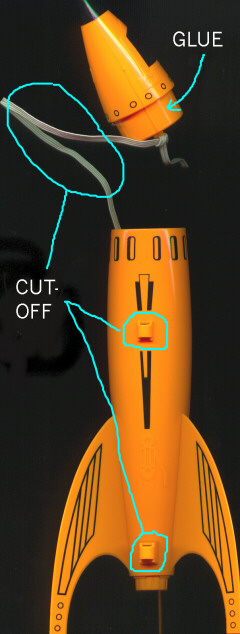
Remove the elastic shock cord that attaches the nose cone to the rocket’s body (it will just rattle around inside the model if you don’t). See photo at right. Carefully apply a drop or two of superglue to the part of the nose cone that fits inside the rocket body and slide it in place so that the mold seams on the side of the cone line up with the seams on the rocket body. Set side for about 15 minutes and allow the superglue to thoroughly dry.
Using a coping saw or similar saw with a fine tooth blade or a Dremmeltm moto-tool, carefully cut away the launching lugs from the rocket. File until flush with the hull, then finish smooth with sandpaper.
Using medium sandpaper, sand off the raised windshield and hatch details (unless you want to leave them there, but I personally think that they look too cartoonish). If you want to leave the windshield, then you'll have to either mask it off before painting or repaint it after you've applied the final silver coat (Step 8).
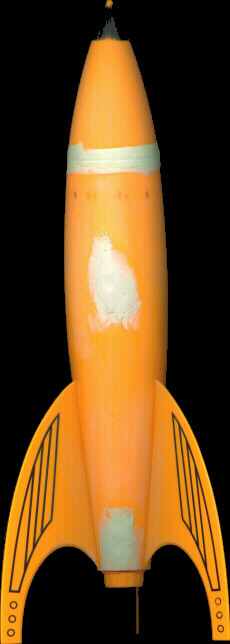
Fill the seam where the nosecone meets the body with a thin layer of model putty. Also fill the holes where the launching lugs were with model putty, but don’t use too much or it takes forever to dry! (See picture at right.) Set your model aside for 24 hours and allow the putty to thoroughly harden.
Using fine sandpaper, sand the puttied holes and seams smooth. Use very fine sandpaper to lightly sand the entire model, then wipe clean with a lint-free towel.
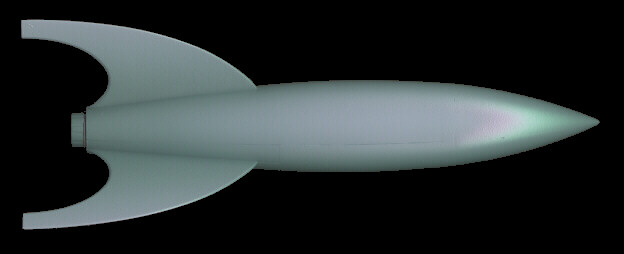
Read the directions on your spray paint, then apply first gray primer coat to your model. (What do you MEAN you wanted to leave it orange???) Allow to thoroughly dry. Sand lightly then apply a second coat. Repeat as needed to achieve a smooth finish. (See picture below.)
Apply two to three coats of silver spray paint, allowing paint to dry between coats. Allow the last coat to dry very thoroughly before touching your model.
You can apply a thin coat of clear spray gloss to your model to protect the finish. The clear spray gloss also helps protect decals. However, make sure that the brand of clear gloss you use is compatible with the silver paint or you may ruin your model's finish!
- 5...4...3...2...1...BLAST OFF!
Notes: More advanced modelers can alter the ship’s appearance by adding wings or different-shaped fins cut from sheet plastic (available at your local hobby shop). Shock absorbers may be made from aircraft model drop fuel tanks and glued to the tips of the fins. Viewports, hatches and other details may be added using decals scavenged from model kits. Varying the size of the hatches can change the scale of your model. At 1/144 scale (1 inch equals 12 feet) the spaceship would be 108 feet long, and at 1/200 scale (1 inch equals 16'8") it would be 150 feet long.