| TECHNIQUE: A step-by-step process |
 |
 |
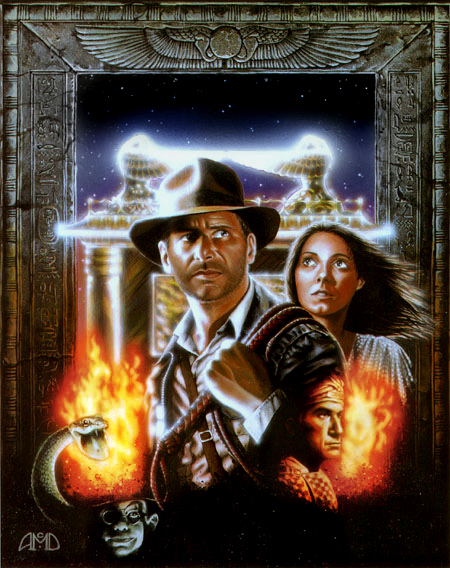
| I wanted to feature a "poster" design similiar to that of Drew Struzan's work for RAIDERS OF THE LOST ARK, but with closeups of the lead characters and a surrounding montage of events from the movie. I sorted through a variety of stills, selecting the two portraits of Ford and Allen that I thought would be perfect! That is, until I decided to change my mind... |
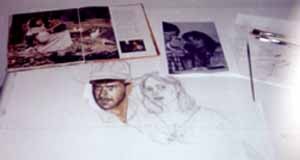
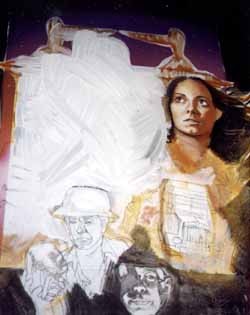
| Above, you can see the original sketch of what I had planned Indy & Marion to look like. Let me say here that every good artist should take their time, plan carefully, and try to have as thorough a sketch of the ENTIRE design as possible... But I'm not that good an artist. I instead insisted on doing the closeup portraits FIRST, under the impression that everything would go great as I went along. Oh well. For Marion, I sketched out and started to paint an alternate pose, but realized early on that I didn't like it, and I opted for another photo reference. |
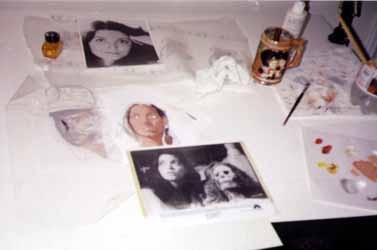 |
| Above you can see the early preparations for Marion as she appeared in the final painting. I covered the earlier painting with gesso, sketched in the new face, and placed over a basic coat of acrylic color. From there, I refine the portrait with more paint as well as colored pencil, layer after layer. (At this point, I was still set on using the old pose of Indy as shown...) |
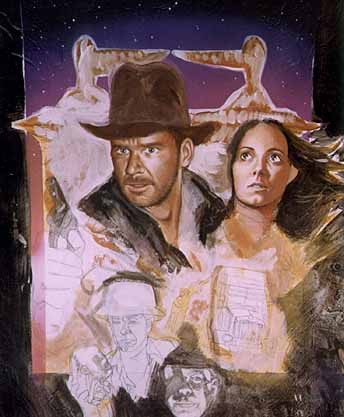 |
| And now the work began to take its completed form. A black border was painted around the characters, as I wanted to incorporate an ancient-Egyptian style "frame". The background sky was airbrushed in. For the smaller montage of characters, you can see that the original idea here, too, differed from the final product: Belloq is in a different pose, Toht has the same pose but is in a different position, and there was the inclusion of an image from the truck chase. The "Ark" in the background was loosely brushed in, so I could have an idea as to how the color balance would look in relation to the characters. But at this point, halfway into the painting, I admitted to myself how much I hated Indy's pose. I tried to revise it over and over, but realized that the only way to get it right was to start over, from scratch... |
 |
 |
 |
| Some people have asked me HOW I do my work. For the illustration at right, I'll coin the punchline Harrison Ford used so well in RAIDERS: "I don't know, I'm making it up as I go..." That was a literal truth with this painting, made over the course of about three years. And so, I thought it'd be fun to show you the various stages that this painting went through before it's completion. |
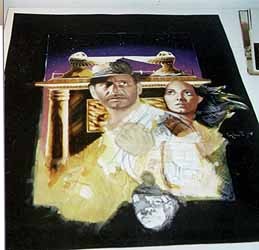
| Here was the paintful process: covering all the work I had done on Indy's mug with a layer of gesso. The gesso was sanded, and the new pose was sketched in. Yet while I liked it much more, it caused another dilemma: it conflicted with the smaller "montage" characters and scenes on the bottom. They, too, therefore needed to be re-done. |
| Easily the hardest part of the painting for me was the Ark. I spent a good month on it. Getting the lighting and color right prior to airbrushing drove me half mad. |
| I really wanted to keep the truck chase image, but it proved problematic in relation to Indy's jacket. I started out on the border "frame" by using a toothbrush to "flick" on specs of color for implying stonework. I had also originally planned to include montage elements on the TOP part of the frame (including a transparent plane flying over the "red line/world map"), but as the border design became more and more detailed, I decided not to overdo it. |
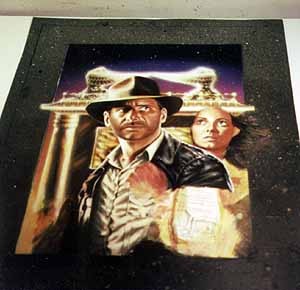
| If you click here to see the final image,, you'll see how I added dramatic flames. This was NOT my original idea, either, but I felt that it would be the best way to "marry" the montage elements together. I also wanted to inject more color -- reds and yellows. This also required my adding red and yellow highlights to the "stone carvings" on the frame for a 3-D effect. (One person saw the image on the internet asked me, "Where did you buy the frame?" So I guess it turned out alright.) |
| Return to www.ADAMMcDANIEL.com |