Do-It-Yourself
Computer Upgrade #1.
Adding
more Memory.
Once upon a time when a computer reached two of
three years of age, it was well past its performance life span and destined for
the spare-parts shelf or the kids room.
Once computing power began to grow this was no longer the case, far too
much emphasis is placed upon the speed of the computers CPU and in reality
computer with a CPU greater than 333Mhz is still capable of running modern
applications with a little work and very few dollars.
Adding a
larger hard drive, a sound card, a bigger video card for high speed gaming or
more RAM (random access memory) is not hard and well within the reach of the
average DIY person.
An office
user may want more speed while multitasking, a gamer better graphics and a
lover of fine music better audio and storage space for all the MP3’s that they
have found on the net. All of this can
be yours with a few simplistic upgrades.
In this article we will focus on undertaking a RAM upgrade.
By far the
most important upgrade and one of the less expensive is to upgrade your RAM,
the short term memory of the computer.
If your computer is less than 128 megabytes then this is where you
start. So, how do I know how much RAM
is in a computer: there are two ways, you can either watch the RAM test when
you first turn the computer on or you can open Notepad and then open Help and
then About and you will see the total of RAM available to you and the system
resources (CPU) that are free.
So, you
have less than 128Mb, now this is the first upgrade step. You must now open the computer case, and this
is in most situations a matter of undoing four too six screws. Once the case is open seek out your RAM, you
will find pictures of the two main RAM types in the body of this article, this
should help you locate them, but RAM is usually found in one of two locations,
it is either to the right hand side of the case or the front of the case, if
the case is laying flat and the front of the case is facing you.
If you
have the older style 72 pin SIMM RAM you may want to think twice about the
upgrade costs, 72 pin RAM is expensive, very expensive, like around $190 for
64Mb and you will need two modules, for that price you can buy a far newer
second hand machine or be well on the way to a brand new one. Bear in mind at all times that a brand new
machine only costs $1400 with the latest operating system and in basic
trim. While a 72 pin RAM powered
machine is costly to upgrade with new RAM, second hand RAM is available. All
old 486 grade computers use the costly 72 pin RAM. Many older Pentium grade
machines run 72 pin RAM, and have an empty DIMM RAM (168 pin) slot next to the
72’s. The reason why the black 168 pin
slot was not used originally was cost, back then 72 pin, while costly was still
cheaper; today this is far from the situation and we use only the 168 pin
slots.
You find
that your Pentium grade machine has 168 pin DIMM RAM slots you smile and say
YES, this upgrade will be very affordable.
128Mb of
DIMM RAM sells for under $50.oo and 256Mb DIMMs for around $90.oo. This places monster power in the budget.
If you are
replacing slower, older RAM with new RAM it pays to remove the old RAM totally
and just use the new RAM, the DIMM RAM of today works at PC133 speeds and the
older style RAM is much slower at as slow as 72 speed.
Now the
confusing bit, yes, you thought it was all too easy, with the older SIMM type
RAM, the 72 pin style, there are different types and you should not mix and
match the types, to name but two types there is EDO and Fast Page, look at your
current RAM and buy the same type. For
most applications EDO is better, but some old motherboards do not support it.
There are five basic steps involved when installing RAM.
1.
Open the case.
2.
Get grounded.
Use an antistatic wrist strap (available from Dick Smiths Rockingham) or
at the very least, touch the frame of the computer while it is plugged into the
wall with the power switch turned OFF.
Then unplug the power lead from the case.
3.
Pick up the RAM modules. Always hold RAM modules by their edges. Avoid touching the flat surfaces or the
contacts along the bottom edge. Static
kills computers quicker than anything else.
4.
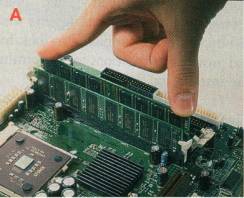
Insert it.
For DIMMs, (Picture A) lower the module into the slot and press
carefully the module should seat its self, and the clips on each end of the RAM
should click into place. If they don’t,
then the DIMM is not seated correctly.
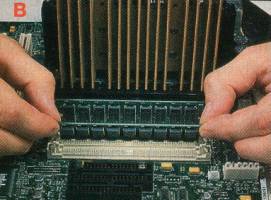
For SIMMs, (Picture B) line the
module up to match the others in the system, insert the module at a 45o
and stand upright, if you have done this right two little clips should hold the
RAM in place. Both DIMMs and SIMMs are
keyed to only go in one way, so pay attention to the way around that you have
them.
5.
The moment of truth. Power up the system and watch the RAM test count down, watch for
error messages. If all the memory is
detected and you do not have any error messages then you have done this right..
Usually
when RAM is added to a computer the owner is so impressed with the speed
difference that they speak about little else for the next week. If upgrading a machine with 32Mb of RAM to
one with 128Mb of RAM the change is staggering.
Upgrading
a systems memory is the singular greatest performance improvement that you can
undertake and for around $50.oo this has never been more achievable.
If the
thought of opening your computer case is daunting to you, or you would like a
professional to show you how it is done this time, so that you can do it next
time yourself, you will find that professional rates for a task like this range
from $30.oo to $65.oo. This is however,
especially with DIMMs a task you are well advised to try as a DIY project. Its really is not hard as long as you
remember to guard against static.
Written by Chris J. Bartle