 |
Making Japanese Garden Lanterns from ConcretePart II - Making Moldsby Herbert Thornton |
| Molds for Circular Roofs |
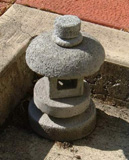 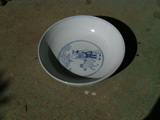 |
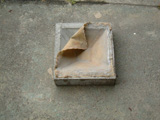
A mold for circular roof - like the one in the picture of the mini lantern - is not difficult to find. To make the mini lantern (top left) I used an inexpensive Chinese-made bowl that seemed to me to have exactly the right shape - (bottom left). Department stores sell all sorts of plastic and aluminum bowls and sometimes one of these turns out to have a shape that appeals to you. Chinese woks sometimes have a suitable shape. The mini-lantern shown in the picture stands about 1 foot high and took a small bucket of concrete. Whatever your mold is made of it is better to coat the inside of it with a parting medium before you put the concrete mix into it: otherwise, when the concrete sets it will attach itself to the bowl and if the bowl is a pottery one like the one in the picture, you will not get the casting out without breaking the bowl. The best thing I have found for making a parting medium is liquid latex. Paint several layers of the liquid latex on the inside of the mold - the more the better - letting each layer dry before you put the next one on. |
| Molds for angular roofs for Oribe-style lanterns. | ||
|
Making a mold for the roof and platform of an Oribe type lantern is a bit more difficult because flat surfaces are involved, and you need to get all the angles correct and the whole thing must be symmetrical. Also, if you are going to make an Oribe lantern you will probably want to make it considerably bigger than the mini-lantern, and you need to think about the weight. The Oribe lantern shown in the pictures stands nearly 4 feet high and the pedestal goes down about 18 inches or more into the ground. The roof alone took more than one whole bag of concrete topping mix. |
|
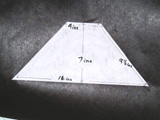
You need, first, to make a template. Make the template out of four pieces of plywood or stiff metal, each shaped like the diagram. Each of these pieces is the same shape as a face of the roof of the Oribe lantern pictured standing in my garden. (I took the measurements shown from that lantern: people who understand geometry better than I do may detect that the 7 inch measurement cannot have been 100% accurate, but the important thing is to make sure that your pieces are symmetrical.) Fasten all four pieces firmly together so that they have the shape of a pyramid with its top cut off. Upend the pyramid and when you feel confident about it staying square and symmetrical, fill it with concrete mix. |
 |
|
The most difficult part is ensuring that the pyramid holds together, is quite square, sits level, and keeps its symmetry. One way that may work for you is to sit the upended pyramid in a sandbox of dampened sand. However, you are on your own on this one and if you come up with a simpler and easier method I shall be eager to learn about it! Leave the concrete to set for at least three days. When it has set hard, stand it the right way up - i.e. the way a pyramid normally sits - and paint the entire top with several coats of liquid latex. When these have dried, you are ready to make the mold. |
|
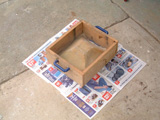
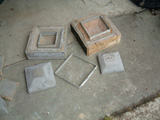
Make a four-sided container from wood or plywood, big enough to hold the pyramid with room to spare at the sides and deeper than the pyramid is high. The container need not have a bottom - only sides. Stand the container on a flat surface, on several layers of newspaper to prevent the concrete sticking to the flat surface. Sit the pyramid, right way up, in the container as in the picture. Fill the container with concrete mix, at least an inch higher than the pyramid and leave it to set for at least three days. When it has set, remove the template: it will fall out of the mold quite easily because of the latex parting medium. You have now made a mold in which you can cast both a lantern roof and a platform for the light box. You probably now no longer need the template, but you may find that you can still use its latex jacket as the parting medium for your new mold. A picture of a couple of molds made in this way is attached. To use the mold, you will need, before putting concrete mix into it, to sit four pieces of 1 � inch steel or aluminum bar in it to get the size of roof (or platform) that you want. The pieces of bar will sit upright in the mold quite satisfactorily by their own weight if they are held together by adhesive strapping tape. Take care that they sit level or the roof will be formed in an unbalanced shape. See the attached picture. |
|
| Molds for light boxes | ||
|
Some pictures of a typical mold for a light box are attached. Refer to them as you read the following description. The notes refer to plywood, but particle board also works quite well. | ||||
 |
 |
|||
|
Decide the outside dimensions of the light box you want you want, and make a plywood box of the same dimensions on its inside. Make the plywood box without a lid. Use � inch or thicker plywood or particle board, and cut it as accurately as you can. You can hold it together with screws, but if it is cut accurately you can use clamps. These make it easier to take apart after your concrete has set. The light box is cast face down. This means that the front of the light box is formed at the bottom of the plywood box. To give the front face of the light box some decoration, cut a piece of 3/8 inch thick rubber, smaller than the bottom of the plywood box, but bigger than the large insert mentioned below. Light boxes usually have a main window and passageway, running from front to back. (When you are casting the light box, the mold is, as mentioned, positioned so that the light box is formed face downwards.) To form this passageway, make an insert the size of the main window and passageway. You position this insert in the mold so that the concrete will harden around it. Make sure the insert is held centrally in the mold and make sure that you will be able to withdraw the insert after the concrete has hardened. See below for some tips. The insert for the main window and passageway can be made from various things. Depending on the size of light box you are making, a couple of pieces of 2 x 4 wood, taped side by side may suit. Or you can make it from a few layers of plywood. Yet another way is to use a waxed cardboard milk carton, (if the shape suits) filled with sand or earth to help it stay in position when you put the concrete in the mold. If you use an insert made from wood, wrap several layers - at least 10 - of newspaper round the insert and tape them in place. The newspaper makes a good parting medium. While the concrete is hardening, the newspaper gets damp, and you will later be able to (gently - remember the concrete is not yet at its full strength) tap the insert out from the mold after the concrete has hardened somewhat. If you want a round window, a cardboard tube like the ones that some bottles of scotch whisky or other products are packed in would work. I repeat, these inserts should be centered very carefully. If you are using an insert made of wood, you can, to make sure the centering is preserved, insert a small hanger bolt in the end of it. Drill a hole in the bottom of the mold so that the hanger bolt can pass through it and be secured by a nut. Also cut a hole in the center of the piece of rubber referred to above so that the hanger bolt can pass through it as well. Light boxes also usually have side openings. To form these, cut circular holes in the center of two sides of the plywood box. Into these holes, insert a couple of dowels, or bits of an old broom handle or pipe of some sort into these two holes but, as you did if you used a wooden insert for the main window, first wrap the dowels in several layers of newspaper fastened in position with adhesive tape so that you can withdraw them from the mold easily after the concrete has set. Insert the newspaper-covered dowels in the holes at the side and snug them up against the main insert. When all this is assembled, fill the mold with concrete mix. Use a trowel. Put in a bit of concrete mix at a time, and keep tamping it down to make sure all the cavities are filled. As to how long you then leave it, see the section about concrete mixing and finishing. I have found no need to coat the plywood surfaces inside this sort of mold with anything, but it might last longer if coated with wax or painted. |
|
Molds for the pillar of an Oribe style lantern |
|
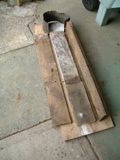
The quick and easy way is to cast a pillar is to use a cardboard concrete-casting cylinder that building supply stores sell, and to insert a metal rod inside it for strength. However, I personally prefer a pillar with flat sides and partly circular top like the one in the picture. I made a mold for this pillar of this sort mostly from plywood. For the partly circular top part I had a piece of sheet metal cut which I bent into shape. This mold was destroyed long ago, so regrettably I have no picture of the original mold. I have put together a sort of mock-up that looks a bit like the original mold to give some idea of how it was put together. |
 |
| Molds for other lantern parts |
|
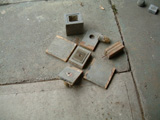
These other parts are usually shaped either like disks or squares (if the lantern is one that sits low on the ground) or, (in the case of topknots for lanterns) are shaped like cylinders with the edges well rounded by rubbing before the concrete has set. For disks, a section of cardboard casting cylinder, mentioned above, works well. For lantern topknots, there are many things you can use as molds: lots of things come in cylinder-shaped cardboard containers of various sizes and these can be used as molds. Another way is to fill a tray with concrete to the thickness you want, leave it for a while to set up enough that it won't slump, and then use an empty can as a sort of cookie cutter. I cast the square lower part of the topknot of my Oribe lantern in the bottom of an ordinary waxed cardboard milk carton with the sides shored up by some bricks to prevent it bulging. |
