Best printed with .75" borders
After cutting
out your pieces you'll go on to
Step One: The Basic Box
 |
This step just entails
putting together the back, sides, top, and bottom, then inserting
the metal tracks for the divider. As with the entire project, screw
holes MUST BE PRE-DRILLED. Finish all exposed cut edges with iron-on melamine tape and caulk the interior seams. |
Here's what it will look like after completing
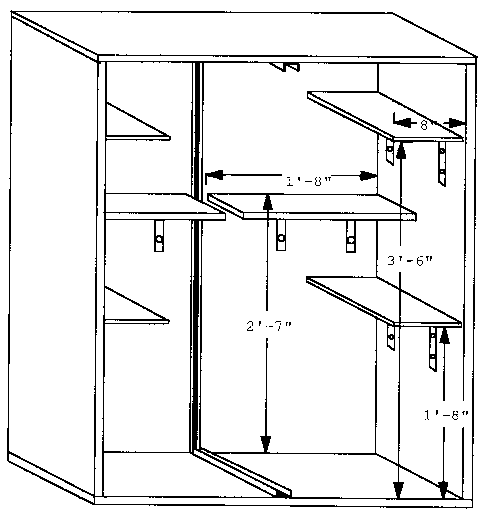
Step Two: The Shelves
 |
|
The shelves
can actually be added at any time following Step One, but now is
as good a time as any. It is easiest to first put the shelf brackets
onto the shelves with pan head screws (be sure to do it against
a very flat surface), then put them into the cage (again with pan
head screws). Don't forget to pre-drill those screw holes! Apply
metal edging to the shelves to prevent chewing. Caulk the top seams.
|
Step Three: The Center Divider Guide
| All you need to do to complete this step is to insert the guide for the center divider. This CANNOT (at least in our experience) be done with the melamine coated pressboard. This piece is too fragile once the center is cut out, so you need 3/4" plywood. Cut out the center slit first with a circular saw then finish the corners with a jigsaw. We put on the iron-on edging along the outside edges of the front just for aesthetics. Do I need to remind you to pre-drill the screw holes at the top and bottom to install this section? | 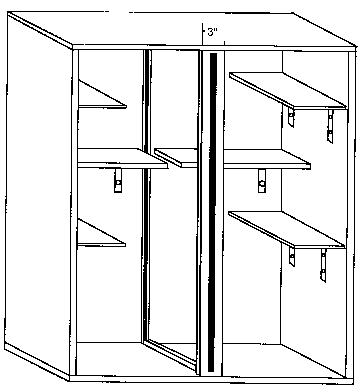 |
Step Four: The Lower Front Panels
|
Drive screws outward (both directions) from insides of windows and also upward from bottom of cage to attach these panels to the frame. |
Putting in the lower front panels will give the cage an almost finished look. To cut the opening out of the solid piece we once again used a circular saw first then finished the corners with a jigsaw. You will need to finish the inside cut edges with melamine tape prior to inserting the plexiglass. Cut and predrill the plexiglass carefully then attach to the inside with pan-head screws. Now, caulk these interior seams. |

Step Five: The Doors

After adding these doors you're ready to add some chinchillas (or perhaps sugar gliders or some other happy critter). The door frame is pieced rather then solid like the lower portion. We had the most trouble here as these small pieces tend to split easily. PRE-DRILL CAREFULLY! A drill press or drill guide is a big help here. Once you have the frame pieced together you'll need to finish the edges with melamine tape then attach the wire mesh. The wire mesh will not only keep the animals in but will provide stability to the door frame. Just stapling the mesh on is okay but you may want to use brackets for extra stability for the door. The doors are attached with 1 ½" hinges and hook and eye closures. |
Center Divider as shown on the cut-outs page and add some critters.!