| KRUSTY KRAB PROJECTS (Page 2) |
| Wiring System |
| When I accepted the boat from the previous owner, there was a foot of water standing throughout. Because of that, there was a good deal of damage/corrosion to the wiring system. I replaced it all. As near as I can tell, the boat was designed with two distinct and separate systems, one for shore power and one for underway. The two systems do not come together in any type of master switch, etc. |
| Back to Coronado Home page: |
| On to more projects: |
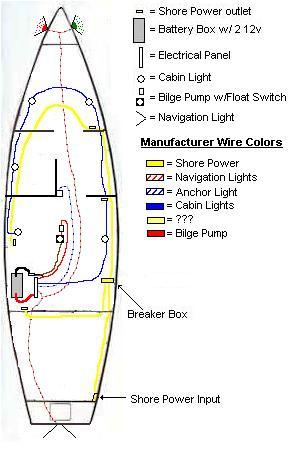 |
| First, shore power. It was relatively easy. I removed all of the old outlets and steel/rusty outlet boxes. Then, pulled out the old wiring (yellow on the diagram).. I traced the wire back underneath the quarter berth on the starboard side and discovered a breaker box. VERY nice! I also found another wire running off to the battery compartment on the port side. Apparently, it was used for a battery charger while dockside. The inlet assembly was mounted inside the cockpit further back to starboard. Once all that was removed, I went to Lowes and bought all new fixtures and utility wire. They sell all of the 30amp wiring, etc you'll need except the 30 amp input which I bought from West Marine. Hints: Buy good wiring and good grounded outlets. Use plastic outlet boxes, not steel. After that, it's simply a matter of re-running the wire and attaching. Black to black, white to white, green to green). |
| What I call the "underway" wiring was a bit more complex. There were a ton of old wires running in all directions. Some of it was moulded into the fiberglass. Some of it ran through the bilge. The wire colors noted in the picture are as close to the manufacturer's colors as I could guess. I used the same. The only exception was that I also used green for my cockpit instruments (i.e. the VHF radio, compass light, and depth guage). Those items are not icluded on the diagram as I added them (along with a trickle battery charger) later. I started this project with two NEW deep cycle marine batteries, hooked in parallel. I ran the positive (red) wire to the new control panel and ran the negative (black) wire to a grounding "bus" where all of the individual wires could be grounded together. I was surprised to find that the cabin lights were hooked in series. That wire ran through the fiberglass up the starboard side and back down the port. I bought new lights from West Marine. Luckily, once I installed them, all but the last light in the series worked. I had to replace wiring from the head to above the dinette table on the port side, but did not have to remove all the wiring. Phew! I wanted to drill as few holes as possible. Another wire that ran through fiberglass the length of the boat was the one for the bow running/navigation lights. Since it was in the top of the cabin, much of that wire was intact. Again, I replaced all of the light fixtures. After replacing a few feet of wire for the stern light, I was in business. One word of caution (learn from my mistake), the bow lights are in the forward anchor locker. Make sure that the wires are secured to the fiberglass. You don't want the anchor rode snagging on the wires later and pulling them out. The bilge pump was easy! The last item, and hardest for me, was the anchor lights on the mast. The old wires disappeared into the fiberglass and I haven't found where they come out. The previous owner ran new wire through the bilge, but the lights don't work. Actually, I'm still tracing that one. For the time being, I'm just hanging a lamp from the boom. |
| Page 3: |
| Page 4: |
| Future Use |
| Future Use |