The original seatbelt configuration is a bone of contention with just about every 510 owner and driver. Unless you're 6'9" the shoulder belt comes across your neck, instead of your shoulder and chest - the way it's supposed to.Ā
There are alternatives out there if you can get them.Ā The first generation 200SX (77-79) have a set up that bolts into the 510 and uses a hanging loop that puts the shoulder belt at the right, non-strangling, height.Ā However, those cars are harder to find in wrecking yards and the belts are color matched
to interior, so when you do find one, the belts are maroon!Ā Further, if you have wide seat bases from other than stock seats, that may not work due to bracket/seat interference.Ā
Originally, I tried using the set of hangers from an 80s model Toyota.Ā These are hard plastic covered belt loop drops that bolt to the original hole up on the roof.Ā Although theĀ hanger sits at the right level, I felt it was too close to my temple in the event of a side impact.Ā
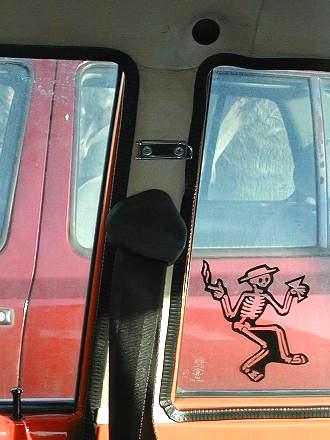
Notice where the belt used to bolt up. I took a 3/8" plastic hole plug from a hardware store and pressed it in place.
Then I tried the retractable belts from a 710 model
car, but the retracting unit was also too big to be sitting next to my soft, squishy mellon on
the relocated spot on the pillar.Ā
What I settled with was the 710 belt with the shoulder
removed from the retractor.Ā Then I used the original 510 chrome shoulder
hoop/lock hanger thingy and bolted it to the new found spot on the pillar.
Below is a rough draft conceptualization of how I
relocated the mounting point from the roof to the pillar.
-----------------
First you'll need to peel back the vinyl from the
pillar.Ā You can do this carefully by peeling the windlace from the door
and vent window and then work the vinyl away from the sheetmetal.Ā It is
glued to the thin layer of foam so take your time.Ā Once you have done this
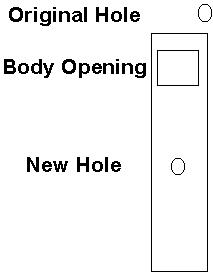
you'll see the opening in the body like below.Ā Figure out where you will
want the new locating hole, based off of your seat configuration and
height.Ā I dropped mine about 8 inches, but that's based off my lowered seat and my 5'10" frame. (no coincidence on my height)
Ā
This picture depicts the
relationship of the original mounting point with the door pillar, and the
location of the new mounting point.Ā You can see the large opening at the
top of the pillar which will allow you to drop the fastener in.
Ā
Ā
Ā
Ā
Ā
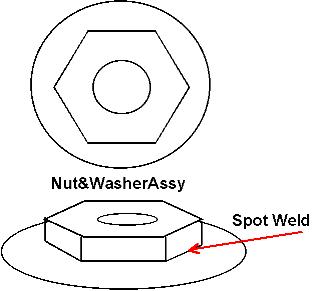
This is a side view of the nut and washer
combination.Ā The red arrows indicate where you will need to spot weld the
two together prior to installation.Ā The ones below are obvious.
Ā
Ā
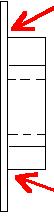
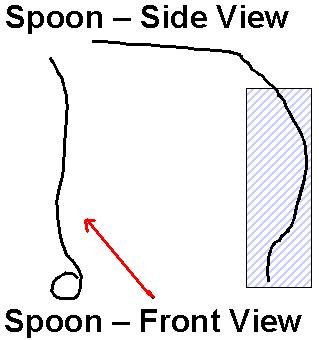
Finally,
the king of all McGyverisms - the insertion tool.Ā You could make this out
of coat hanger, but it may be too pliable.Ā I used heavy gauge piano wire
that had more spring to it.Ā This allowed me to hang on to the nut combo as
I dropped it into the pillar without losing it.Ā The side view depicts how
the spoon needs to be dropped down the pillar from the inside of the car.
As with everything you do to your car,
patience is paramount.Ā Have an extra nut combo, in case you lose one down
the pillar.Ā
Ā
Let me know if you have any further questions about this modification.
 Finally,
the king of all McGyverisms - the insertion tool.Ā You could make this out
of coat hanger, but it may be too pliable.Ā I used heavy gauge piano wire
that had more spring to it.Ā This allowed me to hang on to the nut combo as
I dropped it into the pillar without losing it.Ā The side view depicts how
the spoon needs to be dropped down the pillar from the inside of the car.
Finally,
the king of all McGyverisms - the insertion tool.Ā You could make this out
of coat hanger, but it may be too pliable.Ā I used heavy gauge piano wire
that had more spring to it.Ā This allowed me to hang on to the nut combo as
I dropped it into the pillar without losing it.Ā The side view depicts how
the spoon needs to be dropped down the pillar from the inside of the car.