![]()
Bearghan
Copyright 2004 Pat Liles
Instructions tested and typed by Chris Simon
H hook or size needed for gauge.
Eyes (make 2):
With black, ch 4, join with sl st to form ring.
Rnd 1: Ch 3, 11 dc in ring. Finish off.
Rnd 2: Join white with sl st in any st. Ch 3, dc in same st. 2 dc in each st around. Join with sl st to beginning ch 3. Cut yarn, leaving 2 foot tail for sewing later. Do not weave ends yet.
Nose:
Row 1: With black, leaving long starting tail - about 3 feet - for sewing later, ch 3, sc in 3rd ch from hook.
Row 2: Ch 2, turn. 2 dc in same st. 2 dc in next st.
Row 3: Ch 2, turn. Dc in same st. Dc in next 4 sts. 2 dc in last st.
Row 4: Ch 2, turn. Dc in same st. Dc in next 6 sts. 2 dc in last st. Cut yarn, leaving 3 foot tail for sewing later. Do not weave ends yet.
Muzzle:
Special stitch: long dc - when making dc, draw up stitch about 50% taller than usual. The long dcs will cause the muzzle to be oval rather than round.
With muzzle color, ch 3, join with sl st to form ring.
Rnd 1: Ch 3, 11 dc in ring. Join with sl st in beginning ch 3.
Rnd 2: Ch 3, dc in same st. 2 dc in next dc. 3 long dc in next st. 2 dc in each of next 2 sts. 3 dc in next st. 2 dc in each of next 2 sts. 3 long dc in next st. 2 dc in each of next 3 sts. Join with sl st in beginning ch 3. (27 sts)
Rnd 3: Ch 3, dc in each of next 5 sts, 2 dc in next st, 3 long dc in next st, 2 dc in next st, dc in each of next 8 sts, 2 dc in next st, 3 long dc in next st, 2 dc in next st, dc in each of next 7 sts. Join with sl st to beginning ch 3. (35 sts)
Rnd 4: Ch 1, sc in same st. Sc in next 11 st. Holding top edge of nose together with top edge of muzzle, sc through both pieces in next 10 sts. Sc in muzzle only in next 13 sts. (35 sts) Join with sl st to beginning sc. Cut yarn, leaving a 3 foot tail for sewing later. Do not weave ends yet.
After joining top of nose to muzzle:
Using long tail from top edge of nose, sew down side of nose, tacking nose to muzzle, with tip of the nose at the center of the muzzle. Stitch up the other side of the nose. Finish off.
Using long tail from tip of nose, sew a mouth for the bear. You can use a running stitch straight down from tip of nose for two rows, then left along the curve between rounds 2 and 3 of muzzle for half of bear's smile. Reverse direction and fill in the gaps back to the center of mouth, then go right and back to center to complete smile, then straight up to tip of nose again. Finish off.
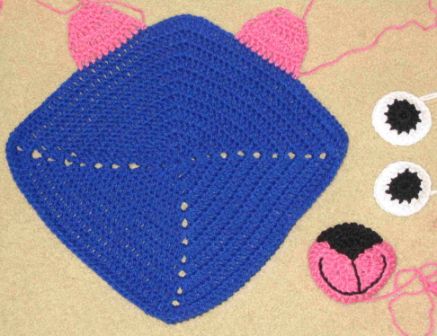
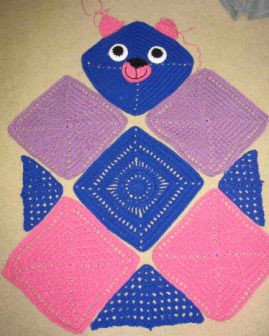
Head:
This is an asymmetric granny square. It's made in a slightly unusual way to make one corner less pointed for top of the bear's head.
Rnd 1: Make ring around finger with yarn. Working in ring, ch 3, 2 dc, ch 1, (3 dc, ch 1) 3 times. Join with sl st to beginning ch 3.
Rnd 2: Sl st in next 2 st, sl st in corner ch 1 sp. (Ch 3, dc, ch 2, 2 dc) in same sp. Dc in next 3 sts, (2 dc, ch 2, 2 dc) in corner sp 2 times. Dc in next 3 st, 3 dc in corner sp, dc in next 3 sts. Join with sl st in beginning ch 3.
Rnd 3: Sl st in next st, sl st into corner. (Ch 5, dc) in same sp. (Dc in next 7 st, (dc, ch 2, dc) in corner sp) 2 times. Dc in next 3 sts, 2 dc in next st, dc in next 2 sts, 3 dc in next st (corner), dc in next 2 sts, 2 dc in next st, dc in next 3 sts. Join with sl st in beginning ch 3.
Rnd 4: Sl st into corner. (Ch 3, dc, ch 2, 2 dc) in same sp. (Dc in next 9 sts, (2 dc, ch 2, 2 dc) in corner) 2 times. Dc in next 9 sts, 3 dc in next st (corner), dc in next 9 sts. Join with sl st in beginning ch 3.
Rnd 5: Sl st in next st, sl st into corner. (Ch 3, dc, ch 2, 2 dc) in same sp. (Dc in next 13 sts, (2 dc, ch 2, 2 dc) in corner) 2 times. Dc in next 12 sts, 3 dc in next st (corner), dc in next 12 sts. Join with sl st in beginning ch 3.
Rnd 6: Sl st in next st, sl st into corner. (Ch 3, dc, ch 2, 2 dc) in same sp. (Dc in next 17 sts, (2 dc, ch 2, 2 dc) in corner) 2 times. Dc in next 15 sts, 3 dc in next st (corner), dc in next 15 sts. Join with sl st in beginning ch 3.
Rnd 7: Sl st in next st, sl st into corner. (Ch 5, dc) in same corner. (Dc in next 21 sts, (dc, ch 2, dc) in corner) 2 times. Dc in next 18 sts, 3 dc in next st (corner), dc in next 18 sts. Join with sl st in beginning ch 3.
Rnd 8: Sl st into corner. (Ch 3, dc, ch 2, 2 dc) in same sp. (Dc in next 23 sts, (2 dc, ch 2, 2 dc) in corner) 2 times. Dc in next 21 sts, 3 dc in next st (corner), dc in next 21 sts. Join with sl st in beginning ch 3.
Rnd 9: Sl st in next st, sl st into corner. (Ch 5, dc) in same corner. (Dc in next 27 sts, (dc, ch 2, dc) in corner) 2 times. Dc in next 24 sts, 3 dc in next st (corner), dc in next 24 sts. Join with sl st in beginning ch 3.
Rnd 10: Sl st in next st, sl st into corner. (Ch 3, dc, ch 2, 2 dc) in same sp. (Dc in next 29 sts, (2 dc, ch 2, 2 dc) in corner) 2 times. Dc in next 26 sts, 3 dc in next st (corner), dc in next 26 sts. Join with sl st in beginning ch 3.
Rnd 11: Sl st in next st, sl st into corner. (Ch 5, dc) in same corner. (Dc in next 33 sts, (dc, ch 2, dc) in corner) 2 times. Dc in next 27 sts, 3 dc in next st (corner), dc in next 27 sts. Join with sl st in beginning ch 3.
Rnd 12: Sl st into corner. (Ch 3, dc, ch 2, 2 dc) in same sp. (Dc in next 35 sts, (2 dc, ch 2, 2 dc) in corner) 2 times. Dc in next 31 sts, 3 dc in next st (corner), dc in next 31 sts. Join with sl st in beginning ch 3. Finish off.
The two "square" sides of square should measure about 12 inches. If necessary, you may add or delete rows to accomplish this.
Right ear:
Join with sl st in 8th st to the left of top of head.
Row 1: Ch 3, dc in each of next 10 sts. (11 sts)
Row 2: Ch 3, turn. Decrease in same st as ch 3 and next st. Dc in next 3 sts, decrease in next 2 sts. Dc in next 2 sts. Decrease in last 2 sts. (9 sts)
Row 3: Ch 3, turn. Decrease in same st as ch 3 and next st. Dc in next st, decrease in next 2 sts. Dc in next 2 sts. Decrease in last 2 sts. (6 sts)
Row 4: Ch 3, turn. Decrease in next 2 sts, decrease in next 2 sts, decrease in last 2 sts. Finish off. (4 sts)
Left ear:
Join with sl st in 18th st to the right of top of head.
Row 1: Ch 3, dc in each of next 10 sts. (11 sts)
Row 2: Ch 3, turn. Decrease in same st as ch 3 and next st. Dc in next 2 sts, decrease in next 2 sts. Dc in next 3 sts. Decrease in last 2 sts. (9 sts)
Row 3: Ch 3, turn. Decrease in same st as ch 3 and next st. Dc in next 2 sts, decrease in next 2 sts. Dc in next st. Decrease in last 2 sts. (6 sts)
Row 4: Ch 3, turn. Decrease in next 2 sts, decrease in next 2 sts, decrease in last 2 sts. Finish off. (4 sts)
Underarms (make 2):
See here for instructions on making a half granny square. Make as written, completing 6 rows.
Between legs:
Make half granny with 8 rows.
Body:
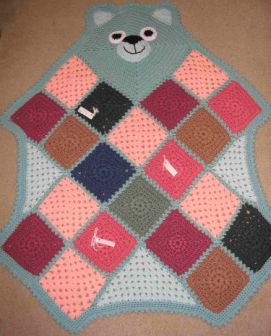
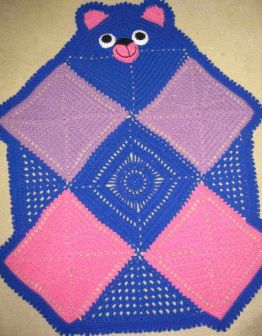
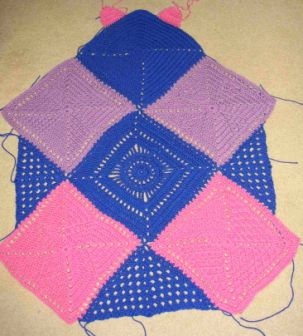
Bearghan body can be made with twenty 6 inch squares or five 12 inch squares.
Assemble squares as shown to form bear's body, arms, legs, and head.
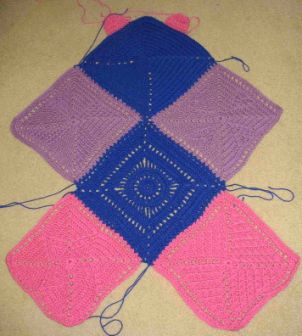
Add half granny squares for underarms and between legs
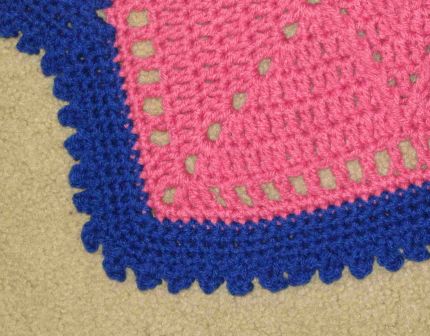
Add edging of your choice to complete bearghan. For this bearghan, I used three rounds of single crochet, plus one round of single crochet alternating with picot stitches. The picot stitches give the bear a nice furry look. Increase and decrease as needed to keep edging smooth around corners.
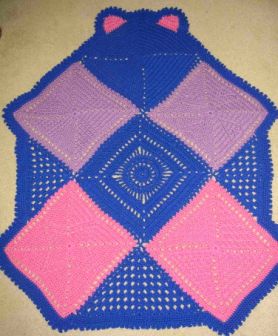
Sew on eyes and muzzle, using photo as a guide. Stuff muzzle lightly with polyfill as you sew it onto the face. Weave in any loose ends.
I have been asked many times by email which square patterns I used in creating this bear, so here's the answer!
right hand - PinwheelWeb page � 1998-2007 Chris Simon - chrissimon(at) verizon (dot) net
This pattern � 2004 Pat Liles - grandyblue (at) amaonline (dot) com
This pattern is intended for charity and personal use only -- neither the pattern nor items made from it are to be sold. You may provide a direct link to this pattern, but may not copy it to your web site. Copyright notice must be attached to pattern when downloaded and printed out. Please email me and let me know if you're linking to this page.
If you choose to make these for yourself or family, please also consider making a Bearghan for charity! Heartmade Blessings loves bearghans!
Want to see more bearghans? Stop by Pat Liles' web page: Bearghan pictures
The basic idea for this bearghan comes from Aunt B. Check out her pattern for a smaller bearghan on her page: Aunt B's web page
Pattern adaptation posted here with permission from Aunt B.
