
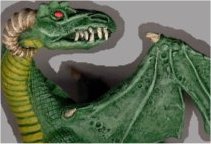
 You
see how the paint used on the high parts of the wing and body has been
lightened with white. and the low areas like the folds of the wing are
painted with a deeper, darker green. So how's it done?
You
see how the paint used on the high parts of the wing and body has been
lightened with white. and the low areas like the folds of the wing are
painted with a deeper, darker green. So how's it done?
Drybrushing
The first tool in the miniature painters toolbox of skills is drybrushing.
The name should give you an indication of what we're talking about here.
It is also important to emphasize here the importance of the paint to this
technique. Acrylic water based paint works the best.
A base color is painted over the area in question then a lighter shade
of the same color is mixed (usually by adding white or yellow to the base
color). The painter then dips the brush in the new color and tries to wipe
almost all of the paint off. This means that the paint dries or partially
dries on the brush. The "almost" dry brush is then stroked over the miniature
so that only the high points are touched. This technique is very tricky
to master. You may have noticed that their are a good many variables in
the method. How much paint on the brush? How thick should the paint
be? How dry should the brush be? When should I use white to lighten the
color and when should I use yellow? Experience is the best teacher here,
but a few common rules are helpful.
First, the drier the paint (on the brush) the more "powdery" the results.
Next, The paint should be of a medium thickness. If it's too thin it will
act as a wash (see below) if it's too thick
it will dry too quickly. Lastly, The less paint you have on the brush (to
a point) the better. remember it's always possible to add more paint but
difficult to take it off.
It should be noted that this skill alone is all that is really required
to paint a good looking miniature. The other tricks we will discuss a really
just icing on the cake.
Washing
The next most important skill you can develop is that of washing. Washing is sort of the reverse of drybrushing. In drybrushing we were trying to accent the high areas of the figure. Washing allows us to tone down the low areas of the miniature to trick the eye into seeing shadows. Games Workshop touts ink as the best material for washing, but don't run out and buy their ink. Some of the colors are great, but most of the basic colors can be found at craft or art stores for allot less. Manufacturers include Windsor & Newton, Pactra, Floquil, and others. I find, however, that the base color paint toned down with black or another dark color works fine for most applications. Mix the color or gather some drops of ink on your mixing surface and add water to make it very thin. Gather a good sopping brush full and apply it to the area. The thinned paint or ink should flow down into the low areas and collect there. You may have to coax it a bit. You may also have to adjust the thickness of the paint when you put it on the figure. Allow it to dry and ta da! instant shadows. This trick works really well to shade leather.
Wetbrushing
Wetbrushing is really drybrushing with a small amount of thinned paint on the brush. It works well for caucasian skin (the hardest color to shade well), but is very tricky to master. Too much paint and it won't work. Too thin and it will act as a wash. Not enough paint and you may end up rubbing the brush over the miniature so many times you wear off the base color. Only experience can teach this trick well.
Glazing
Glazing is simply painting a color (usually a transparent color) over something else. For instance, a jewel can be represented by painting it silver (or if the miniature is metal just buffing the metal surface) and then glazing it with a color of ink (or glass stain). This technique can be used on an entire miniature (see the D1GMT method on the Painting Styles page).
Blending
Blending is, without a doubt, the hardest skill to master. It involves
putting two or more colors directly onto the miniature and blending them
together to achieve the depth your looking for. It is best done in a cold
room, since this retards the drying of the acrylic paint. It works well
for some of the science fiction miniatures that have large curved areas.
Like Space Marines with full body armour.
However, like wetbrushing, this is a technique reserved for experienced
painters.
On to Tools On to Painting Styles Back to Home
e-mail the author: [email protected]