|
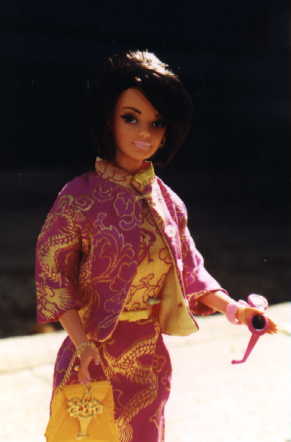
BACKGROUND Background is your canvas. If you want your doll to stand out, don't use a busy background, such as your garden. Finding a suitable background can be difficult, because you need to find a spot with sufficient light, particularly if you are not using a flash, which incidentally, I rarely use. Try to find a background that fits the scale of the doll. Large leaves and bricks and such make your doll appear small. Ideally, most of us prefer pictures in which the doll looks like she could be our size. Setting up a board, or my favorite, a Chinese screen outside gives you a sufficient light, but not a lot of distraction. You can tack fabric or nice paper (matte finish to avoid glare) to the board or screen. Obviously, you can't always go outside to take your pictures because of the weather or various other reasons. You can set up your own miniature photography studio. I use a Chinese screen (alone or covered with fabric), a high stool on which to put the doll, and a spot light or two. I set my studio up in front of a window to allow as much natural light as possible. If you are finding you can't get enough light, use a pale colored fabric to cover your background, and it will enhance your light. Blue tends to be a nice background color to accentuate most dolls.
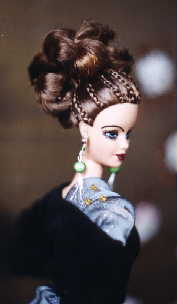
Also, keep in mind that dark colors may blend too much with the dolls hair. This is one of my favorite photos because I like the shadow with underlighting effect, but you can't see the doll's hair because the background is too dark. Remember, if you want to keep the background out of focus, go to a lower F-stop to get a shorter range of focus.
LIGHTING Good lighting is the most tedious and frustrating part of the photography process, but when you get a good result, you will be thrilled at how professional your picture will look. I mentioned before that I rarely use a flash. Flashes are intended for snapshots and for objects that are usually at least 6-8 feet away. When you are only a few inches from your subject, it washes out the light colors. When I don't have enough light, I move my makeshift studio, or I wait until another day. If you do use a flash, it's imperative that your flash can be diverted away from the doll. Swivel the flash so that it faces 90 degrees away from your doll. You can use a white poster board off to the side of your studio off which the light from your flash can bounce. Natural light is by far the best for enhancing colors and reducing shadows. However, bright sun may actually be too much light. Bright overcast days are ideal for photographing your dolls. Note the difference between these two photos of the same doll. They were each taken in exactly the same spot on my porch with the same Chinese screen as a background, but one day was sunny and the other day was overcast. Pictures taken on a sunny day will give much higher contrast and may wash out details, just like a flash. Also note how much more focused the background is in the sunny picture because of the long range of focus from using a small aperture.
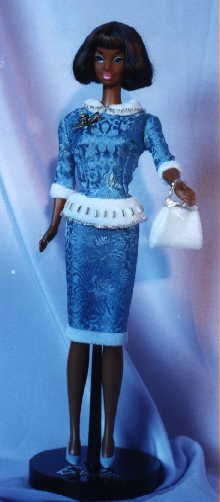
If you can't go outside, or it's too dark to use natural light, you can achieve sufficient light by using spotlights that screw into a standard light socket (like a desk lamp!). Normal light bulbs, unless very high watts, don't provide enough light. Spotlights are not very expensive. I would recommend at least 60 watt bulbs. If you can find "full spectrum" bulbs, they are even better. These can be found at gardener supply stores or at pet stores that sell reptile supplies. Most light bulbs give off very yellow light. You may not be able to tell with your eye, but you can definitely tell in your photo, when everything is yellow. You can partly overcome this effect by using a blue background. Full spectrum bulbs have a little more blue spectrum than regular bulbs. If you use one spotlight, keep watch on the shadows on the dolls face from her hair, or her rooted eyelashes, or her nose, or even your head getting in the way! Two spots can help and you can move them around for artistic effects. You can also experiment with different color bulbs, which will wash the entire photo in a different hue. Try red. It is very interesting. Also keep in mind that light also reflects from your background onto the doll. Look how the bluish background made the whole picture blue.
The last, and most important, part of the lighting is remembering to keep adjusting your F-stop and shutter speed if needed. Remember that with light alone you can accentuate parts of your doll and minimize other parts. You can drastically change the background of your photo by adjusting your range of focus, which is essentially a lighting adjustment. You can even try overexposing the picture a little. In this photo, I adjusted the camera so that there was actually too much light, which gave a very ethereal high contrast image.
That's it! Load up your camera, and you're off. Experiment with backgrounds, colors, and poses. Most importantly, don't be afraid of your camera. Use it as your tool, as an extension of your doll artistry!
Barbie® is a registered trademark of Mattel®, Inc. Gene® is a registered trademark of Mel Odom and Ashton Drake. Candi® is a registered trademark of Hamilton Designs. Tyler Wentworth® is a registered trademark of the Robert Tonner Doll Company. Any other dolls mentioned are registered trademarks of their respective owners. This website and those who maintain it are in no way affiliated with the any above mentioned parties. The images of the dolls displayed are photos taken by the author(s) of the article and/or the designer featured. Please do not remove pictures and/or text from this website without permission of the webmaster and/or the photographer. |