|
Mark the halfway point of that long body strip on both edges. This is the shoulder line. Right side to right side, sew the 1/4" (0.625 cm) back seam from this to the hem, and press it open. If you like, press under the raw edges of the seam and blindstitch them to the kimono body to prevent ravelling. Unless otherwise noted, all seams are assumed to have a 1/4" (0.625 cm) seam allowance.
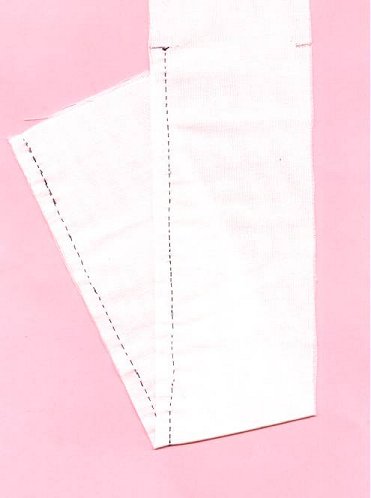
From the center back seam at the shoulder line, mark a line out 1/2" (1.25 cm). At right angles, down the front, draw a line for 1/4" (.0625 cm). Get out your protractor and draw a line from the last point to the center front edge at 30 degrees to the line or the front edge. Cut along this mark.
Some of you will cleverly try to save yourself a step here and say, "I'll just cut them in one with the body. Shoot, in the girl kimono it doesn't add a bit to the tan width." What it *does* add is a seam and a big seam allowance, which is stiffer than unseamed fabric. Try it the other way if you must, but I make no warranties for how your important front lower edge hangs. (At least for Barbie� and Skipper�. On Kelly�, no matter. Stacie�? Your call. You can probably skip it for Dawn�, but it gets very important on Gene�.) Do you need to match patterns? Take a paper mockup of the extension. Lay it down next to the left front of the body so that the pattern is close, matching the bottoms, and sketch in the pattern at the edge. Do the same on the right, using the other side of the paper. Use these to match and cut.
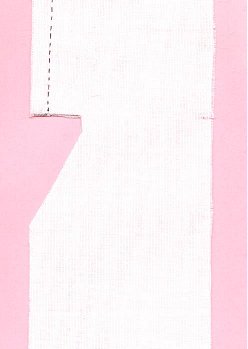
This is one of the fitting seams, which means in Japanese that the edges will not match. Right side to right side, sew the extension to the front so the seam is 3/4" (1.875 cm) in from the front edge on girl kimono, 1/2" (1.25 cm) on boy kimono. That translates as moving the edge of the extension in 1/2" (1.25 cm) from the edge of the front on the first, 1/4" (.625 cm) on the second. For more slender dolls, move it even closer to the side, but no farther than straight down from the vertical of the neckline. Press the allowance toward the front; press under the edge and blindstitch. Extend the angle of the neckline across the extension. STEP 4: The Neckband This is not attached directly to all edges of the neckline.
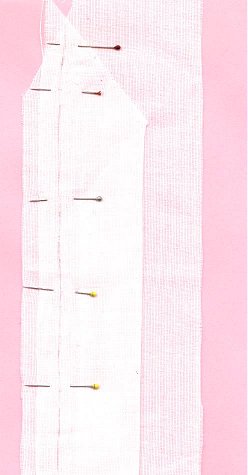
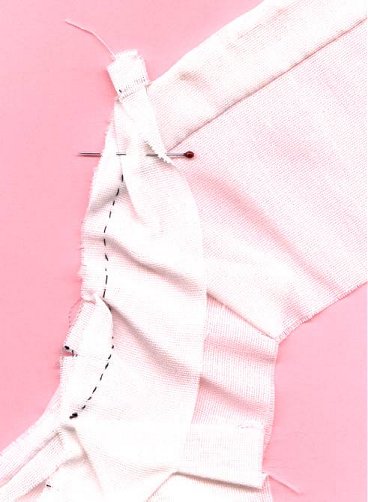
At the center back it is sewn, right side to right side, a little back from the square line, and curves gently down to meet the 1/4" (0.625 cm) seam allowance at the first turn. Sew this by hand from one side to the other, with the ends of the band flapping loose. Then you will have to pull the shoulder line of the body back under the band in an angled pleat so that one side of the front can line up with the band. Sew this, then do the same to the other side.
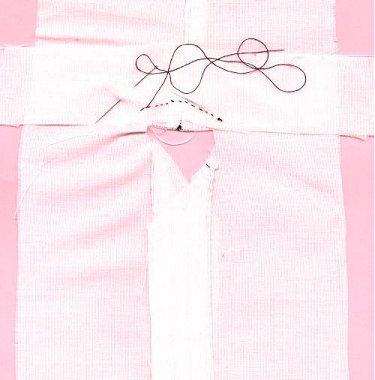
Press the seam allowance towards the band. Fold the band in thirds lengthwise, first towards the outside, right side to right side, then in, wrong side to wrong side. Stitch across the ends right at the edge of the front extension. If a tremendous lot is left over, your protractor slipped and the neckline is at the wrong angle. Unstitch to the bit across the back, and angle it farther down. Hung roughly on the doll, the end of the neckband should com around its lower hip. Turn it, and get those corners pushed and picked out square. Press it, and blindstitch the edge down. This thirds folding lets it interline itself, providing just enough extra stiffening but not too much. In Barbie scale, this looks like just folding back a seam allowance as well as folding a band right side to right side, but in larger scales it will definitely look like thirds of what is left.
If you are using some terribly limp, soft fabric (as in "this fabric has
a great pattern but the hand of it is all wrong"), interline the neckband
at least by stay-stitching a bit of light broadcloth inside it. That's stiffening
enough. It's not supposed to be rigid and upright.
Barbie® is a registered trademark of Mattel®, Inc. Gene® is a registered trademark of Mel Odom and Ashton Drake. Candi® is a registered trademark of Hamilton Designs. Tyler Wentworth® is a registered trademark of the Robert Tonner Doll Company. Any other dolls mentioned are registered trademarks of their respective owners. This website and those who maintain it are in no way affiliated with the any above mentioned parties. The images of the dolls displayed are photos taken by the author(s) of the article and/or the designer featured. Please do not remove pictures and/or text from this website without permission of the webmaster and/or the photographer. |