Halloween Crafts
![]()
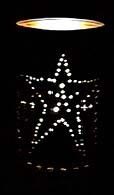 |
Halloween Lantern You Will Need: Paper Pencil Nail Hammer Metal can Throw rug Masking tape Rubber bands How to:
|
||||
| Make this Craft and we will
send you some free stickers! |
Halloween Party Favors You will need: Halloween print small paper Dixie cups plastic spider rings (the same number as cups) halloween treats or candy black or orange tissue paper Cut the tissue paper into large squares. Put a square over a paper cup and push the middle of the square down to the bottom of the cup. Fill the tissue paper in the cup with candy or other treats. Gather the edges of the paper together and slide a plastic spider ring over the top. Pull the edges of the tissue paper out a little above the ring to make them look nice. You can place these at table settings at parties or for kids at Halloween dinner. The cup can be used for drinking during the meal after the k ids take the treats out. |
||||
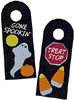 |
Halloween Door Hangers You will need: Black or orange craft foam sheets Halloween Stickers (optional) Acrylic Craft Paint T-shirt paint (optional) Scisors Have an adult cut out a shape from the foam to make a door hanger. Using the acrylic paint, paint words onto the door hanger to let others know if you are home. If you want, you can make one side that says you are home and the other side say that you are out trick-or-treating! You can paint on Halloween pictures. Squeeze thick t-shirt paint around the pictures and let dry. Cut a slit in the top where the hole is and hang on your door! |
||||
| Popcorn Hands You will need: clear plastic gloves popcorn candy corn black or orange ribbon or yarn spider rings (optional) Take white plastic gloves and drop a piece of candy corn into each finger. Fill the glove with popcorn. Tie at the hand with orange and black ribbons, curl ends and place a spider ring on one of the fingers and use for party favors or decorations. |
|||||
 |
Halloween Finger Puppets These are great for trick-or-treaters or for playing with at home. Parents can make them as nice toys for candy-free Halloween treats. You will need: scraps of cloth or felt craft or school glue yarn in different colors markers sequins, jewels, googly eyes, etc. scissors |
||||
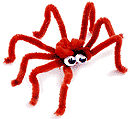 |
Pipe Cleaner Spiders Materials: Pipe cleaners, Four-hole buttons, Stick-on googly eyes, Synthetic spider web, Double-sided tapeStep 1: Bend a pipe cleaner into a V shape. Push the base of the V up through one of the buttonholes until it protrudes 1/2 inch. Then, bend the 1/2-inch length over the top of the button. Use the same method to thread the three other pipe cleaners through the remaining buttonholes. Step 2: Next, shape the legs (there should be eight, of course!) by bending the pipe cleaner ends first 1 inch from the button and then again 1/4 inch from the tips. Stick the googly eyes onto the button between the front legs. Step 3: To create a web, the easiest option is to use a synthetic stretching spider web (sold at most novelty shops for under $2). If you can't find one, use a thin sheet of cotton batting. Stretch the web across a doorway, using pieces of double-sided tape to anchor the sides to the door frame. Then, set your spiders in the web wherever you like—their legs will stick easily to the fibers. |
||||
 |
Window Creepies! You will need: craft glue scissors construction paper or craft foam sheets plastic t-shirt paint or permanent markers. These are much cheaper than the store-made window decorations. Cut the craft foam or paper into the shapes you need to create your creepy window watchers. Glue the pieces together and wait until they dry. Use a black permanent marker or plastic t-shirt paint to paint scars, mouths, and eyeballs. Hang in the window and enjoy! |
||||
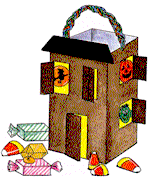 |
Haunted House Treat Carrier Here is what you need: Half gallon milk carton, Brown, black, and yellow construction paper, Scissors, Halloween stickers, Clear tape, White glue, Yarn, Hole punch
You can draw your own spooky ideas for Halloween characters in your house instead of using Halloween stickers. |
||||
| Make this Craft and we will
send you some free stickers! |
Halloween Table Cloth
Take an orange paper tablecloth and draw on various Halloween ghosts, goblins, pumpkins, black cats, etc. Stick on Halloween stickers and glue on any pictures you can find that are related to Halloween. |
||||
 |
|
||||
| Make this Craft and we will
send you some free stickers! |
Cereal Box Gravestones Have fun decorating your yard with this craft! Adult supervision is recommended with the use of a hot glue gun. What You Need
HINT: Find some sand or rocks and place inside boxes to keep them from blowing over. Stand them in mounds of dirt or sand. |
||||
 |
|
||||
| Make this Craft and we will
send you some free stickers! |
Gauze Ghost Note! Kids, please get Mom or Dads help with the ghosts. Materials: 6" square of surgical gauze or cheesecloth Scissors Liquid starch Bowl Newspapers Empty soap or drink bottle Black felt-tip pen String 1.Use the scissors to round the corners of the 6" gazes or cheesecloth. 2.Pour the liquid starch into a bowl and dip the gauze or cheesecloth in it completely. 3.Set the bottle on the newspaper. 4.Drape the wet gauze or cheesecloth over the bottle and allow it to dry for 24 hours. 5.After completely dry, use the black felt-tip pen to draw a face on the ghost. 6.Place the ghost on your table for a centerpiece |
||||
| Make this Craft and we will
send you some free stickers! |
Jack-O-Lantern Candy Jars You will need: one clear glass jar with lid green craft paint black construction paper tape or glue a bag of candy corn paintbrush First, paint just the outside of the lid of the jar green and set aside to dry. Cut eye, nose and mouth shapes out of the black construction paper. Glue or tape the shapes onto the jar. Fill the jar with the candy corn all the way to the top and then close the jar. Enjoy! |
||||
 |
Paper Bag Invitations You will need: paper bags hole punch markers yarn large-eyed needle scissors Cut rectangles out of the paper bag as large as you want the invitations to be. Using a hole punch, punch holes all the way around the edges of the card. Thread some yarn through the large needle and "sew" all the way around the card. Tie a bow with the two ends of the yarn at the top of the card. On the front, write what the invitation is for. On the back of the card, you can write information such as the date, what to bring and where the party will be along with your phone number in case they need to contact you. |
||||
| Make this Craft and we will
send you some free stickers! |
Magic Ghost! You will need: One sheet of black construction paper one sheet of white paper or white scraps glue scissors Pencil tape On the back of the black piece of paper, draw the outline of a large ghost and cut it out. Cut out three ovals from the white paper for eyes and a mouth. Glue them onto the black ghost. After it dries, tape the ghost to the wall and look at it for thirty seconds. Then look at a blank white wall next to the ghost. You will see a white ghost magically appear and disappear! |
||||
| Make this Craft and we will
send you some free stickers! |
Halloween Chain
Cut orange and black strips of paper, 4" long long and
1/2" wide. |
||||
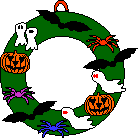 |
Kids' Halloween Wreath
This project is VERY EASY. Anyone can do it. Kids can hang it on their door, or put it in their room, or you could even hang it outside. What You Need:
|
||||
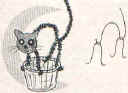 |
Halloween Cat Favors For each favor you will need a small paper cup, four, black 6" pipe cleaners, two gummed reinforcements and a bit of white string. For the body of each cat, bend the pipe cleaners, as shown. Twist ends to join.For the face, cut a 2" circle of black paper (with ears). Glue on reinforcements for eyes. Attach the head to body with end of pipe cleaner. Poke pipe cleaner through the head at center back and bend in front to form the nose. Glue on pieces of string for whiskers.To attach cat to cup, punch four holes below rim of cup and insert legs; bend up feet to hold in place. |
.
Other Activities
Spider Maze
Cauldron
Maze
Halloween Word
Search
Make a
Spooky Halloween Pop-Up Card
Make a String
of Jack-O-Lanterns or Ghosts!
Trick-or-Treat for
Unicef