Gifts
![]()
 |
Journal Craft
|
 |
Pretty Pincushion What You Need Empty tuna or cat food can, Piece of fabric 6 inches by 6 inches, Fiberfill or cotton balls to fill the can, Decorations for the side of the can - ribbons, lace, fabric, construction paper, buttons, etc., Craft glue, Scissors, Lemon juice How To Make It
|
| Make this Craft and we will
send you some free stickers! |
Simple Stationery Materials Needed: Crayons, Markers, or Colored Pencils, Computer Paper Instructions: Take some crayons, markers, and (or) colored pencils and the computer paper and draw many pretty and "cool" designs on them, for example pictures of hearts, stars, moons, cats, dogs, or little lines in different varieties. You may also write your name in different colors at the top or in the middle of the page for more decoration. You are now ready to write letters! You may write letters to family or even write the grocery list with this. Children love doing this and they can trade stationary with their friends. |
| Make this Craft and we will
send you some free stickers! |
Simple Shaped Soap Bars Materials: Mild Bar of Soap (I prefer Ivory), Warm water, Cookie cutters Instructions: Grate 1 cup of soap off the bar. Pour it in medium sized mixing bowl. Start with 1/2 cut of warm water. Pour into the grated soap and knead to mix. Add more warm water, a little at a time, and continue to knead until all soap mixes in and it is the consistancy of thick dough. If you want to make colored bars of soap, mix food coloring in with the water. Once your water and soap is well blended, press mixture into cookies cutters. Set the cookie cutter on it's side so the soap dries on both sides, or flip it often. Put in a dry place to dry for about 24 hours. Gently pop your soap out of the cookie cutter. More: Instead of using cookie cutters, you can make miniature bars of home-made soap by pressing your mixtures into ice cube trays or small candy or soap molds from the craft store. You can also roll them into balls. For a simple gift, tie a ribbon around the home-made bars of soap, or fill a small gift basket! |
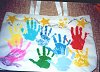 |
Personal Tote Bags Materials Needed: Canvas Tote Bag, Fabric Paint, Mirror Instructions: Using a canvas tote bag, washable fabric paint, brushes, and fabric markers create a special bag for Mother's Day. This is a very messy project so be very careful! Paint one of your hands with fabric paint and "stamp" your handprint onto the tote bag. Keep your fingers together and it looks somewhat like a tulip. Add leaves and a stem with paint. Then write Happy Mother's Day - or other appropriate message - with the year at the top of the bag with the markers and sign your name. These take a while to dry well so make sure you allow enough time |
| Make this Craft and we will
send you some free stickers! |
Photo Bookmark Materials Needed: Pencil, Ruler, Scissors, Old or blurry photographs Instructions: Collect your old or blurry photographs, mark off 1/2" or 3/4" along the short sides on top and bottom, then draw the lines along the length of the photo. Cut the photo along the lines, and round off the corners. Voila! -- now you have a paperback bookmark. You don't even have to seal it, since it is already glossy. Happy reading! |
| Make this Craft and we will
send you some free stickers! |
Tiny Gift Box Materials Needed: Egg cartons, Paint, Stickers or glitter to decorate, Clear tape or masking tape, Tissues, Piece of jewelry or any small gift item Instructions: First, cut out 2 egg carton pieces. Next, tape the 2 egg carton pieces together only on one part of the back. ( so it makes a hinge.) Then, paint the box with any color and wait 'till the paint dries. Next, put stickers or glitter on to decorate. Then, stuff tissues inside the little round gift giving box. Finally, put your small gift item or piece of jewelry into the box. And....... Your Done!!! (Give your gift in this small gift box made with love |
| Make this Craft and we will
send you some free stickers! |
Dried Flower Sachets Materials Needed: Flowers, String, Felt, Glue, Lace, Material, Piece of Lace, Perfume Instructions: Cut out the felt and lace material into whatever shape you want your sachet to be (hearts are fun, but any simple shape will work. The size you make will defepend on how many flowers you have. You will want your sachet 'pillow' to be full, but not too big (probably 6 inches maximum size). Put glue around the edge of your felt shape, but leave a small section without glue. This is where you will stuff your dreid flowers in. A hot glue gun works well, but any sort of thick, tacky glue will work also. Set your lace shape on the glue. Be careful to match the edges as best as you can. Set it aside for the glue to dry. Once the glue and flowers are both dry, carefully stick the petal of the dried flowers into the opening you left in your felt/lace shape. Once full, glue the opening shut. Caefully put a dab of glue around the edge of your shape, on the lace side. Carefully stick the edge of the piece of lace onto the glue. Set aside to dry. Once your glue is dry, your sachet is pretty much ready! Put a small amount of purfume on the back of your felt so your sachet smells great. These make great gifts, and are perfect for making drawers, closets, and other small areas smell sweet! |
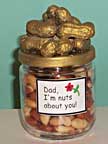 |
“Dad, I’m nuts about You.” Jar of
Nuts
|
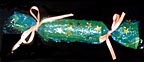 |
Surprise Packages Craft |
| Make this Craft and we will
send you some free stickers! |
Pencil Holder for Dad You will need: a tin can or a jar craft ribbon colored paper, wallpaper, or cloth scraps buttons, jewels, stickers, craft paint, etc. for decorating Begin by wrapping paper around the can if you are using a tin can. Decorate the can or jar by gluing on jewels, buttons or other decorations. Let dry and give to dad for father's day! |
 |
Refrigerator Magnets All you need to do is buy some small hand soap or candy molds and Plaster of Paris and follow the directions on the package. After you pour the plaster, press one round magnet into the wet plaster and it will dry in place. If you forget to put the magnet in, just use hot melt glue to glue a magnet onto the back when you are done. Use acrylic craft paint to paint the magnets or use glitter to decorate them. Let dry and seal with an acrylic sealer. Enjoy! |
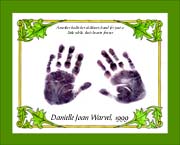 |
Hand Print Picture Mother’s Day Craft
What you will need: typing paper, construction paper, ink pads or paint, markers of crayons, clear embossing powder (optional) What to do:
|
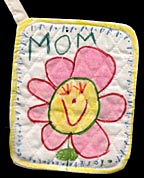 |
Pot holder Craft for Mother’s Day |
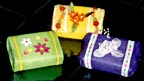 |
Decorated Soap Craft
|
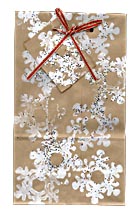 |
Gift Bags with gift tags Craft |