Just For Fun
![]()
| Make this Craft and we will
send you some free stickers! |
Felt Photo Albums
Since we are notorious "dollar store shoppers", it is a safe bet that's where we get our photo albums! They do not have to be pretty for this project, so go for the dollar bin rejects. What You Need Felt in assorted colors, Scissors, Craft or tacky glue, Photo album How To Make It We bought our felt at the craft store from a bolt of fabric. Felt is available in sheets or a bolt, and we found that the price on the bolt saved us quite a bit of money. We picked colors to match the season, and that season just happened to be Christmas. We took home our new bottle of tacky glue (love that stuff) and our gold, red, green, white, and blue felt.
|
|
|
Seasons Greetings Blocks
These blocks are easy to make and fun to display. They can be adapted to your choice of holidays. What You Need
|
| Make this Craft and we will
send you some free stickers! |
Crayon Can Don't know what to do with all those crayons? Crayon boxes falling apart? Create a crayon can of your own to keep your crayons organized. You can also make cans for other things like doll clothes, blocks, Legos, hair clips,treasures or craft supplies. You will need: one coffee can or plastic ice cream pail all your crayons photos and stickers (optional) craft glue colored tempera paint or craft paints Begin by painting the entire can one color. You can use the other colors to paint pictures on your crayon can. You can also glue photos of you and your family or your pets onto the can. Stencils also work well for decorating. Stick stickers on if you like. When you are finished, let the can dry and then put all your crayons inside. Remember never to leave your crayon can in a window or your crayons will melt! |
 |
Paper Bag Invitations You will need: paper bags hole punch markers yarn large-eyed needle scissors Cut rectangles out of the paper bag as large as you want the invitations to be. Using a hole punch, punch holes all the way around the edges of the card. Thread some yarn through the large needle and "sew" all the way around the card. Tie a bow with the two ends of the yarn at the top of the card. On the front, write what the invitation is for. On the back of the card, you can write information such as the date, what to bring and where the party will be along with your phone number in case they need to contact you. |
| Make this Craft and we will
send you some free stickers! |
Colorable, Reusable Window Clings! Materials Needed: White polylining, Computer graphic or colouring book picture, Glossy black fabric paint (in squeeze bottle), Washable markers (highlighter work well too!), Newspaper (to protect work surface), Scissors Instructions: I made these clings for my daughter's 8th Birthday Party and let the girls color them in. If you use the washable markers the clings can be washed out and then colored in again when dry!
NOTE: You should be able to find polylining in a fabric store! |
| Make this Craft and we will
send you some free stickers! |
Time Capsule Materials Needed: Coffee Can or a Large Jar, Many Misc. Items Instructions: Creativity is the key here. You are going to use the coffee can or a large bottle to make a time capsule to hide away. Use paint and/or construction paper to decorate the outside of the coffee can. You can try to make a special design... Confetti and a large 2000 would be fun, or how about fireworks, or a clock? One thing for sure you should include on the outside of your 'time capsule' is 2000 to commemorate the turn of the century. You probably will want to write a small note to whomever might find your time capsule. Something along the lines of "Do Not Open Until January 1st 2020" or whatever year you choose. Once you are done designing your Time Capsule, find some special items to place inside it. Some personal items such as a few pictures would be nice. You might also want to include items that are popular these days. How about a few Pokemon cards or a token of some other hot trend. You can clip out a few important news stories also. Another fun idea is to record one of your favorite songs and place the tape in your time capsule. It would also be fun to write a letter to whomever finds and opens your time capsule. Tell them about yourself, your family, etc. Include a picture too, if you can. Can you come up with any other fun ideas? Finally, once you have your time capsule filled, use glue or tape to 'seal' the top closed. Last of all, you need to find a safe hiding place for your time capsule. Hopefully someplace where no one will find it for quite awhile. Talk to adults and see if they have any ideas. (We made one of these while we were remodeling our house. We sealed it in the new walls when they were put up!). |
| Make this Craft and we will
send you some free stickers! |
Sand Candles Materials Needed: A lot of sand (1 gal.), Water, Wax, Shells, Wick material, Plate big enough to hold the candle Instructions: 1. Put the sand in a LARGE bowl. 2. Pour water over the sand to make it wet. 3. Make a hole in the wet sand as big as you want your candle to be. 4. Place shells around the sides if desired. 5. Take the smallest shell you can find and tie it to the wick and put it in the center bottom. 6. Melt the wax in a tin can. 7. Pour the wax in the sand mold while holding the wick up enough to keep it straight. 8. Hold the wick there for about a minute or until the wax has hardened enough for the wick to not fall in it. 9. When it's hard and cold, dig about an inch away from the candle a trench about 6-10 inches deep, depending on how big your candle is, and then GENTLY pull the candle out. 10. Put the candle on the plate. ENJOY!! |
| Make this Craft and we will
send you some free stickers! |
Photo Bookmark Materials Needed: Pencil, Ruler, Scissors, Old or blurry photographs Instructions: Collect your old or blurry photographs, mark off 1/2" or 3/4" along the short sides on top and bottom, then draw the lines along the length of the photo. Cut the photo along the lines, and round off the corners. Voila! -- now you have a paperback bookmark. You don't even have to seal it, since it is already glossy. Happy reading! |
| Make this Craft and we will
send you some free stickers! |
Pencil Carrier Materials Needed: Potato Chip Canister with Cover (Pringles), Supplies to Decorate, Glue Instructions: Wash out the can using soap and water; dry completely. Now, make a personalized pencil carrier by decorating the outside of the canister! You are only limited by the supplies you have and your own imagination. Here are some suggestions for you:
|
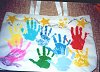 |
Personal Tote Bags Materials Needed: Canvas Tote Bag, Fabric Paint, Mirror Instructions: Using a canvas tote bag, washable fabric paint, brushes, and fabric markers create a special bag for Mother's Day. This is a very messy project so be very careful! Paint one of your hands with fabric paint and "stamp" your handprint onto the tote bag. Keep your fingers together and it looks somewhat like a tulip. Add leaves and a stem with paint. Then write Happy Mother's Day - or other appropriate message - with the year at the top of the bag with the markers and sign your name. These take a while to dry well so make sure you allow enough time |
| Make this Craft and we will
send you some free stickers! |
Shrink Art Craft Materials Needed: Styrofoam Meat Trays Instructions: Cut shapes and color a picture on the bottom of a styrofoam meat tray. Put them on a cookie sheet and in the oven for a few minutes on about 350 degrees. You will see them curl and shrink; then they are ready to take out. You can make your shrink art into jewelry by following the directions above. Just punch a hole before putting into oven. Thread onto yarn or colored string. Make necklaces and bracelets. Make your shrink art into a key chain. Cut out a large oblong or any shape, color with a permanent marker, punch a hole in the top, and shrink in the oven. They make a cute keychain |
| Make this Craft and we will
send you some free stickers! |
Simple Shaped Soap Bars Materials: Mild Bar of Soap (I prefer Ivory), Warm water, Cookie cutters Instructions: Grate 1 cup of soap off the bar. Pour it in medium sized mixing bowl. Start with 1/2 cut of warm water. Pour into the grated soap and knead to mix. Add more warm water, a little at a time, and continue to knead until all soap mixes in and it is the consistancy of thick dough. If you want to make colored bars of soap, mix food coloring in with the water. Once your water and soap is well blended, press mixture into cookies cutters. Set the cookie cutter on it's side so the soap dries on both sides, or flip it often. Put in a dry place to dry for about 24 hours. Gently pop your soap out of the cookie cutter. More: Instead of using cookie cutters, you can make miniature bars of home-made soap by pressing your mixtures into ice cube trays or small candy or soap molds from the craft store. You can also roll them into balls. For a simple gift, tie a ribbon around the home-made bars of soap, or fill a small gift basket! |
| Make this Craft and we will
send you some free stickers! |
Stained Glass Suncatcher Materials Needed: Clear, plastic, smooth tumbler glasses, Permanent markers, Hot glue gun, Ribbon Foil Instructions: Preheat oven to 350 degrees. Spray foil lined cookie sheet with non-stick spray. Color any way you choose with the permanent markers on the outside and/or inside the clear tumbler. When colored to your satisfaction (not all spaces have to colored) place cups on foil and into the oven. Check after a minute and watch closely. The cup will melt and you do not want it to burn. Each cup will melt in a different shape; play with the placement. Remove from foil when slightly cool to keep from sticking. When completely cool, make a hole with the hot tip of the glue gun and string a ribbon thru the hole to hang in window or on tree. This project requires an adult to help but is great for all ages from 2 years old and up. |
| Make this Craft and we will
send you some free stickers! |
Simple Stationery Materials Needed: Crayons, Markers, or Colored Pencils, Computer Paper Instructions: Take some crayons, markers, and (or) colored pencils and the computer paper and draw many pretty and "cool" designs on them, for example pictures of hearts, stars, moons, cats, dogs, or little lines in different varieties. You may also write your name in different colors at the top or in the middle of the page for more decoration. You are now ready to write letters! You may write letters to family or even write the grocery list with this. Children love doing this and they can trade stationary with their friends. |
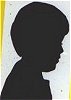 |
Silhouette Picture Materials Needed: Paper, Flashlight, Pen, Pencil, or Marker Instructions: Tape a large piece of paper to the wall. Have the child stand or sit sideways next to the paper. Darken the room and shine the flashlight on them so their profile is shadowed on the paper. Trace the shadow. Cut out the profile and mount it on contrasting piece of paper. This looks great with the profile cut out of black paper and mounted on white paper or vice versa |
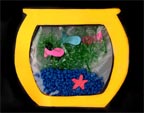 |
Fish in a Fish Bowl Craft |
 |
Journal Craft
|
|
Make this Craft and we will |
Bead Curtains Materials Needed: A stick or dowel to hang the strings from, neon or clear colored straws, beads and dry macaroni, Yarn, Artificial Flowers (optional) Instructions: Cut as many lengths of yarn as you will need for your curtains. Make sure they are all the same length. When you have enough pieces of yarn cut, decorate them by stringing on pieces of straws, beads, flowers and painted or plain macaroni. Tie the strings to your stick and hang them above your door or over your window. Enjoy! |
| Make this Craft and we will
send you some free stickers! |
Colored Sand Craft Materials Needed: Sand, Food Coloring, Glass or Metal Bowl (you can also use paper cups, paper bowls, or baggie) Instructions: Use one bowl for each color you want to make. Place the desired amount of sand in the bowl. Pour on enough water to barely cover the sand, then add a generous amount of food coloring to each container. Stir and set the bowl aside and let it sit until it is the desired color (this can take a while). Once the sand has reached the desired color, empty out the extra water, and pour the sand onto paper towels to dry. |
 |
Clay Pot Apple Treasure Box Materials: 3 inch Terra Cotta Clay Pot, 3 inch Terra Cotta Clay Saucer, Small Wooden Spool, Fun Foam, Paint, Clear Acrylic Sealer Spray, Glue (hot glue gun preferred) Wipe down your terra cotta pot and saucer with a damp cloth and let dry completely. Paint the clay pot and saucer red (figure 1) - let dry. Paint a face on pot (figure 2). Paint the wooden spool green. Once all your paint is dry, spray it with the clear acrylic sealer. Flip the saucer upside down and place it as a lid on top of the clay pot. Glue the wooden spool on to the bottom of the saucer (figure 3). Cut a small leaf shape out of fun foam and glue it to the wooden spool. Your apple is now done! A great place to keep treasures, candy, or other small items |
| Make this Craft and we will
send you some free stickers! |
Earth Suncatcher Craft Materials Needed: Clean Margarine Bowl Lid, 2 Bottles of Glue, Wax Paper, Yarn Instructions: Find a picture of the planet Earth and use that for a pattern. The 2 bottles of glue should be about 1/2 full (it is okay if there is more). Using food coloring, make the glue in one of the bottles blue. Make the glue in the other bottle green. Put the squeeze tops back on the glue bottles. Carefully squeeze the glue into the lid to create a picture of the earth. Use your picture of the earth as a guide as to how much blue and how much green to use. Don't worry if you don't get it exact! Make sure you fill the lid completely with no gaps. Set aside to dry. Depending on how thick you make it, it could take up to 24 hours! Once the glue is dry, it should easily pop out of the lid. set your earth on a piece of wax paper. Use a nail to poke a small hole in the top of your glue earth and then let it sit on the wax paper over night to get firmer. You can then tie a piece of yarn through the hole and hang your earth in a window |