| November 26, 2000 |
| March 11, 2001, Game 1 |
| March 11, 2001, Game 2 |
| September 16, 2001 |
| October 20, 2002 |
| September 21, 2003 |
The following game was my first win against Mr. Spektor in quite a while. The game was played with a time control of 45 minutes for the whole game.
Bill Price - Izyaslav Spektor
November 26, 2000
1.e4 e5 2.Nf3 Nc6 3.Bb5 d6 4.d4 Bd7 5.0-0 a6 6.Ba4 Nf6 7.Re1 h6 8.c3 b5 9.Bb3 Na5? (Drops the e-Pawn. He obviously wasn't playing in good form this evening.) 10.dxe5 dxe5 11.Nxe5 Nxb3 12.Qxb3 Be6 13.Qc2 Qd6 14.Bf4 Nh5
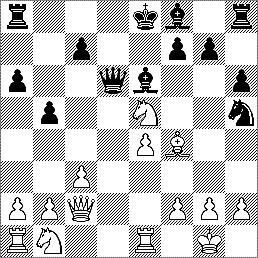
Position after 14...Nh5
(Now White wins Black's KR. But afterwards can he save his Knight?) 15.Nxf7 Qxf4 16.Nxh8 Bd6 17.g3 Qg4 18.e5 (To provide g6 as an escape hatch for the wayward Knight on h8.) 18...Be7 19.Qg6+ Qxg6 20.Nxg6 (White now has 2 extra Pawns and the Exchange. Easy win? Black has plenty of fight left with the two Bishops, and White's Q-side is still undeveloped. And my opponent's ability to defend well in lost positions is only too well known to me.) 20...Bc5 (Preventing White from playing f4. The pressure of the two Bishops begins to make itself felt.) 21.Nd2 (Finally.) 21...Bf5 22.Nh4 Bd3 23.Ne4 Bb6 (Note how Black's Bishops bear down on the White King.) 24.Rad1 Bc4 25.a3 (If 25.b3, then the c-Pawn becomes a target.) 25...Ke7 26.Kg2 (Breaking the pin on the frustrated f-Pawn.) 26...Be6 27.f4 Rg8 28.Nf3 Rf8 (Here I burned about 10 precious minutes on my clock trying to find a suitable plan. I have a material advantage but can't seem to make any headway. Realizing I had to do something, I decided on:) 29.Nd4 Bg4 30.Rd2 Bd7
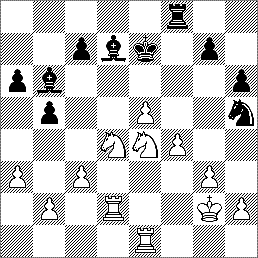
Position after 30...Bd7
31.e6! (Finally I found a way to cash in on my extra material and centralized position. White now threatens to advance the Pawn-chain and gain some control over the White squares, which up to this point have been in Black's hands.) 31...Bxe6? (Black played this move rather quickly. Did he not see what was coming?) 32.Nc5 (Now Black is busted. But probably even better would have been 32 Nxe6, for if 32...Kxe6 then the Black King quickly falls into a mating net: 33. Ng5+! Kf6, (33...Kf5, 34 Rd5+ and mate next move) 34.Re6+, Kf5; 35.Rd5+, Kg4; 36.h3++) 32...Bxc5 33.Nxe6 Kf7 34.Nxc5 Resigns
The following game was played at a time control of 45 minutes. It was an enjoyable King's Indian in which I used pins against both King and Queen to apply pressure to White's position. The pressure paid off with a blunder by White on move 26.
Izyaslav Spektor - Bill Price
March 11, 2001
1.d4 Nf6 2.c4 g6 3.Nf3 Bg7 4.Nc3 d6 5.Bg5 0-0 6.e3 Nbd7 7.h3 e5 8.d5 a5 9.Bd3 Nc5 10.e4 Qe8 (Breaking the pin to advance the f-Pawn.) 11.Bc2 Nh5 12.Be3 f5 13.Bxc5 dxc5 14.g3 fxe4 (Opening the f-file.) 15.Bxe4 Ra6 16.Qd3 Qf7 17.Rh2 (Keeping an eye on f2, and declaring that the WK will not castle K-side.) 17...Rf6 18.Ng5 Qe7 19.Bf3 (Threatening 20. Bxh5 gxh5, 21. Qxh7++.) 19...e4! (Protects the Nh5, exploits the position of the WK, and opens up the a1-h8 diagonal for the Bg2.)
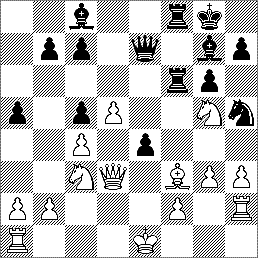
Position after 19...e4!
20.Ncxe4 (Eats the Pawn but pins the Knight.) 20...Rf5 21.Bxh5 Rxg5 22.Be2 (Breaks the pin against the King) 22...Bf5 (But now the pin is against the WQ.) 23.f3 (White's returns his extra Pawn.) 23...Rxg3 24.0-0-0 Qe5 (Threatens mate.) 25.Qc3 Bh6+ 26.Rd2? (An unnecessary blunder, probably a result of having to defend for most of the game. White seems to have a satisfactory game after 26.Nd2.) 26...Rg1+ 27.Kc2 Qxh2 28.Kb3 Bxd2 29.Qxd2 Bxe4 30.fxe4 Rg2 White Resigns
Who says that you can't gamble and play chess at the same time? Taking chances and playing a wild game - especially in "speed" games - is what makes chess enjoyable. Many years ago I used to be a dull, conservative woodpusher who hung onto every last Pawn as if my very life depended on it. Now in my old age I'm learning how to loosen up and enjoy chess. This game, played at a time control of 25 minutes per player, is a good example of this new philosophy. Sure, the sacrifice is probably unsound, but I had fun doing it, and in the end it paid off.
Bill Price - Izyaslav Spektor
March 11, 2001
1.e4 e5 2.Nf3 Nc6 3.d4 exd4 4.Bc4 (This has been one of my favorites lately.) 4...Bb4+ 5.c3 dxc3 6.Nxc3 (I should have tried 6. 0-0.) 6...h6 (This is a typical time-wasting move that my opponent seems to have a weakness for.) 7.0-0 Bxc3 8.bxc3 Nge7
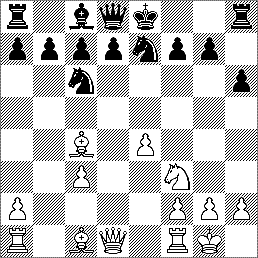
Position after 8...Nge7
(One look at this position - the e8-h5 diagonal, the B on c4, no Black N on f6, a lot of open lines for my pieces - and what else could I do but:) 9.Bxf7+!? Kxf7 10.Nh4 g6 11.Qf3+ Kg7 12.Bb2 Rf8 13.c4+ Kh7 14.Qc3 Rf7 (So far the game has played itself. But now what?) 15.f4 d6 16.f5 (The f-Pawn is defended by three pieces but attacked by four; and yet it's safe because of the mate threat on g7.) 16...g5 17.f6 Ng6 18.Nf5 Nce5 19.Rad1 Nf4? (Having to defend at every move has finally taken its toll. Black conveniently returns the extra piece.) 20.Qxe5 Qf8 21.Qa5 (Not Qd4 or Qe3 because of 21...Ne2+.) b6 22.Qd2 Be6 23.Qc2 Ng6 24.e5 (Opening up the b1-h7 diagonal.) 24...dxe5 25.Ne7 ...
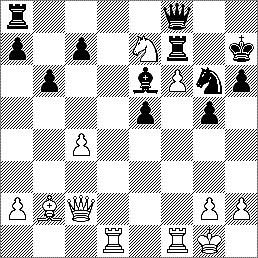
Position after 25.Ne7
(The gambling has paid off, since I win the Exchange at this point, and Black's flag fell. But the game was too interesting to abandon, and so we played on:)
25... Rxe7 26.fxe7 Qxe7 27.Bxe5 Qc5+ 28.Bd4 Qxc4 29.Qf2 Rf8 30.Qd2 Nf4 31.Rde1 Rd8 32.Rxe6 Nxe6 ... (Here we abandoned the game. I conceded that I had blundered into a very lost position. But it had been a fun game, and that's what really counts.)
Don't you just love games where White and Black castle on opposite sides of the board and then launch flank attacks on each other's Kings? Whoever gets there first wins. In this game Black gets a fine-looking Kingside attack under way but fails to take appropriate measures for a decisive breakthrough. While his attack fizzles out, White mounts pressure on the Queenside and gets Black's King into a mating net.
Bill Price - Izyaslav Spektor
September 16, 2001
1.e4 e5 2.Nf3 Nc6 3.Bb5 d6 (My opponent has a distinct preference for the Steinitz variation.) 4.d4 Bd7 5.Nc3 h6 6.0-0 g5 (A questionable K-side advance, but typical of his playing style.) 7.d5 Nb8 8.a4 a6 9.Bc4 Bg4 10.Be2 Nd7 11.Ne1 (Seeing that Black's Pawns are being fixed on black squares, I welcomed the exchange of white-squared Bishops, leaving him with a "bad" Bishop for the remainder of the game.) 11...Bxe2 12.Qxe2 Ngf6 13.Be3 (After making this move, I thought that I perhaps should have kept e3 free for a Knight en route to f5.) 13...Be7 14.f3 (Protecting e4, freeing the Knight on c3.) 14... Nh5 15.Qd2 (In preparation for Ne2-g3-f5.) 15...Ng7 16.Ne2 f5 (Black's Ng7 was aimed at this Pawn thrust, which I must admit I had overlooked.) 17.exf5 Nxf5 18.Bf2 Nf6 19.Ng3 Nxg3 20.Bxf3 Nh5 21.Nd3 (Watching the f4 square.) 21...Qd7 22.a5 (This grabs some more space on the Q-side where Black's King lives, and also starts putting some pressure on the black squares in Black's front yard, as well as vacating the square for a possible Ra4.) 22...Nf4 23.Bxf4 (Here I figured that eliminating the strongly posted Knight on f4 was more important than keeping my black-squared QB. I also noticed that the Nd3 can "hold the fort" if posted on g4.) 23...gxf4 24.Nf2 Rg8 25.Ne4 (A nice place for the Knight until needed for defence at g4.) 25...h5 26.c4 (This move gains more Q-side space, and it also locks the Black Queen out of White's Q-side for the time being.) 26...h4 (Black starts his K-side assault immediately, drawing the WN back to g4.) 27.Nf2 h3 28.Ng4 hxg2 29.Qxg2 0-0-0 (As was to be expected, Black castles Q-side, swinging all of his weight over to the K-side for an all-out assault - which, however, never materializes.) 30.Qc2 (This move eyes the b1-a7 diagonal, as well as occupying a file facing Black's King.) 30...Rg7 31.Rf2 Rh8 32.b4 (White continues a Q-side advance. The defence on g4 will hold until Black decides to sacrifice the Exchange on g4 or undermine the Knight's support on f3.) 32...Rh3 (Black goes straight for White's Achille's heel at f3.) 33. Qe2 Qf5 34.Rg2 (White needs to break the pin on the g-file.) 34...Qh7 (34...e4 seems much stronger.) 35.b5 (Getting closer to Black's King.) 35...Qg8 36.bxa6 (The b-file is finally open.) 36...bxa6 37.Qf2 (With an eye to Qa7.) 37...Kb8 38.Rb1+ Ka8 (But now Black's King is precariously stranded in the a-file.) 39.Qf1 (Now there are discovered threats against the Rh3, as well as a direct path to Black's a-Pawn.) 39...Qc8 40.Rgb2 Rh8 (Black has had a strong position on the K-side for quite some time, but has failed to take decisive action. The tide is beginning to turn.) 41.Kh1 (I considered this to be White's last defensive move. The Knight on g4 is now free to go on adventures.) 41...Bh4 (Saddling Black with a "bad" Bishop has paid off. Only now does Black attempt to put it to use, but it's too late.) 42.c5
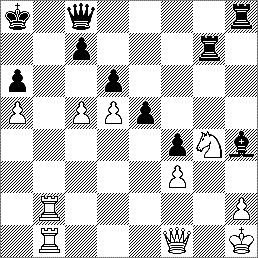
Position after 42.c5
(The decisive strike. The immediate threat is Rb8+. Note the curious mirror-image symmetry of the position: WK on h1, BK on a8; WQ on f1, BQ on c8; WRs on b-file, BRs on g- and h-files; b-file open, g-file open; White's c- and d-Pawns advancing on Black's corresponding Pawns, Black's d- and e-Pawns potentially ganging up on White's f-Pawn. The one lopsided feature is the position of the Minor pieces, both on the K-side: White's excellently posted Knight has been blocking the g-file and defending the h-Pawn, whereas Black's Bishop has been doing next to nothing.) 42...dxc5? (Black doesn't see White's next move. I had been expecting something like 42...c6, opening up Black's second rank for the defense at a7.) 43.Rb8+! Qxb8 44.Qxa6+ Qa7 45.Qc6+ Resigns
Much of this enjoyable game was played two Pawns down, trying to keep up an attack against my opponent's exposed King. I almost lost my way on move 21, but then remembered the old maxim, "If you see a good move, look for a better one." And I found it.
Bill Price - Izyaslav Spektor
October 20, 2002
1.d4 d5 2.c4 e6 (I had been expecting an Albin Counter Gambit with 2...e5, something that he had tried on me before.) 3.Nc3 Bb4 (Another surprise. I can't remember ever having seen this move before.) 4.Nf3 dxc4 5.e4 b5 (Black apparently intends to keep the extra Pawn.) 6.Be2 Bb7 7.Qc2 h6 8.0-0 Bxc3 9.bxc3 Nf6
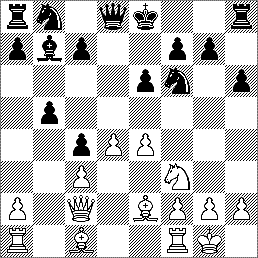
Position after 9...Nf6
(Black is going after the e-Pawn. I didn't like the way 10.e5 looked, and so I decided to try an aggressive gamble by giving up another Pawn to open the center files.) 10.d5 exd5 11.exd5 Bxd5 12.Ba3 (Locking Black's King on the open files.) 12...Be4 13.Qb2 a6 14.Rad1 Nbd7 15.Ne5 Qb8 16.Nxd7 Nxd7 17.Bg4 Bd3 (I overlooked this simple move.) 18.Rfe1+ Kd8 19.Bxd7 Kxd7 20.Qe2!
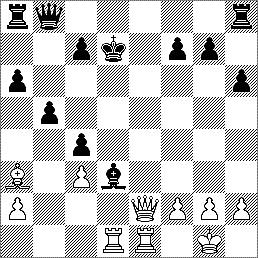
Position after 20.Qe2!
(Now the Queen comes immediately into play, thanks to the pin on Black's QB.) 20...Re8? (Not the best defense. At this point I spent considerable time looking for the best continuation. I'm two Pawns down and need to keep the ball rolling. I kept looking at two lines, neither of which seemed satisfactory. The first, 21.Qg4+ Kc6 would allow me to eat some K-side Pawns, but it opens the K-side files for Black. The second, 21.Rxd3+ cxd3, 22.Qxd3+ Kc6 didn't seem to go anywhere, either. And then I saw something much better...) 21.Qf3! (This quiet-looking move carries the devastating threat of Qd5+. 21...c6 is no good on account of 22.Qxf7+ Re7, 23.Rxe7+ followed by mate.) 21...Rxe1+ 22.Rxe1 c5 23. Qd5+ Qd6 (The Rook must fall. 23...Kc7 allows 24.Bxc5 followed by loss of material.) 24. Qb7+ Qc7 25.Qxa8 Kd6 26.Qe8 Qa7 27.Qe5+ Kc6 28.Qxg7 (Not just Pawn-grabbing. The threat now is Re6+ leading to mate or loss of the Queen.) 28...Kb6 29.Bxc5+! Resigns (29...Kxc5, 30.Qd4+ wins the Queen.)
We have played so many games where I get a good game out of the opening and middle game, but blow the ending. Here is a recent example.
Izyaslav Spektor - Bill Price
September 21 and October 12, 2003
1.e4 d5 2.e5 Bf5 (The correct response to 2.e5. Black ends up playing a French with a liberated QB.) 3.d4 e6 4.a3 (Another typical time-waster.) 4... c5 5.c3 Nc6 6.Nf3 Nge7 7.dxc5 Ng6 8.Bb5 Bxc5 (He had been playing too fast up to this point, and had overlooked the hanging Pawn on c5.) 9.Qa4 Qc7 10.0-0 0-0 11.Bxc6 bxc6 12.b4 Bb6 13.Re1 Be4 (Deliberately provoking the following response, locking in the White QB.) 14.Nbd2 Bd3 (If now 15.Nb3? then 15...Bb4 wins the Queen.) 15.Qd1 a5 16.Nb3 Bc4 17.g3 (I'm not quite sure what this does, other than restrict the N on g6.) 17... a4 18.Nbd4 c5 19.Nc2 Rfd8 20.Be3 Bb3 21.Qd2 Rac8 22.Rac1 Qc6 (Eying the N hanging on f3.) 23.bxc5 Bxc5 24.Bg5 Rd7 25.Nfd4 Qb6 26.Rb1 Rb7 27.Nxb3 axb3 28.Nb4 (His body language in executing this move was saying, "There! Now I eat the Pawn on b3." The following move, however, destroys his illusions.) 28... d4!
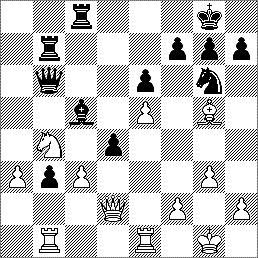
Position after 28...d4
(Now if 29.Rxb3 Black gets a fine game with 29...dxc3, since both 30.Qxc3 and 30.Rxc3 fail to 30...Bxf2+.) 29.cxd4 Bxb4 30.axb4 Qxb4 31.Rec1 R8c8 32.Rb2 h6 (Preparing the way for the N to occupy the beautiful outpost on d5.) 33.Be3 Ne7 34.Kf1 Nd5 (I felt very good at this point. My Nd5 has a home it can occupy as long as it wants, whereas White's QB is stranded in an ocean of black-square Pawns. My extra Pawn on b3 is strong and healthy, tying down White's pieces to the defense, while his own extra Pawn on d4 is backward and blockaded.) 35.Ke2 Qa4 36.Qd1 ... (Here the game was adjourned. My opponent offered a draw, which I refused. I felt that I should win in this position, in spite of the fact that I had lost many an endgame to him in the past. My plan here is to push the b-Pawn down by maneuvering the N to c4 via b6. Since an immediate Nb6 blocks the Rooks, I first move one of them up.)
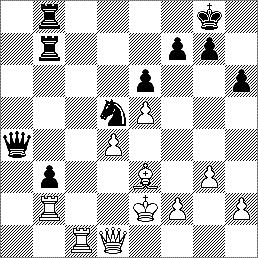
Position after 36. Qd1
36... Rb4 37.Ke1 (Stepping away from the N's forking square at c3) 37...Nb6 38.Ra1 Qb5 39.Qe2 Nc4 40.R2b1 b2 41.Ra2 Rb3? (Following my original plan, and preparing the way for Na3. But 41...Qd5 was much better here, threatening not only a discovered attack on the hanging Ra2 but also the devastating 42...Qe4! It also avoids the Queen trade. Even better, according to Fritz, is 42...Qc6 43.f3 Nxe3.) 42.Ra7 (White is hoping for some counterplay on f7). 42...Na3 43.Qxb5! (White suddenly realized that 43.Qf3? immediately loses to 43...Nc2+. He therefore goes for the Queen trade and simplifications.) 43...R8xb5? (The simple 43...Nxb5 avoids White's next move.) 44.Rxa3! (White coughs up the Exchange. But now the b-Pawn is a sitting duck, and Black's overwhelming position of a few moves ago has been swept away like a dream.) 44...Rxa3 45.Kd1 Kf8 46.Kc2 R3b3 47.Bd2 Ke8 48.Bc3 Kd7 49.Rxb2 (Not 49.Bxb2, pinning the B against the R.) 49...Rxb2+ 50.Bxb2 Kc6 51.Ba3 Kd5 (Worth considering here was 51...Ra5) 52.Bc5 (White could eat a g or f-Pawn here, but for whatever reason decides to hold the d-Pawn instead.) 52...h5 53.h4
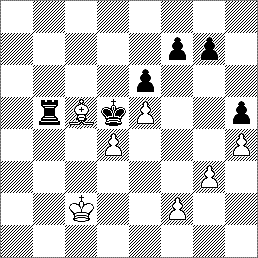
Position after 53.h4
53... Ra5?? (As soon as I made this horrible move I realized that I had just thrown away my big chance to position my King on e4. Now things are looking very good for White.) 54.Kd3! Rb5 55.Ke3 Rb2 (Fritz here recommends 55...Rxc5 56.dxc5 Kxe5 57.c6 Kd6) 56.Bf8 g6 57.Bc5 Rb3+ 58.Kf4 (My opponent was starting to talk about going for a win. I didn't know if he was serious or just bluffing. In any case I realized that my winning chances had dwindled away, and the word "draw" was beginning to have a nice ring to it.) 58...Rd3 59.f3 Rd1 (I was starting to worry about my f-Pawn.) 60.Ke3 Rb1 61.g4 hxg4 62.fxg4 Rh1 63.Be7 (I had overlooked this simple defense of the h-Pawn before starting the Pawn exchange. Now the prospects of an outside passed Pawn on the h-file started looking very ominous.) 63...Rf1 (I figured I could at least keep White's King cut off from the g and h files.) 64.Bc5 Rh1 65.Be7 Rf1 (Here I offered a draw. "You want a draw?" he asked. "I do not accept!" - and he promptly plays:) 66.Bf6 (Zugzwang. My Rook cannot move without leaving the f-file, and so where does my King go? I decided to stay near home territory.) 66...Kc6 67.Ke2 Rh1 68.Kf3 Rf1+ 69.Kg3 Kd5 70.Kg2 Rf4 71.Kg3 Rf1 72.h5 (White finally decides to go for it.) 72...gxh5 73.gxh5 Rh1 74.Kg4 Rg1+ 75.Kh4 (Here another Rook check lets the King slip in front of the Pawn. I was sweating bullets. How was I going to stop that terrible h-Pawn? The Bf6 holds the queening square, and also serves to cut off the BK from a back line defense... Then I remembered a tournament game I had played many years ago in which I got a cheap win in an inferior position by mating my opponent's King on the side of the board with my Rook.) 75...Ke4! (The King and Rook are positioned to mate in two with ...Kf4 and ...Rh1. If White moves his Bishop, Black plays 76...Kf5 and the h-Pawn is lost. If 76.h6, then 76...Kf5, 77.Kh5 (77.h7 Rh1+) 77...Rh1+ 78.Bh4 Rxh4+ 79.Kxh4 Kg6 and draws.) 76.Kh3 Rh1+ 77.Kg4 Draw Agreed.
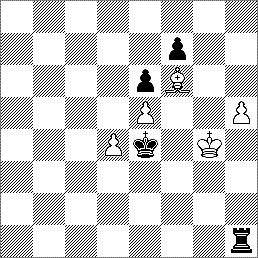
Final position
| Copyright � 2000, 2001, 2002, 2003 by Bill Price |
| URL = www.geocities.com/bprice1949/recentgam2.html |
 |