 Do
It Yourself
Do
It Yourself
Instructions
for basic repairs and maintenance for A-types
Checking and
adjusting valve clearance
When we say valve clearance,
in fact we mean the clearance between the rocker and the valve. Valve clearance
should be checked at least once a year: increased clearance is not the thing which
should disturb you too much, but if its value is less than it should be, it can
be very dangerous for the engine. Proper value is 0.2 mm for the cold engine.
The way to check and adjust this parameter is the following:
- remove the front wings
(I'm not sure that this is necessary, it probably depends on the tools that
you have. Check it yourself).
- remove valve covers;
like written in the part about oil change, valve covers keep significant amount
of oil, so put appropriate dishes under them; use this opportunity to visually
check
the condition of the crankshaft!
- clearance of the intake
valve should be measured when the exhaust valve on same cylinder head is full
open; the same goes for the exhaust valve - measure the clearance when
the inlet valve on same cylinder head is full open.
- NOTE:
in some manuals I've read that measuring / adjusting order is the following:
intake valve is done while intake valve on the opposite head is full open;
same for the exhaust valve. However, I couldn't adjust valves this way. It
probably depends on engine type and year of production. If you're unsure,
try both ways and see which one is appropriate for the engine you deal with.
- in order to bring the
valves into desired position, turn the crankshaft with the starting handle,
or by pushing flywheel's teeth with a screwdriver for the fine position adjustment.
- measure the clearance
between the rocker and the valve using feeler gauges like shown on the
figure 1
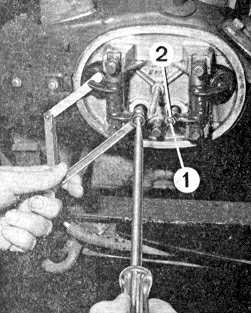
Figure
1: measuring and adjusting valve clearance
- in case that the clearance
is less or bigger than it should be, adjust it in the following way:
- loosen the counter nut
(position 2 on figure 1); turn the adjusting bolt (position 1 on figure
1) into desired direction, which will change the value of the clearance
(turning the bolt clockwise will decrease the clearance, and vice versa)
- check the clearance
again: 0.2 mm-feeler gauge should pass tightly between the parts, 0.15 mm
must pass easy, and 0.25 mm must not pass at all.
- tighten the counter
nut, keeping adjusting bolt (1) from turning (this would mess up the job you've
done)
- check the clearance
again; if necessary, repeat previous 3 steps until you measure proper value with
counter nut tightened (counter nut secures adjusting bolt from turning - potentially coused by engine vibrations and operation of valve mechanism - and therefore from changing
the clearance value)
- when all valves are
done, put the valve covers back (rubber gaskets must be attached in the proper
way) and top up an oil to necessary level.
- start the engine to
check the sealing on the valve covers.
- have a nice drive!