 Do
It Yourself
Do
It Yourself
Instructions
for basic repairs and maintenance for A-types
Checking oil cooler
Air cooling of cylinders and
cylinder heads is not enough for relatively forced engines of our cars. For that
reason, oil plays another big role besides greasing: its temperature is decreased
in oil cooler, so it cools other parts of engine.
Several problems are possible with oil cooler:
- dirty "honeycomb"
- cooler is clogged from
inside
- cooler leaks
These problems may cause
overheating, irregular greasing (because of inadequate oil temperature and pressure),
or increased oil consumption. In shorter or longer term of exploitation, engine
can be seriously damaged.
You can check the cooler
in following ways:
- visual inspect: look
if there's a lot of dirtiness on a cooler which disables proper heat exchange
between cooling air and oil which runs through the cooler; also check if there
are some oil spots on and around the cooler or its pipes which may point out
to leaking; oil spots inside of the fan area also can be caused by leaking
cooler
- remove the cooler and
sink it into the gasoline (in such a way that holes of the pipes are not sunk);
let the air under pressure through one of its pipes, clog the other one and
check for bubbles
If you find out that cooler
leaks, you should replace it although in some cases it can be fixed.
Cleaning
oil cooler
Sink the cooler into trichlorethylen
(gasoline can be used instead), and after that blow it through with the air
under (not too high) pressure. Blow the air through the pipes and through the
honeycomb as well. The compressor should be used, but in necessity manual pump
can help. Repeat the cleaning until you're sure the result is satisfying. If
there's a lot of dirtiness on a honeycomb, use a wire to remove it from there.
Honeycomb is made of pretty gentle and thin aluminum so be very careful to avoid
making some damage on it. It's also a good idea to leave this job to a service
which has special machines for washing engine parts.
Yet another thing: if you
are going to clean the cooler, it's best to do this right before an oil change.
In this case engine will be cleaned from the maximum possible amount of used
oil which is very important.
Tip: when the cooler
is removed, it will make it easy to check cylinder cooling ribs and to
clean them also if needed. A lot of dirtiness can deposit there and aggravate
cylinder cooling. Don't miss an opportunity to do this job.
However, if some work
on the cooler is necessary, it has to be removed first.
Removing
oil cooler
- remove sheet panel with
a grille between front wings (Dyane and Ami) and protecting wire net in front
of the fan.
- remove the air filter
- remove the fan (follow
the instructions)
- unscrew all nuts and
bolts that are retaining the front air deflector (engine hood) - position
1 on figure 1, including engine mounting nuts (position 4)
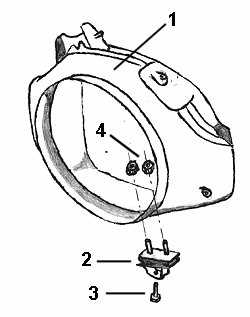
Figure
1: Front air deflector (engine hood) (1) and engine carrier (2) with
its bolt (3)
- unscrew the engine carrier
(2) retaining bolts (3)
- in order to remove engine
hood, engine carriers must be removed first; to do this, jack the engine up
for a little, so you can take them out
Note: if you don't
have appropriate jack for lifting the engine, you can ask someone (2 men needed)
to lift the engine on their hands until you do the job (which should last only coupple of seconds). In such a case manifold should be used for engine handling.
- now you can remove the
engine hood
Note: I've been
told that the engine hood can be removed without removing engine carriers: if
you know how, please notify
me
- unscrew the bolts that
connect cooler pipes to the engine oil pipes (position 1 on figure
2): use 14 mm open ended spanner; this can take some time because these
bolts are pretty unreachable
- remove sheet panel in
front of the cooler
- make sure there's no dirtyness
arround the pipes
- remove the cooler: certain
amount of oil will leak out, so be ready to cork the holes with something; be very carefull -
dirtyness must not enter!
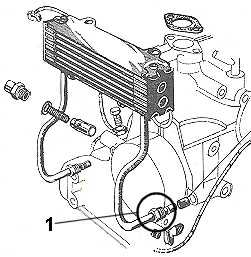
Figure
2: cooler mounting bolts (1)
IMPORTANT: you MUST
NOT start the engine when the cooler is off, because oil circulation is interrupted
and the engine can be damaged!
When the cooler
is cleaned or fixed, you can place it back (or mount a new one):
Mounting
oil cooler
- make sure that rubber
seals on the cooler's pipes are fixed properly ( position
6 on figure 3);
it can also happen that these seals do not leave the housing when you remove
the cooler: in such case just push the pipes back carefully
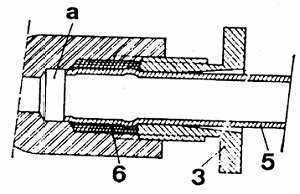
Figure
3: installing cooler pipes
- screw the bolts, which
you must do very careful: edges of the bolt heads can be easily damaged because
of very inconvenient position of spanner
- start the engine to
check the sealing between cooler pipes and the engine. If you have repaired
cooler which was leaking, also check critical points. Viscosity level of the
oil is lower on higher temperature level, so it is good even to drive the
car for a while in order to achieve higher temperature, which will make checking
more credible. But keep in your mind that the fan is off, so drive only for
short and don't push it too hard! Or, install the fan before drive.
- if you find out that
it does not seal well, try to screw the bolts harder. It can happen that you
must remove the cooler again and place it back with more care, but it's important
to do this job properly - be patient enough if needed!
- when everything is all
right, place all parts back. Pay attention for
electric wires behind the fan. Put some grease on engine hoods' edges to make
installing easier. Install engine hood before engine carriers (installing
is the same as removing but in the opposite order - you'll need to lift the
engine again). Tighten engine carriers' retaining bolts hard enough (6 daNm
tightening torque is determined by factory manual)