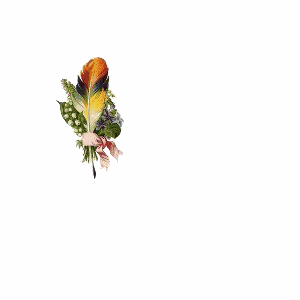
Materials needed: PSP - Animation Shop 3- Feather Tube
Font: Monotype Corsiva or another Font.
Lot's of patience - Ready? Let's start.
Open in PSP your Feather tube - click edit, copy and paste as new image, close the original, and move the copy in a corner.
Now Click Image Resize - width and height: 50 Percent - OK - Leave in the corner
Open a New Raster Image - width 300 pixels - height 300 pixels
Settings in Materials - Color Palette: Foreground Color: Black =#000000 (top square in Material Color Palette)
Background Color: Red = #C00000(bottom square in Material Color Palette)
Click on your Text tool: A - make it Floating - Monotype Corsiva - Size 72 - Stroke Width 1.0 - Anti Alias
Type your Initial and apply an Inner Bevel with the following settings
Effects - Inner Bevel
Bevel nr:1 Width:1
Smoothness:10
Depth:5
Ambience:0
Shininess:80
Angle:315
Intensity:25
Elevation:40
Color: white
After applying the Inner Bevel click: Selections - Select None
Hit Shift D a few times so you have a few copies of your Clear Initial.
Minimize the other initials and keep one activated
Activate your feather
Click Edit - Copy - Activate your Initial - Paste as New Layer.
Your feather is now on the Initial and you have now two Layers see right in the Layer Palette
Layer 1- Bottom is your Initial Layer - Layer 2- Top is your Feather Layer
In the Layer Palette activate Layer 2-Feather by clicking on it
With the Mover Tool move the Feather to where you want it to start to write.
We are now going to remove the Initial.
If the Feather is in the way move it a bit away from the Initial.
Now Highlight the Initial Layer in the Layer Palette by clicking on it.
Click on the Selection Tool
Draw a box around the Initial - Marching Ants are showing up - Hit the "DELETE" button.
The Initial is gone - the Marching Ants are still there - Deselect by clicking: Selections - Select None
Layers-Merge-Merge Visible
File-Save As: Feather1.jpg
Activate a clear Initial - Activate your Feather - Copy - Activate your Initial -Paste as New Layer
With the Mover Tool move the Feather to the second place where you want it to be.
NOTE: Every saved Feather.jpg means a move in the Finished Initial Quill.
Activate Layer1 - and with the Selections Tool draw a box around the Initial except
the area around the first and second place where the Feather has been moved and saved
Hit the "DELETE" button - Deselect by clicking: Selections - Select None
Layers - Merge - Merge Visible
File - Save As: Feather2.jpg
Do the above until the Feather has been moved around the Initial as if you are writing the Initial.
Depending on your initial and moves the saved feather.jpg's might vary.
Activate your Feather - Click Image - Rotate - Rotate Clockwise 90
Activate a new Initial - Activate the Rotated Feather - Click Copy - Activate the Initial - Paste as New Layer
The Feather is now on the Initial.
With the Mover Tool move it under the Initial.
Layers - Merge - Merge Visible
File - Save As - LastFeather.jpg
After the Feather has gone around the initial
we are now Ready to animate it in Animation Shop
Open Animation Shop
File - Animation Wizzard
Check: Same Size - NEXT
Check: Tranparant - NEXT
Check: Centered in Frame - NEXT
Check with the canvas color - NEXT
Check: Yes, repeat the animation indefinately
How long do you want each frame to be displayed? 40 - NEXT
Add Image - All Saved Feather Images - NEXT
FINISH
You have now all Feather Images in Frames
Click View - View Animation - Your Initial Quill is now Animated
If you like it then Click File - Save As myfeather.jpg - SAVE - NEXT - NEXT - NEXT - FINISH
You can find my Pastel Art Lesson here
Pastel Art
It is Translated into Dutch with Permission from
Nightshadow.
Enjoy! ~ Desiree ~
|
|