Let's Start Shall We!
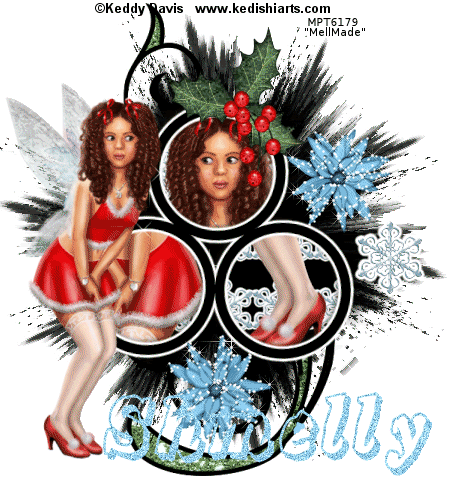
1. Open a new Image 500 x 500 and floodfill with white
2. Select your eclipse preset shape, foreground Black, background null and width of 10.00.
3. Draw out a circle(see my tag for size) and convert to raster.
4. Duplicate 2 times and move the circles into a triangle shape.
5.Hide your white background and merge visable the 3 triangles.
6.Magic wand inside each of the 3 circles. Selections, modify expand by 5
7. Copy and paste a paper of choice as a new layer.
8. On your circles layer, Selections, Invert and then on your layer palette hit delete on the paper layer.
9. Select none and move your paper layer below.
10. Now magic wand inside of the top circle, Selects modify expand by 5.
11. Copy and paste your tube as a new layer and position.
12. On your circle layer, go to selections, invert and then in your layer palette hit delete on your tube layer.
13.Select none and move the tube below the circle frame.
14. Repeat steps 10,11,12 and 13 for the remaining circles.
15. Now select a flower of choice, resize and copy and paste as a new layer.
16. Position your flower, duplicate and mirror, then duplicate again and move this duplicate so its at the bottom of the circle frames.
17. Merge visable these 3 layers. Duplicate 2 times
18. On your first layer use the following Xenofex 2 Constellation settings(small star constellation)

19. On your second layer repeat the above settings but change your random seed.
20 On your third layer repeat again the settings above and change the random seed.
21. Select none and on your layer palette, hide your 2 duplicate flowers
22. Layers new raster layer and flood fill with black. Move this layer to the bottom above your white background.
23.Layers, Load mask from disk, Select your mask and click ok
24. On your layers palette delete the mask layer and merge group.
25.Now on your mask layer, select all, float, defloat and duplicate 2 times.
26. On your first layer use the following VM Natural Sparkle settings

27. Repeat for the second layer but change the random seed.
28. Repeat for the third layer again changing the random seed.
29. Select none and hide the duplicate layers.
30. Add some embellishments of choice. I used the mistletoe, doodle and a snowflake from the kit.
31. Add your name and any wordart of choice
32. Add your �Information and crop your image
33. Edit copy merged, Open animation shop and paste as a new animation
34. Back to psp, hide the first layers on your mask and flower and unhide the second layers
35. Edit copy merge and paste after current frame in animation shop.
36. Back to psp, hide the second layers and unhide the third layers.
37. Edit copy merged and paste after current frame in aimation shop.
38. View animation
39. If your happy, file save as and follow the prompts.