|
Love Notes
Tools needed
PSP- I used version 9 but it should work with all.
Animation Shop
Filter/s- Mura Meisters Clouds
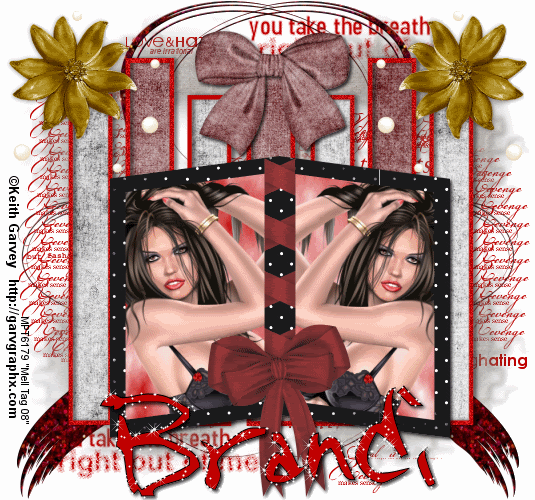
Tubes of choice- I used the work of Keith Garvey who is a PTU artist. You can buy his tubes at MPT. You MUST have a license to use his work
My template HERE.
Brushes of choice
Font/s of choice- I used a font called Note Scrawl which can be found HERE.
Mask of choice-I used a mask I made myself, You can download my
masks from the download section of my site.
Scrapkit- I used Love Notes by Brandi at Designs by Brandi. You can purchase this scrap kit from
HERE. If you choose not to buy this kit you may improvise with other scraps.
Ok.Lets get started.
1. Open a new transparent Image 550 X 500 and flood fill with white
2. Copy and paste my rectangle template as a new layer and colorize. Try and centre it as much as possible
3.Magic wand inside of the smaller rectangles, selection,modify expand by 2 and copy and paste a paper as a new layer
4. Selections invert on the rectangle layer and hit delete on the paper layer. Select None.
5. Repeat step 3 and 4 for the 3 larger rectangles,but use a different paper.
6.Move the paper layers below the rectangle template layer. and give your template layer a drop shadow with the settings below

7. Duplicate both paper layers and colorize them 0,0. hide these for now.
8. click on your white layer and copy and paste another paper of choice as a new layer.
9. Open up your mask of choice and go to layers, new mask layer from image, select your mask and click ok. delete the mask layer and merge group. Give a drop shadow
10. Click on your top layer..Copy and paste frame of choice, if using one from the kit i am using you will need to resize, Place near the bottom of your tag.
11. Magic wand inside of one side, selections modify expand by 5, layers new layer and flood fill with colour of choice. Go to Mura Meisters clouds and use the following settings.DO NOT DESELECT

12. Open up a tube and copy and paste as a new layer, resize if needed and position. 13.On your frame layer go to selections Invert and hit delete on the tube layer, select none and move the frame above these 2 layers.
14. Repeat steps 11,12 and 13, for the other side of the frame. Merge visable the frame,tubes and paper layers.
15. Open up a doodle of choice, resize and paste as a new layer below or above your mask layer. layers duplicate and mirror
16. Copy and paste any other embellishments.. I added some flowers from the kit and duplicated them and also some bows.
17.Add your �Information. Make sure it is correct and you have proper license #'s etc.
18.Now add your name and any other text.
19. Now before we animate, add a new layer above the white background and add some brushes of choice.
20.Open all layers, now hide the greyscale small rectangle papers and hide the greyscale large ones.
21. Edit copy merged and paste as a new layer in animation shop, back to psp
22. Hide the smal greyscale papers and open the colour ones, hide the large color ones and unhide the greyscale ones.
23. edit copy merged and paste after current frame in animation shop
24. Play with the frame properties a bit and when your happy, file save as and follow the prompts.
YOUR DONE!
This Tutorial was written on the 28th April 2008 by Mell aka Babylicious36
This tutorial is written using my imagination and is in no way copied from any other tutorial. Please do not Steal.. You may print this out for future use.
This page was assembled by Mell aka Babylicious36
Artwork � Keith Garvey www.garvgraphx.com MPT6179 |