
Saving the Family Heirloom
|
This orchid is affectionally known as "The Family Heirloom" because that's quite often what happens. Someone inherits one of Aunty Flo's old neglected cymbidiums. What are you meant to do with it?? Take care of it of course. And produce lots of flowers next year!! The following notes and pictures show the steps I took. Please email me if you have any specific enquiries. |
|||
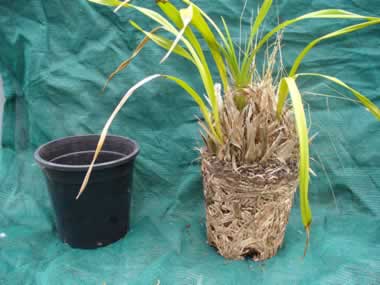
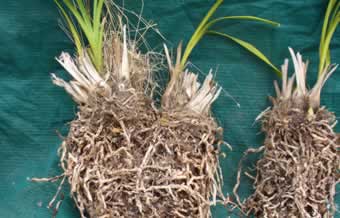
| This first example shows the Cymbidium out of the pot. The method I usually use is to lay the pot down on the edge of a bench with the leaves hanging over and hit the side of the pot with the bottom of my fist to distort the root ball and loosen it in the pot. In really difficult cases the pot can be laid on a piece of timber and rolled backward and forward with the sole of the boot. If that doesn't work then cut the pot off. To loosen up the roots I usually hold the plant by one or two of the bulbs and hit upwards on the base of the roots with the heel of my hand, working my way around the base. This will loosen the roots and allow the old mix to slowly come away. I find that this does less damage to the roots than any other method. In difficult cases the roots can be hit down on the top of a post to get the same effect.
|
 |
||
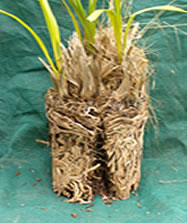
| To divide the plant I decided to start by
removing the green growth to the left of the picture above. As the root ball was very tight and few of the roots were in good condition I used sterilised scissors to cut up the front as shown in the right hand pic and to the left of the growth as shown in the left hand pic. The two cuts were cut right into the centre of the pot so the bulbs would come away reasonably easily. |
 |
 |
|
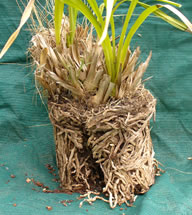
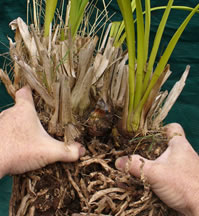
| In this picture I have got a good grip on the
two halves of the plant just below the bulbs and have pushed my thumbs
into the gap as shown in the pic directly above. I will prise the two pieces apart by rolling them backwards to open up the gap and then pull apart. You may need to cut a few more of the roots near the top if the two pieces won't roll apart. |
 |
||
| This picture shows the right hand piece separated from the other and I have also takn off a few of the back bulbs which were immediately above my left thumb in the pic above. I have then started to pull the remaining piece apart. |
 |
||
| This shows the middle piece separated from the larger piece. The pen to the left is in between some older backbulbs and the remaining plant. The front part will be pulled away from the backbulbs as can be seen in the pic below. Note that I have also taken all the old and detached roots from the right hand piece and have remove the backbulbs from the middle piece. This was necessary as the backbulbs were soft and could have caused rot in the remaining bulb. |
 |
||
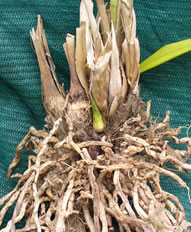
| This shows the removed piece cleaned up with all dead roots removed as well as the old sheaths from the three growths to the right. Care must be taken when removing sheaths as it is very easy to pull them downwards and break off a new growth eye at the base of the bulb. The correct technique is described below.
|
 |
||
| In this pic the left hand growth has been
turned around to reveal another new growth from the base of one of the
old leafless bulbs. All of the other backbulbs will be removed leaving
the one bulb with it's eye as can be seen below. Bulbs are removed by getting a good grip on the bulb with thumb downwards and then twisting down. Note that the old brown sheath on the pic to the right has been split down the middle starting near the top. The two halves can then be pulled sideways and backwards away from the new eye so as not to pull the eye away from the bulb. If you're not confident about this the sheath can be left on the bulb. |
 |
 |
|
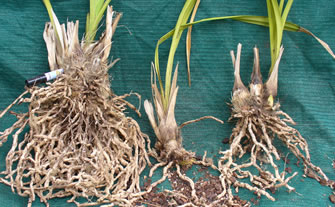
| Nearly there. The roots have been left
on the first piece from the left but as it has no leaves they could also
be removed.
The second piece has one bulb left attached as the growth itself has no roots. It will also act as a food supply for the new growth and will be removed later when repotting or sooner if it goes soft or shrivels badly. The third growth has roots still attached but these and the remaining leaves were removed before potting as the bulb was also treated as a backbulb. The small growth eye can be seen. |
 |
||
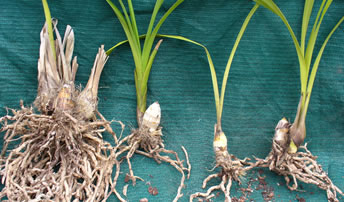
| And finally, the remains of the family heirloom. Grandpa's or Grandma's plant lives again. I don't hold out a lot of hope for the smallest backbulb as the rot from the attached old bulbs had started to get into the rhizome near the base of the bulb. I cut everything off as close to the eye as possible and treated the cut with fungicide so I will keep my fingers crossed. GO TO index for MORE ORCHID CULTURE INFO |
 |
||
| General notes I will take a pic of these 4 plants in the future and include here so you can see that outcome. | |||
NOTE
To avoid the junk mail filter the word 'orchid' must be included in the subject
of your email.