The TestDrive Applet - Version 1.1
I put these instructions together rather quickly (in 1996). If you have any problems understanding them or
making things work, let me know. Please don't ask me
for help using sound and image tools or coding HTML unless you have genuinely
tried to figure things out on your own. If you use this applet, please include a link back to this page
for anyone else interested in how it works.
To add the Z28 applet to your web page:
- Download z28applet.zip (108k) and unzip the files to
an empty directory (Get WinZip to unzip the file if you don't already have a compression utility.).
- Place the extracted files in a directory on your web server (such as your home page
directory).
- Create an HTML document and add the following HTML tag to the document:
<APPLET CODE="TestDrive.class" WIDTH=600 HEIGHT=150 NAME="TestDrive">
</APPLET>
- Place the new HTML document in the directory on your server where you copied the
extracted files. The HTML document will display the Z28 applet when it is loaded in your
web browser.
To customize the Z28 applet and add it to your web page:
- Follow the instructions above.
- The extracted files will include the sound files:
- startup8k.au
- revup8k.au
- burnout8k.au
- idle8k.au
and the image files:
- wheel(0-3).gif
- smoke(0-1).gif
- car0.jpg
You may replace any of these files when customizing the applet.
- To change the image files used by the applet:
- Obtain a digitized side-photo of the vehicle you wish to animate. You can take a
photo with a digital camera or scan a traditional picture with a color scanner. If you don't
have access to a color scanner or a digital camera, try getting a photo scanned at
a print or copy shop. You will also need an image editing tool such as
Paint Shop Pro.
| Crop the image so that there is very little extra space around the car, then fill in
the rest of the area around the car with a single color (whatever you prefer the
background to be). Save the image as a JPEG file. | 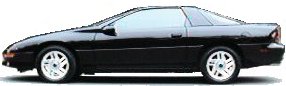
|
- Select and copy one of the wheels. The square area that you copy should include
as little of the actual tire as possible. Paste this selection as a new image and
fill the area outside the wheel with a solid color (pick a background color that is
not already in the wheel picture). Reduce the color depth of the
wheel picture to 256 colors, find out the index of the background color and save the
image as a GIF file, setting the image's transparency index to that of the background color.

- Rotate the wheel image 90 degrees and save it as a new file. Rotate it 180 degrees
and save it as a new file (Remember to reload the original wheel file so your rotation is
starting from 0 degrees each time.). Rotate the image 270 degrees and save it as a new
file. You may rotate the image less each time so that you end up with more than four
wheel pictures if you wish. Make sure the transparency index stays the same for each
file.
| If you wish, you can make several smoke images. These should also be saved as
transparent GIF files. | 
|
- Replace the image files you extracted from z28applet.zip with the files
you have just created. Make sure you use the same names as the old image files.
- Set the x and y offset parameters for the front and rear wheel pictures and the
smoke picture (see Modifiable parameters below).
- To change the sound files used by the applet:
- First you will need to obtain new sound files and a sound editing tool such as
Goldwave. To record original sounds you will
need either a digital recording device (such as a mini-disc player) or a device capable
of sampling analog sound recorded from a traditional recorder. If you have a very high
end sound card, it might be capable of this. Remember, you don't need to change the
sound files just because you changed the images. Nor is it necessary to change all the sound
files just because you change some of them.
- Using your sound editing software, create the sound files you wish to be played when
your car animation starts up, revs up, burns out, or idles. Save these sound files in the
8khz .AU format (make sure you give these files the same names as the files they are replacing).
The applet will only load sound files in this exact format (a limitation of the current
JAVA implementation). Some sound editing tools give you the option of saving in the
.AU format but do not save at the proper sampling rate (e.g. they might save at 22khz instead
of 8khz). If you have done everything else properly and are having problems getting
the sounds to play, try using the sound tool listed above and save the files as type .AU with
the file attributes set to "JAVA/Web, mono".
- Finally, set the applet parameters which specify the length of the sound files you are
using. This is not crucial, but it will ensure that everything is synchronized properly.
Modifiable parameters of the Z28 applet
Here is how to add a parameter value to the applet tag:
<APPLET CODE="TestDrive.class" WIDTH=600 HEIGHT=150 NAME="TestDrive">
<param name=parameter_name value="parameter_value">
</APPLET>
Example:
Adding the parameter below would tell the applet that the length of the burnout8k.au sound
file is 7000 milliseconds (7 seconds).
<APPLET CODE="TestDrive.class" WIDTH=600 HEIGHT=150 NAME="TestDrive">
<param name=burnoutSoundLength value="7000">
</APPLET>
Parameter List
You may change any or all of the parameters listed
below.
- name=backgroundColor
default value="#ffffff"
accepable values=any hexadecimal value
that can be used to specify the background color of an HTML document
- name=numWheelPics
default value="4"
This parameter should be set to equal the number
of wheel pictures available to the applet.
- name=numSmokePics
default value="2"
This parameter should be set to equal the number
of smoke pictures available to the applet.
- name=numFrames
default value="4"
This parameter determines how many animation frames
will be built and displayed when the applet's animation sequence is played. The animation
will appear best when this value is equal to the numWheelPics parameter or the numSmokePics
parameter, whichever is greatest.
- name=frontWheelXOffset
default value="39"
This parameter determines where the front
wheel images will be drawn on the x-axis. The top left corner of the main car picture is
coordinate 0,0 on the x,y-axis.
- name=frontWheelYOffset
default value="50"
This parameter determines where the front
wheel images will be drawn on the y-axis. The top left corner of the main car picture is
coordinate 0,0 on the x,y-axis.
- name=backWheelXOffset
default value="205"
This parameter determines where the back
wheel images will be drawn on the x-axis. The top left corner of the main car picture is
coordinate 0,0 on the x,y-axis.
- name=backWheelYOffset
default value="50"
This parameter determines where the back wheel
images will be drawn on the y-axis. The top left corner of the main car picture is coordinate
0,0 on the x,y-axis.
- name=smokeXOffset
default value="236"
This parameter determines where the smoke images
will be drawn on the x-axis. The top left corner of the main car picture is coordinate 0,0 on
the x,y-axis.
- name=smokeYOffset
default value="38"
This parameter determines where the smoke images
will be drawn on the y-axis. The top left corner of the main car picture is coordinate 0,0 on
the x,y-axis.
- name=burnoutSoundLength
default value="6100"
This parameter should be set to the
length of time in milliseconds of the burnout sound file (milliseconds=seconds*1000).
- name=startupSoundLength
default value="2700"
This parameter should be set to the
length of time in milliseconds of the startup sound file (milliseconds=seconds*1000).
- name=idleSoundLength
default value="1000"
This parameter should be set to the
length of time in milliseconds of the idle sound file (milliseconds=seconds*1000).
- name=revSoundLength
default value="4000"
This parameter should be set to the
length of time in milliseconds of the rev-up sound file (milliseconds=seconds*1000).
- name=acceleration
default value=".20"
This parameter controls how fast the car accelerates
during the burnout animation. A higher value results in faster acceleration, but a value of
.30 is probably the maximum for a realistic effect.
- name=deceleration
default value=".12"
This parameter controls how fast the car decelerates
after the burnout animation. A higher value results in faster deceleration, but a value of
.20 is probably the maximum for a realistic effect.
- name=offScreenDelay
default value="3500"
This parameter controls how long in milliseconds the car delays its drive back onto the
screen. If you increase the acceleration and/or deceleration values, you might need to increase
this delay to make sure the car does not drive back on the screen too soon.
- name=animationDelay
default value="1500"
This parameter controls the delay in milliseconds between the time you press the burnout button
and start of the animation sequence. This allows for a delay between the start of the burnout sound
and the beginning of actual tire-spin.