The maps at the end of the book show the whole sky on six sheets, the first and last maps showing circular sections round the north pole and south pole respectively and the remainder of the celestial sphere being divided into four sections and “flattened nut”. The lines drawn on the map show the right ascension and declination of the stars in the same way as longitude and latitude are shown on terrestrial maps. The right ascension lines are numbered in hours round the polar maps, and at the top and bottom of the remaining ones and the declination lines are numbered in degrees along the central vertical line of the polar maps and at the sides of the other maps, the north and south being marked. For example, the star Canopus in the constellation Carina on the south polar map is in the position R.A. 6h. 21m., -Dec. 52½o south and Altair, on Map V, is in position R.A. 19h. 46m., Dec. 8½o north. [*11]
The constellations (or groups of stars) in the northern part of the sky are mostly named from characters in Greek myths, such as Orion and Perseus. The southern part of the sky, Which could not be seen by the Greeks, was divided up by astronomers and the sections given names chosen by them, for example Telescopium (the telescope). The names of some of the more important stars have been derived from Greek or Arab legend. Others are named by a Greek letter and the name of the constellation in which they are situated. Usually, though not always, the letters are allotted nearly in order of brightness of the stars in the constellation, for instance α will be brighter than β, and so on. So that you will be able to use the names, a list of the Greek letters is given below.
| α Alpha | ζ Zeta | λ Lambda | π Pi | φ Phi | |
| β Beta | η Eta | μ mu | ρ Rho | χ Chi | |
| γ Gamma | θ Theta | ν Nu | σ Sigma | ψ Psi | |
| δ Delta | ι Iota | ξ Xi | τ Tau | ω Omega | |
| ε Epsilon | κ Kappa | ο Omicron | υ Upsilon |
The relative brightness of stars in the sky is designated by numbers 1, 2, 3, etc., called magnitudes. The brightest stars have magnitude 1, and the fainter the star the larger the magnitude number. For example, Arcturus, Regulus and Spica on Map No. IV are 1st magnitude stars, while the star marked η to the right of Arcturus is a 3rd magnitude star. Stars down to a little fainter than the sixth magnitude can be seen with the naked eye. There are about 6,000 of these over the whole sky, only half of which can be seen at any one time.
Table I gives the sidereal time or right ascension on the meridian at various hours during the night at different times of the year and will indicate which map to use. For example, on February 5, at 10 p.m. the right ascension on the meridian is 7 hours. Since this right ascension is on Map III this is the map to use. The table shows that a given star appears four minutes earlier each day.
In order to compare the maps with the sky, turn them in various ways so that the stars on the map will have the same orientation as the part of the sky being examined. The end of the maps marked N will always be to the north, and the higher right ascensions will always be towards the east. Note particularly that the right-hand side of the four equatorial maps is the west and not the east as is the case with terrestrial maps. This is because we look at the celestial sphere from the inside rather than from the outside as we do for the Earth. From New South Wales or places of similar latitude when you are looking at the sky to the north you will find it necessary to turn the top of the maps downward, and when looking towards the east the top left-hand corner of the maps should be held downward. It will be necessary to use neighbouring maps to cover the whole of the sky visible at the time. In the example quoted above if we look further eastwards [*12] in the sky we will go out of the area represented by Map III and enter the fight-hand side of Map IV. The right ascension on the meridian from Table I shows also the part of the polar region which is uppermost.
------------------------------------------------------------
                                 Mid-
Date.    6 p.m.  8 p.m. 10 p.m.  0 a.m. 2 a.m. 4 a.m. 6 a.m.
                                 night
------------------------------------------------------------
Jan. 5      01     03      05     07      09     11     13
Jan. 21     02     04      06     08      10     12     14
Feb. 5      03     05      07     09      11     13     15
Feb. 20     04     06      08     10      12     14     16
Mar. 7      05     07      09     11      13     15     17
Mar. 22     06     08      10     12      14     16     18
Apr. 6      07     09      11     13      15     17     19
Apr. 22     08     10      12     14      16     18     20
May 7       09     11      13     15      17     19     21
May 22      10     12      14     16      18     20     22
June 6      11     13      15     17      19     21     23
June 22     12     14      16     18      20     22     24
July 7      13     15      17     19      21     23     01
July 22     14     16      18     20      22     24     02
Aug. 6      15     17      19     21      23     01     03
Aug. 22     16     18      20     22      24     02     04
Sept. 6     17     19      21     23      01     03     05
Sept. 21    18     20      22     24      02     04     06
Oct. 6      19     21      23     01      03     05     07
Oct. 21     20     22      24     02      04     06     08
Nov. 6      21     23      01     03      05     07     09
Nov. 21     22     24      02     04      06     08     10
Dec. 6      23     01      03     05      07     09     11
Dec. 21     24     02      04     06      08     10     12
-------------------------------------------------------------
The best way to begin learning the stars is to work outward on the sky and the maps at the same time from a part of the sky you already know or have managed to identify with certainty from the directions already given. The best constellations to start with are Crux (the Southern Cross), Orion or Scorpio. Suppose that Crux on the south polar map is already known and we wish to work from this. In the line from α in Crux to β in Crux and about twice this distance further we see a bright star marked on the map β in Centaurus and a little further another marked α. The same configuration can easily be found in the sky. By thus connecting the stars in the sky and on the map with imaginary geometrical figures it is easy to extend the known region. After a few nights spent with the maps you will be surprised at the number of constellations and individual stars you can recognize. The maps may also be used later to find the position of the stars in right ascension and declination for purposes of finding direction and time. [*13]
[The maps are drawn on Clarke’s minimum error perspective projection, the centre of projection being 1.01 times the radius distant from the centre of the sphere. The stars were taken from the Yale “Catalogue of Bright Stars”. In plotting the stars of variable brightness (of which there are 31 on the maps the variability was neglected when the star varies less than 1 magnitude, or if the magnitude is constant for most of the time. This left only Mira Ceti and η Carinæ, which are represented by untilled circles. In four places stars are not placed on the maps in their proper coordinate places since they were too close together in the sky. The only case that need be mentioned is the Pleiades, the group. of six stars in the constellation Taurus, where the scale is locally increased so that the relative positions of the group are maintained. The designations of nearly all stars to the third magnitude, including all likely to be used for navigation, are placed on the maps.]
The best brief description of the nature of stars is the statement that our Sun is a star. The other stars appear so much fainter and smaller than the Sun because of their immensely greater distances. Many of the stars, most of those visible to the naked eye, would appear much brighter than the Sun if they were as near to us. The Sun is situated in a great system which includes many millions of stars. The system is roughly disc shaped, and its size is such that it would take a ray of light, which travels at 186,000 miles per second, a hundred thousand years to cross it from edge to edge and six thousand years to traverse its thickness. The Sun, and with it, of course, the Earth, is situated about the centre of the thickness of the disc at a third of the way in from the edge. If we look in the direction of greatest extension of the star system, that is in the plane of the disc, it is natural that we see many more stars than if we look perpendicular to it, and so there is a zone in the sky where the stars appear to cluster. This region in the sky is the Milky Way, which consists mainly of millions of stars, most of which are too faint to be seen individually. Its approximate extent is represented on the star maps by the shaded area. It will be noticed that in some places there appear to be gaps in the Milky Way (the very noticeable one near the Southern Cross is called the Coal Sack) and that along a good deal of its length the Milky Way is divided bv a dark patch down the middle. These patches do not represent places in the star system from which stars are absent, but are due to the presence of large bodies of gas and dust in space. This gas is very tenuous; in fact, according to our standards, a very good vacuum, but on account of its extent it absorbs the light from the stars behind it and we see what appears to be a gap in the Milky Way.
Detached from the Milky Way are two areas similar to it in appearance, depicted on the south polar map, and known [*14] respectively as the larger and smaller Magellanic Clouds. These are star systems, similar in constitution, though probably not in shape, to the Milky Way, in which we are situated and which is very much larger. There are known to be many millions of other star systems beyond ours as far into space as it has been possible to observe.
Some of the readers of this booklet will intend to study navigation, and an understanding of the apparent movements of the heavenly bodies and a familiarity with the stars will be of great assistance to them if gained beforehand. Although only a few of the stars on our maps will be actually observed for position, it will quite often occur that much of the sky will be overcast, and when this happens difficulty may be experienced in the identification of the star you are able to observe. This would lead to delays in obtaining the fix, which might be very serious in the air. If you are familiar with the sky, difficulty of this kind will be much less probable.
The following is the principle on which astronomical navigation is based. When you think of the Earth at the centre of the celestial sphere as represented in Figure A, it will be realized that at a given instant for every star it is possible to choose a point on the Earth’s. surface such. that the star is exactly overhead at that point. Let us call this point the sub-stellar point. Suppose a star has been observed for position. If we know the Greenwich mean time at which the astronomical observation for position was made, you can see that it should be possible to know just what the configuration of the sky was at that instant, hence we can find the point on the Earth’s surface at which the observed star was in the zenith.
The observation consists in measuring how far from the zenith the star appears to be at the place of observation. If the star is at the zenith, we know that we are at the sub-stellar point, and the further the star appears from the zenith the further our distance from this point. In fact the distance from the sub-stellar point, measured in nautical miles, equals the angular distance of the star from our zenith, measured in minutes of arc, so that our astronomical observation has given us our distance from a given point on the Earth’s surface. If, by observing a second star, we can obtain our distance from a second point, it will be seen that our position is completely fixed.
|
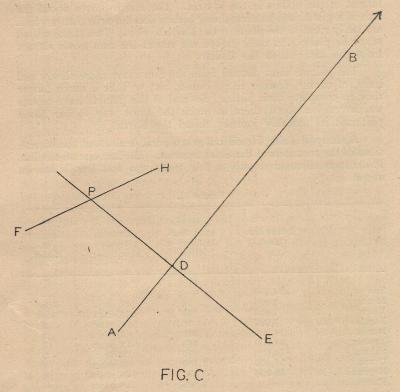
This merely explains the principle involved, and the process is modified as follows for convenience of application. A geographic position is assumed, and using this and the time of the observation the navigator computes the altitude which the observed object would have had if the assumed position had been correct. The difference between the observed and calculated altitudes gives [*15] a measure of error of the distance of the assumed position from the sub-stellar point. The navigator then draws a position line on his chart perpendicular to the direction of the observed object and at the determined distance from the assumed position. If he is able by taking two observations to draw two position lines, then the true position must be at their point of intersection. If the ship or aircraft has moved between the two observations, this may be allowed for by movement of the first position line. For example, suppose Figure C to represent portion of a chart, A being the assumed position and AB the direction of the observed object. The computed altitude of the object was less than the observed altitude by an amount corresponding to the distance AD. The navigator then drew the position line DE. He was able in the same way to use a second observation to draw another position line FH. Then P must have been his true position. [*16]
Having described the appearance of things in the sky, it is logical to take a viewpoint away from the Earth and try to give reasons for some of the movements described. It is seen that the Earth is one of a number of bodies (the planets) revolving about the Sun. It is a member of the Solar System. The Sun is by far the largest of the bodies in the system. The Earth moves about the Sun in a plane, and the remaining bodies also move in planes which are fairly close to the plane of the Earth's orbit. This is the reason why the planets in their movement round the Sun never depart from the zone called the Zodiac.
The planets most distant from the Sun move more slowly and have, of course, further to go round, and so take a much longer time to complete their paths. Several of the planets have moons which revolve about them in much the same way as our Moon performs its monthly journey round the Earth.
A study of Table Ii will tell you a good deal about the dimensions of the members of the Solar System. The last one on the list, Pluto, was discovered only a few years ago and less is known about it.
***********************************************************
                          Distance
              Diameter.   from Sun.    Time to     Number
              (Miles.)  (Millions of   Revolve       of
                           Miles.)    about Sun.    Moons.
***********************************************************
 Sun     ..   864,000         --        --           --
 Mercury ..     3,000         36       88 days      None
 Venus   ..     7,600         67      225 days      None
 Earth   ..     7,927         93        1 year        1
 Mars    ..     4,200        142        2 years       2
 Jupiter ..    88,700        483       12 years      11
 Saturn  ..    75,000        886       29 years       9
 Uranus  ..    31,000      1,738       84 years       4
 Neptune ..    33,000      2,793      165 years       1
 Pluto   ..         --     3,666      248 years      --
***********************************************************
Our Moon has a diameter of 2,200 miles and moves around the Earth at a distance of about 240,000 miles.
It is of interest to express the measurements of the Solar System in the same terms as were used for the stellar system in the section on the Milky Way. Light takes only 8½ minutes to reach us from the Sun, and a ray of light would cross the whole Solar System from one end of the orbit of Pluto to the other in about 11 hours. But it would take more than four years to reach the nearest star. [*17]
The Moon gives out no light of its own; it is merely a huge bail, and the light we see is reflected from the Sun. The Sun lights up one hemisphere of the Moon’s surface and this is the part that appears fight. As the Moon-proceeds in its orbit we get different views of this lighted portion and its outline assumes different shapes.
A few minutes experiment with a lamp as the Sun, your head as the Earth, and a tennis ball as the Moon will show the various phases quite clearly. Move the ball round your hand so as to represent the motion of the Moon in its orbit. When the Moon is in a direction opposite to the Sun the whole of the visible half of the Moon is illuminated and the Moon is full. If the direction of the Moon is at right angles to the direction of the Sun, only half of its surface is illuminated, as it appears at first or last quarters. When the Moon is straight towards the Sun the illuminated half is pointed away from us and it cannot be seen. This stage is called new Moon; About a day or so after the Moon has passed the new we begin to see the edge of the illuminated portion as a crescent.
The existence or otherwise of moonlight may affect military operations considerably, and it is therefore desirable to know approximately the state of the Moon, whether it will be full or not, and approximately its time of rising and setting. Usually, no doubt, a calendar will be available giving the dates on which the various phases of the Moon occur, but in any case if it is remembered that there are 20½ days from full Moon to full Moon it should be easy to make an estimate of the state of the Moon for some time ahead, the interval between the phases, full Moon, last quarter, new Moon and first quarter being in each case approximately 7¼ days. The age of the Moon is the number of days since the last new Moon. A knowledge of the phase of the Moon makes it possible to estimate its time of rising and setting. The experiment with the lamp and tennis ball will help towards understanding this. At full Moon, when the direction of the Moon is opposite to that of the Sun, the Moon rises at sunset and sets at sunrise. At new Moon, when the Moon is in the same direction as the Sun, the Moon rises at sunrise and sets at sunset, but, of course, it cannot be seen, since it is so close to the Sun. It may be seen as a thin crescent when it is a day or so old. In first quarter the Moon is at right angles to the direction of the Sun and reaches its highest point in the sky (that is, it is on the meridian) at sunset, and at last quarter it reaches its highest point at sunrise. This means that at first quarter it is moonlight in the first half of the night and at last quarter it is moonlight in the second half. The time when the Moon is on the meridian may be found approximately by adding 0.8 of the Moon’s age in days to twelve, and if necessary subtracting twenty-four hours. The Moon rises or sets later each night, the difference averaging forty-eight minutes, but since the Moon is moving in a [*18] north-south direction in the sky as well as towards the east, this figure may vary a good deal; however, it will serve as an approximation. Directions for finding the times of risings and settings of the Moon may be found in the Nautical Almanac, together with the material for putting the directions into practice, but, since it is only for the year to which the Almanac applies, a permanent table, cannot be given.
During the experiments with the lamp and the tennis ball, you will have noticed that if the tennis ball came directly between yourself and the lamp you could not see the lamp, and this is what happens when the Moon (which will be a new Moon) comes between the Earth and the Sun. The light from the Sun is cut off and there is an eclipse of the Sun. If at full Moon the Earth comes directly into line between the Sun and the Moon, the light from the Sun does not reach the Moon and there is an eclipse of the Moon.
An eclipse of the Sun does not take place at every new Moon nor an eclipse of the Moon at every full Moon, because the orbit of the Moon is slightly tilted out of the plane in which the Sun and Earth always lie (the ecliptic), so that at new Moon the Moon more often passes above or below the line which would give an eclipse and at full Moon passes above or below the shadow of the Earth. It is only when the Moon is in the plane of the Earth’s orbit just at the time of new Moon or full Moon that we see an eclipse. When the Moon does not get exactly in front of the Sun and so covers only part of it, or when only part of the Moon goes into the Earth’s shadow, partial eclipses occur.
If no watch is available and it is a clear night, it is possible to get an estimate of the time from the stars. In the southern hemisphere the Southern Cross (Crux) is the easiest group to use. Imagine a large clock face in the sky with twenty-four divisions in its face instead of twelve. The centre of its face is at the south celestial pole (the centre of the south polar map) and, with the division 0 at the top and 12 at the bottom of the dial, it is numbered round in a clockwise direction (the opposite way to the numbering round the map). Now regard the star Gamma in Crux as the tip of the hour hand and read off the time from the imaginary clock in the sky and add two hours for every month to pass till the next March 31st. A little practice will be needed before you will be able to read the time from the sky clock. Remember that if the final result is more than twenty-four hours you will need to subtract twenty-four hours to get the time. Do not forget that in this method of telling the time there are twenty-four hours in the day, so that what we usually call ten o’clock at night will be twenty-two hours, and not 10 p.m. With a little practice this method of finding [*20] the time is fairly easy and should give results within half an hour. Although this is not very accurate, circumstances might exist in which it would be very useful to know the time even with this accuracy. A similar method may be used in the northern hemisphere, but remember that there the stars will appear to move fit an anti-clockwise direction, so that the imaginary clock must be numbered round in the opposite way from the usual clock face. The line from Polaris to the star Alpha in Ursa Major is used as the clock hand and the steps to find the time are :
(1) Read the time as shown by the twenty-four-hour sky clock, remembering that the numbering is anti-clockwise.
(2) Add two hours to this for every month to pass till it is again March 7th.
These methods, using motion of stars about the pole, have the disadvantage that in some latitudes some of the stars will go beneath the horizon. Another method, and one giving somewhat more accurate results, is as follows:
Step 1. Find a star exactly overhead, a small deviation to the north or south will not matter, and estimate its right ascension from the star maps. Step 2. Add two hours to this for every month to pass till the next September 22nd, remembering that twenty-four hours may be subtracted from the final result if this is more than twenty-four hours.
Again keep in mind the fact that a twenty-four hour clock is being used. In fact the twenty-four hour clock is always used for astronomical purposes and it is a pity that it is not more generally adopted, since it would be much more convenient than the conventional way of saying a.m. and p.m. with two twelve-hour intervals.
Example: The star Spica was found to be directly overhead on May 281h. From the map the right ascension of Spica is approximately 13h. 22m. Since on May 281h 3¾ months have to pass till September 22nd, we must add 7½ hours to this, giving 20h. 52m. as the time {in ordinary affairs this would be called 8.52 p.m.).
It is very important to remember that the time obtained by these methods is mean time, which for estimates of this kind may be regarded as sufficiently near to standard time, but when summer time is in force, the amount by which clocks have been advanced must be added.
Figure III gives the means of finding the time of sunrise and sunset in latitudes between south 45o and north 45o. To get the time of sunrise, use the top section of the figure, take a point on the date line corresponding to the date for which sunrise is wanted, and [*20] run perpendicularly to the date line from this point until a distance is reached corresponding with the latitude; then estimate the fraction of the distance between the two neighbouring time lines and read off the time of sunrise to the nearest minute. In order to avoid putting too many figures on the diagram not all of the time lines have been numbered, but with the numbers on the diagram, and allowing for the fact that the lines corresponding to the hours and half hours are thicker, it should be easy to see what time belongs to any line. In order to estimate the fraction of the distance between the time lines it is best to run exactly horizontally or exactly vertically. The direction to use will be the one giving the shortest line. Subtract four minutes for every degree east of the standard time meridian, or add four minutes for every degree west of it. For example, the time of sunset at Sydney, latitude 34o S., longitude 151¼ oE., standard time meridian 150o, on February and is estimated from the figure to be 19h. 05m. {i.e. 7.05 p.m.}. Subtract five minutes for the distance east of the standard time meridian and the standard time of sunset is 19h. 00m. The time of sunset, September 281h, in latitude S. 10o, longitude 120o, standard time meridian 120o, is estimated from the diagram as 17h. 50m. The same procedure may be followed exactly for sunrise. From a number of examples it appears that the times obtained from this diagram will very rarely be more than two minutes in error; in fact, only one of the worked examples had an error as big as this.
It is important sometimes to know at what time it will begin to be light, but this depends a good deal on the prevailing weather conditions. However, the time of civil twilight, described in the Nautical Almanac as the time when ordinary civil outdoor occupations become possible, may be taken before sunrise approximately as follows: at 20o latitude, 22 minutes; 20o latitude, 24 minutes; 30o latitude, 26 minutes ; 40o latitude, 31 minutes. Twilight ceases the same time after sunset. At the beginning or ending of civil twilight ordinary print can only be read with difficulty. At twice this time before sunrise or after sunset it is not possible to see the silhouettes of large buildings half a mile away, and only in clear country could one reasonably hope to see a man who wished to remain unseen 100 yards away. At three times this time before sunrise or after sunset it is for all practical purposes as dark as it will be. Anyone making use of these times should try to familiarise himself with the amount of light at various times before sunrise or after sunset and alter the figures to suit his needs.