Welcome to my HTML tutorial. I hope you will find this guide helpful and easy to understand. I will try to include examples of everything you might find in a basic website. If you want an example of how to do frames or complex scripts, you've come to the wrong place. Please check out the links at the bottom of the page for good explanations on how to do frames. Sorry.
Tags are the basic elements of an HTML document. They are what define a document as being a webpage, and serve as instructions to the web browser on how to display text, images, and links to other documents. A tag is made up of two main parts. The first element of a tag are the brackets (which are actually the symbols found above the , and the . keys on your keyboard--look at this document's source code for a look at them in action). Inside these 'angle brackets', as these are called, is the second element of an HTML tag--the command code. This can be anything as simple as a letter-- P for paragraph, I for italics, or BR for break--or the command code can be a long, detailed instruction of the size, color, and alignment of a given string of text. There are other uses and examples as well, but you get the point. Most tags come in pairs. Like a light switch, these must be turned on at the begining of your document or string of text to be modified, and then turned off at the end. A closing tag looks identical to the opening tag, except that it has a forward slash mark (/) after the first angle bracket (also called the less-than symbol) and before the command code text. It is true that some tags have no need to be "turned off". In the following sub-section, you will see examples of both kinds of tags. If you haven't done so already, click on the 'view' menu button at the top of your browser, and then click on 'source'. *You will then see the actual code of this page and will be better able to follow along. IF YOU DO NOT LOOK AT THE SOURCE CODE, YOU ARE ONLY GETTING HALF OF THE LESSON.
Here is a partial list of important tags and what they are used for in an HTML document:
In the code of this document, I have included explanations of some of the tags and other tools used in this page. I have set this documentation apart so it can only be viewed when looking at the source code for this document, and can be found in the tags designated by an exclamation point (!).
Images bring color and life to any document. Websites are known for their ability to handle multimedia, and so it should follow that you should add some images to your site. What graphics you add are your choice, but here are some examples of the code you will use for adding them into your page Remember to look at the source code to see how this is done. Otherwise, you wont understand what's going on.) :
|
Here is a picture of me: 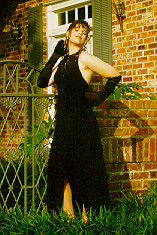
|
Here is the same picture, resized by HTML code:
|
By adding height and width values to the image code, you can resize an image really to any dimensions. However, as you can see, the quality gets bad the more you alter the original size. It is best to only resize simple images, or keep the image near its original size.
The above image examples are not aligned in an eye pleasing manner. You can position images at the top, baseline, right, left or center of your area to make a design that is more organized:
This image is positioned on the left:
This image is positioned on the right:
And this one is positioned in the center:
Notice how the images above are slightly off of vertical alignment. In order to have the images side-by-side, you must use a table, as shown in the resized images of me, above. In order to align tabled items, you must use the VALIGN specification:
|
Here is a picture of me:
|
Here is the same picture, resized by HTML code:
|
In order to wrap text around an image, you must align your image either left or right. If you specify top or baseline, the text will stop before your images and continue after.
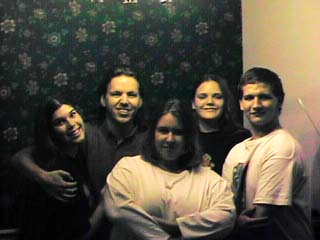
This is a picture of me and my friends at a party in Shreveport, LA. We had a blast and slept over at the small apartment where the party was held. Four of the people pictured plus the guy with the camera had to sleep in the livingroom, side by side, because there was only one bedroom. Good thing there wasn't much furniture! My hubby and I had to get home for a school function at 8 AM so we really didn't get that much sleep anyway :)
The trick is to write a paragraph, insert your image after the first closing tag for your paragraph, and start a new paragraph immediately following your image, with no breaks in between. When your paragraph finds the bottom of your picture, it will automatically wrap around to the left margin.
Linking a document to another document is what the Internet is all about. It's Random Access taken to the extreme. Most people use three kinds of links in their webpages.
The first kind is a link inserted into the regular text of their page. The person may be writing about his girlfriend Mary, and use the mention of her name to create a link to a page all about Mary.
The second type of link is an image that serves both as a regular picture or illustration, and also as a means to get to a page with more pictures or further information. This type can be found in the main body of the webpage, or at the end, in a special links section.
The third type of link is much like the first, exept that the links are in their own special section of the page, not stuck in a paragraph.
There is a fourth type, but it is not as widely used. The fourth kind is called an anchor, and it is used to link to an item further down on the current webpage.
Examples are as follows:
A link in a paragraph takes you to another webpage, and you can click on it while reading information about that other page.

If you are linking to a site on unicorns, you can use an image of unicorns to link to that page. When a user passes his or her cursor over the picture, the picture will be highlighted just like a text link would, and the target url will appear in the bottom toolbar of your browser.
I will now use the 'anchor' link type to take you to the links section.
You can use links in a variety of other ways besides the ones shown here. You don't have to link just to other HTML pages, but you can also link to movies, sounds, programs, FTP sites, Gopher sites, newsgroups, email addresses, and telnet sites. Below, I've included the text of the code used to create these types of links, but i haven't made them working links. All you have to do to implement these into your code is to inclose them in angle brackets and type a lable for the link (such as the word 'another' in an above example) and then enclose /A in angle brackets immediately after. Then you will have a working link to whatever file or document you have intended.
To link to movies, sounds, programs or other files on your own or someone
else's webpage, use this code:
To link to an FTP site:
To link to a Gopher site:
To link to a newsgroup:
To link to an email address:
And to link to a Telnet site:
I hope you have found this guide helpful. If you have trouble understanding certain points or need further information, consult a book such as Elizabeth Castro's HTML 4 for the World Wide Web, an excellent guide for the beginner or intermediate-level coder. If your question is simple, feel free to email me. Thanks for visiting, and tell your friends about this tutorial. :)
Some characters, like the angle brackets, will not show up in your document. Indeed, including them in your page may cause a browser to interpret your text as HTML code, producing bugs or even causing your page to load improperly. To use these symbols in your page, then, you must use special codes that insert them in your document. Some of these are as follows: You must look at the source code to see how these symbols are inserted!!!
Although both Netscape and IExplorer understand 16 colors (Silver, Gray, White, Black, Maroon, Red, Green, Lime, Purple, Fuchsia, Olive, Yellow Navy, Blue, Teal, and Aqua) by name (you can use these in text or background colors instead of the six-digit numeric designations I've used), you may want to use a color that is different from those 16 'easy' colors when designing your page.
To understand how hex works, we must break down the code. Hex is nothing more than three pairs of color codes strung together. The first two digits in the hex code represent the amount of blue in a color, the second pair represent how much red is present, and the last pair tell us how much green is present. You can combine the 16 symbols used to designate hex in many ways to come up with different colors. An easy way to experiment with this is to insert the BODY BGCOLOR="#000000" tag at the top of your document and change the hex code to change the background color. Just keep saving after every change, and load up your file on your web browser to see the results. You will have to refresh your page after every save.
Remember, the 16 hex symbols are (from greatest to least):