Scanning CD jewel case inserts
alt.binaries.sounds.music.classical
november 25, 2001, Version 0.02
A practical, straightforward, description of scanning, editing and printing
CD inserts and booklets. This FAQ is written for the alt.binaries.sounds.music.classical
group.
1. INTRODUCTION
1.1 Purpose of this FAQ
1.2 You need...
1.3 Naming conventions
2. OPENING THE CASE
3. OUTLINE OF THE METHOD
4. THE SCANNING
5. THE EDITING
5.1 Image types
5.1.1 "gif" images
5.1.2 "jpeg" images
5.2 Steps for correcting the picture
5.3 Cropping the image
5.4 Enhancing the contrast
5.5 Enhancing the sharpness
5.6 Creating a small border around the scan
5.7 Saving the image
5.7.1 Saving the image as "jpeg"
5.7.2 Saving the image as "gif"
6. THE PRINTING
6.1 Printing your own art work
6.2 Printing someone elses art work
7. THE CUTTING
Scanning CD jewel case inserts
1. INTRODUCTION
1.1 Purpose of this FAQ
This faq describes how to scan, digitize and print CD inserts and booklets.
It’s purpose is to give you a straightforward, practical method that yields
good results. "Practical" means: it works for me. Yes, there are many
other roads towards the same, desired result. This FAQ is for you if you want
quality and exact copies of your CD inserts and booklets. The FAQ assumes you
have little experience with image editing.
Not covered here is scanning the CD itself and printing
CD labels.
I’m assuming you are using ordinary paper sizes like A4 and no special stuff,
preformatted paper, special tools etc. Nor do you need a specialized program
for editing and printing CD inserts.
1.2 You need ...
- A scanner (I use an HP 4100C scanner)
- A color inkjet printer (I use an Epson 740C inkjet color printer)
- An image editor program for enhancing the scans (I use CorelPhotopaint 8.0).
You only need some basic functions, so many image editors will serve well
- A computer, obviously
- A steel ruler and a knife, for cutting
- Glossy or matted inkjet paper for color photo quality. You don't need a
special size, just A4 or legal
1.3 Naming conventions
People use different words for referring to the few pieces that make op the
CD case:
- CD jewel case = the whole thing
- the CD itself = you guess it
- the front and the back = the two transparent moving pieces
- tray = the container to fix the CD in its place, usually black
- spine = is the small back or the small front edge

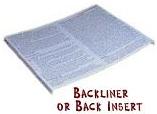

The following pieces of this CD jewel case contain text and image info:
- CD-label - we are not going to scan this
- front insert or front cover or front
label (4.7188" x 4.75", 120 mm x 121 mm)
-
back insert or backliner
or back cover, including end flaps (4.62" x 5.87", 117 mm x 150
mm)
- booklet with booklet-cover, -back and
-pages (same size as front cover)
Use these names when posting your scans to newsnet.
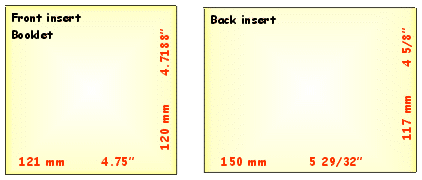
Size of front insert, booklet and back insert
2. OPENING THE CASE
Booklet and/or front insert are easy to remove from the CD case. To reach the
back insert, however, poses some difficulties. With trial and error, you will
learn this. But I might just as well give you my convenient method.
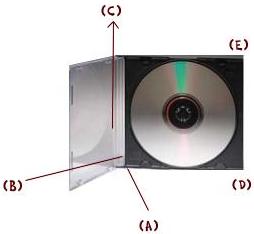
- Open the lid of the CD case;
- Take the case in your right hand, keeping hold of both front and back;
- Press the nail of your left hand thumb between the transparent back and
the black tray, in the top left corner (A);
- Press the nails of your second and third fingers of your right hand between
the transparent back and the black tray, also in the top left corner (B).
With your right hand, lift the black CD tray from the transparent case; the
top left corner will come loose;
- With your right hand, gently pull the black CD container to the left (C);
the top right corner will come loose;
- Rest the CD case in your left hand, your thumb to the left side, your little
finger and third finger to the right side. Now press the bottom of the back
of the case with your second finger so it becomes hollow;
- With your right hand, in one and the same movement lift the black tray up
and pull it a little to the right; the bottom left corner (D) will come loose;
- Now, lifting the final bottom right corner (E) is a piece of cake.
I hope you got it.
3. OUTLINE OF THE METHOD
The method followed here does not make use of special
jewel case design programs nor does it involve the use of special formatted
paper. Instead, we are using ordinary (inkjet) paper and a general purpose pixel
oriented image editor.
- We will scan the inserts and the booklet at a resolution of 350 dpi;
- We will save it as a ".tif" picture;
- Using the image editor, we will enhance the contrast and the sharpness;
- We will save the enhanced picture as either ".jpg" or ".gif"
image. The image has a reduced size now;
- You can print the picture, using the same resolution as the scan (350 dpi)
on inkjet photoquality paper;
- Using a steel ruler and a sharp knife, we will cut out the insert from
the paper.
Below, we follow each of these steps in some detail.
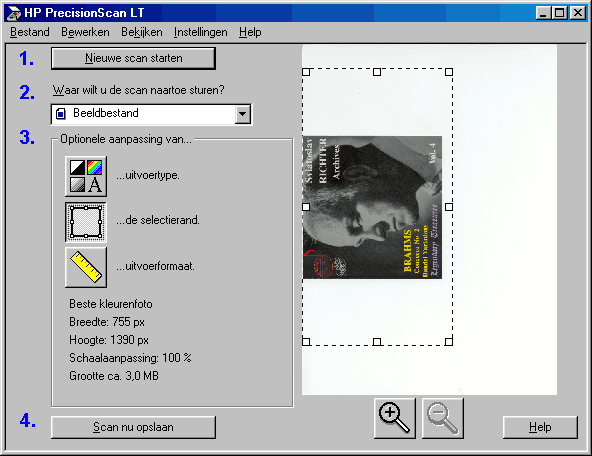
4. THE SCANNING
The dialogue windows of my printer driver are in Dutch, sorry for that. I'm
giving a few suggestions for scanning your CD inserts here.

- First, thoroughly clean the surface of the scanner. Dust is your enemy.
Use special screen cleaning wipes, or other cleaning products.
- Put the cover on the scanner bed.
- Set the scanning resolution to 350 dpi (dots per inch). Be sure this resolution
is optic, not digital. Is 350 dpi essential? No, I think 300 or 250 is acceptible.
Remember the mp3 discussion about encoding in 192 kbps versus 256 kbps? That's
the same thing. You know that 128 kbps is insufficient. Likewise, scanning
at resolutions lower than 250 dpi will affect the quality.
- Be sure to include some of the white space around the cover. This can be
done by preventing the scanner to define the border automatically. You should
be able to define the border manually.
- Be sure the picture is of the type "best color photograph", or
16,7 milion colors.
- Save it as a ".tif" file. This will use some disk space, typically
5 to 8 MB, depending on the size of the scan.
Some remarks: often it is possible to scan from without your image editor.
In that case, there is no need to save the scan as a "tif" file. Start
editing after the scanning result is available in your image editor, as described
below.
5. THE EDITING
Scans are imperfect. We need to improve them, in a few steps, using an image
editing program. In the examples below, CorelPhotopaint is used for editing
5.1 Image types
First thing to know is that two compressed image types are useful for us because
they can be posted over internet: gif images and jpeg images. Tiff images -
the result of the scanning process - are useless, because they take up too much
disk space.
5.1.1 Gif images
This type of image has a limited number of colors, maximum is 256 colors.
In different gif images, the color pallet can be different. Gif images are
useful for graphic pictures with a limited number of colors, and for text.
For text pages, gif gives better result and uses less disk space.
5.1.2 Jpeg images
Jpeg (or jpg) pictures can display all 16,7 million colors of your scan that
you saved as a tiff file. However, the compression makes the picture slightly
blurred. Jpeg images typically are used for photographs, both black and white
as well as color photographs.
We are going to use gif images for saving the text
pages of the booklets, and jpeg images for saving the front and back inserts
of the CD case. There could be exceptions on this rule, however, for instance
when the back cover of the CD case is mainly black and white text in which case
saving the scan as a gif file is more appropriate. Or vice versa, when the booklet
contains color pictures in which case I would suggest you to save the scan as
a jpeg file.
5.2 Steps for correcting the picture
Common to both gif and jpeg images are the following
actions:
- Cropping the image
- Enhancing the contrast
- Improving the sharpness
- In some cases: creating a border around the scanned cover
5.3 Cropping the image
We are going to remove most of the white space around the scan. However, important
is to keep a very small band of white, just enough to keep the border of the
cover - usually a little gray line or the staples of the booklet - visible.
Later, when printing and cutting, this little white band will be convenient
for cutting along the edge. If the border of the cover is invisible, we will
make a small border ourselves, as will be described later.
.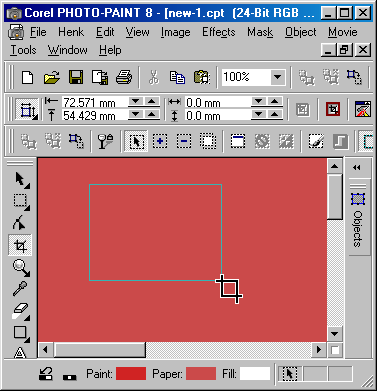
- Cropping is done with the cropping tool, which typically looks like this
. Drag the mouse indicator around the picture to be cropped.

- Then pull the handles at sides and corner to neatly fit in the picture.
- Confirm with "enter".
5.4 Enhancing the contrast
Most scanners, in my experience, produce rather dim pictures. Therefore, we
will need to enhance the contrast and the sharpness. First the contrast. The
best tool for this job is "Level Equalisation" (Image / Adjust / Level
Equalisation).
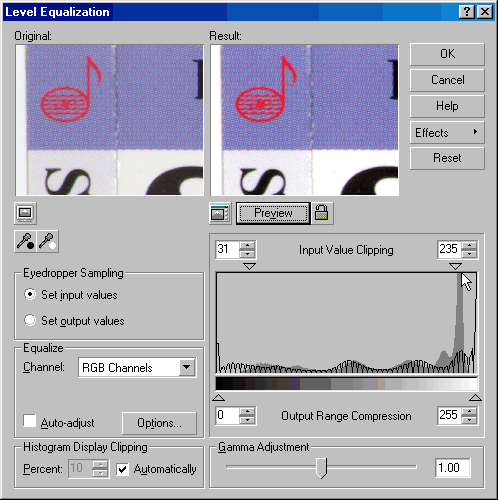
- Drag the triangles of "Input Vlaue Clipping" a little towards
the middle. The left triangle makes the blacks more black. The right triangle
makes the whites more white. Ideal is when in the graph below the blacks
just touch the left window border, and the whites just touch the right window
border. This is perfect.
- Click "preview" in the window above to see if the action will
have the desired result.
- If you are satisfied, click "OK". Now the scan is brighter in
contrast and will be more alike the original when printed.
5.5 Improving the sharpness
Sharpening the scan will dramatically improve your print. Be careful not to
overdo! This will result in distortions.
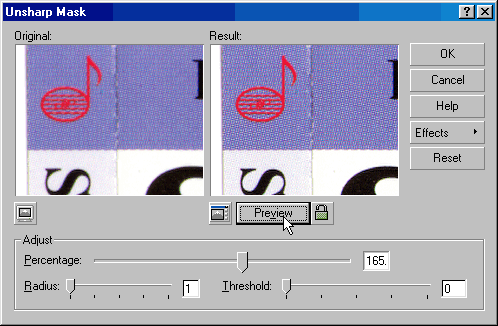
- The tool we will use is - paradoxically - called "Unsharp Mask"
(Effects / Sharpen / Unsharp Mask).
- Set "Percentage" somewhere between 100 and 200. "Radius"
should be 1, and "Threshold" 0. Try out different settings using
the preview functions.
- If you are satisfied with the result, click "OK"
|
|
|
|
|
original scan
|
improved contrast
|
improved sharpness
|
5.6 Creating a small border around the scan
Sometimes, a case insert has white background. We won’t see the border between
insert and the white paper we printed it on, and we will not be able to cut
the image back to its right size. The solution: creating a small border around
the picture.
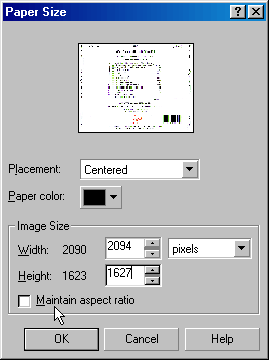
- Again with CorelPhotopaint: choose "Image / Paper size".
- Make the paper a little bit larger, and choose a dark paper color. In the
example below, I’m about to add 6 pixels to the width and the same number
to the height of the picture.
- Click "OK".
5.7 Saving the image
"Jpeg" compression is suitable for photograph-like
pictures. "Gif" compression is more suitable for text and schematic
pictures.
5.7.1 Saving the image as "jpeg"
Your original scan is in "tiff" format.
This is an uncompressed digital image, which means that every pixel uses 24
or 32 bits. This "tiff"-image is several Megs large, typically. Before
converting this tiff-image into an other, compressed, format, save the result
of the previous steps.
- Choose "File / Save as".
- In the dialogue window choose file type "jpeg" or "jpg"
and click "Save".
- A new dialogue window opens, "Jpeg export"; set "compression"
to 10. Keep "smoothing" to 0 and don’t enable the check boxes "progressive"
or "optimize".
- Click "OK".
That’s it. Now, if you think your jpeg image uses to much space, you can set
compression to a higher number than 10. The file will be smaller, but the quality
will be worse. Don’t set compression too high (i.e. above 30 or so) , or the
image will become too blurred. This FAQ points you towards quality.
5.7.2 Saving the image as "gif"
Saving your original picture in "gif" format is a bit more complicated.
You can’t just save the tiff as a gif. First you need to make a conversion.
The color depth of your tiff file is 24 or 32 bits. This should be reduced to
8 bits or less. Yes, this means that the picture can only hold up to 256 color.
The color palette is not fixed, but can be manipulated. For instance, you can
choose shades of black.
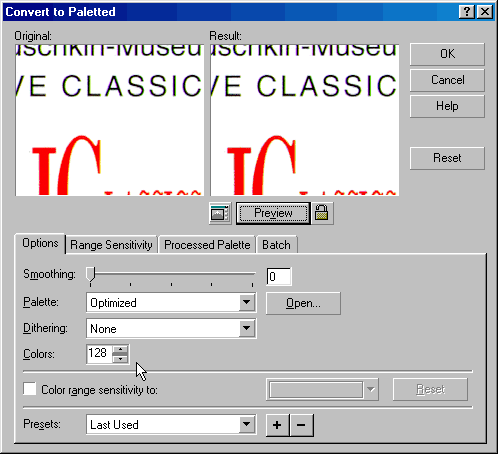
- Choose "Image / Convert to / Paletted (8-bit)".
- In the dialogue window, set "smoothing" to 0, "palette"
to optimized, "dithering" to none. You can set the number of colors
to a a value between 0 and 256. The larger the number, the more realistic
the image and the larger the resulting file. I suggest you choose 32 if you
have only shades of one color, 64 if you have shades of two colors etc. If
the image is only black and white, set "palette" to grayscale.
- Click "OK".
The biggest mistake with text images is to think they are made up of black
pixels and white pixels. Wrong, the edges of the text will also have gray pixels.
Therefore, do not convert text images to black and white only. This will result
in jagged edges and the print will not look smooth.
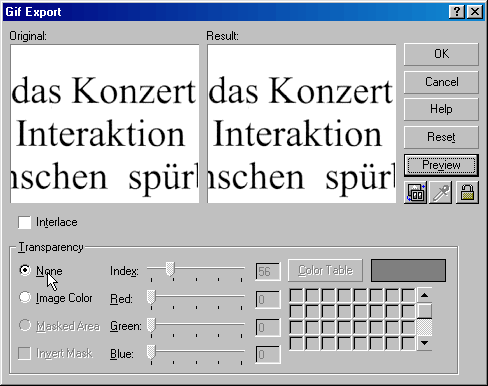
- Once converted to a paletted image, you can save the picture.
- Choose "File / Save as" and select "CompuServe bitmap (GIF)
in the dialogue window.
- A second dialogue window pops up. Keep the "Interlace" box unchecked,
and set "transparency" to "none".
- Click "OK"
6. THE PRINTING
6.1 Printing your own art work
The printing is done on glossy or matted ink-jet paper. Choose a paper brand
that allows printing 600 and more dpi (dots per inch) color, although 300 dpi
might satisfy you. Usually, these sheets are coated at only one side, so you
must insert the paper into your printer in the right way. Choose stiff paper,
80 grams or more.
We are going to print using the image editing program. In my case, I use CorelPhotopaint.
Open the image. If all went right, the image still has the same resolution as
the original scan, i.e. 350 dpi. You can check this with "File / Document
info".
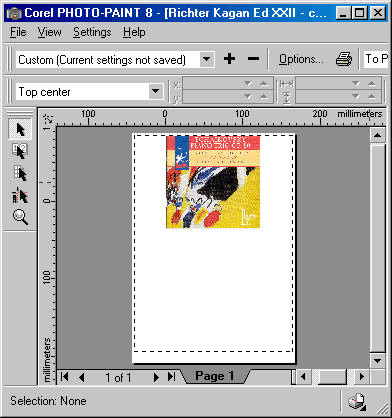
- Choose "File / Print preview". In the "Image position"
selection field, select "top center". You can also drag the picture
to the position you want on the page.
- Now choose the correct printer options. First click on "Options"
(or "Setting / General").
- Then click on "Properties". This opens a dialogue window where
you can choose options for your printer. The specific options and the interface
are dependent on your printer manufacturer. Below I will describe the options
that I’m allowed to give with my printer (Epson 740).
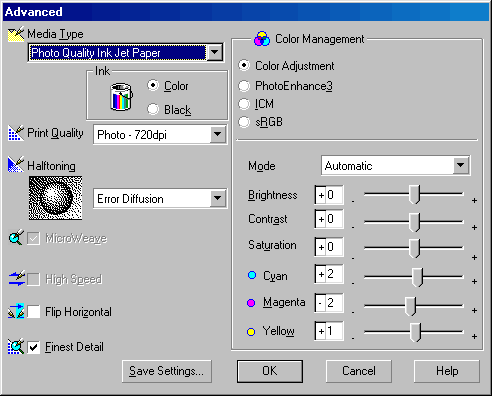
- "Media type" - Choose "Photo Quality Ink Jet Paper"
or comparable papers. Of course, this should match the paper you are using.
- "Print Quality" - The higher, the better. 720 dpi is a good
quality. The specification of the paper should match this quality more or
less.
- "Halftoning" - Choose "Error Diffusion ", if possible
with your printer. This gives better results than the traditional dithering
methods.
If your printer does not give you detailed control
over the different options, choose best quality printing and be sure you selected
the right type of paper.
Well, you should be gazing at your first jewel case front insert by now! Ready
for posting above all! Part of the paper is still unused. Re-enter it in your
printer and print the back tray insert on the bottom of the paper.
6.2 Printing someone elses art work
Changes are, you have received a scan from someone else. Sometimes, these scans
have a good quality. Often, they are poor in quality. Then, improve the scan
before printing it. Remember the steps: 1) Level Equalisation, 2) unsharp mask.
However, if someone posts a tiny image, measuring less pixels than the pixels
on your screen, improving it does not make much sense. You can still print it
of course:
- Check the size in millimeters or inches of the scan. In CorelPhotopaint:
File / Document Info;
- If the image is too large or little (see table below), scale the image:
Image / Resample
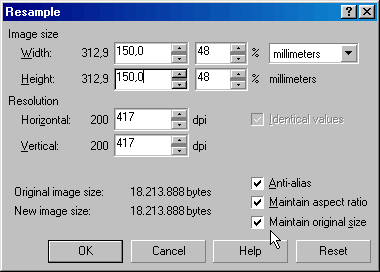
- In the dialogue window, you must check the "Maintain original size"
box, since this prevents the program from actually resampling the image. Instead,
it will just say to the picture that the resolution should be interpreted
higher or lower. In the example below a correct with of 150 mm is entered,
and the other fields are corrected automatically. The resolution is automatically
set to 417 dpi in this example.
- Start the printing as described above. The print size will be exactly the
size you entered in step 3 above. This saves the tricky handle pulling in
the print preview window.
| |
width
|
height
|
| |
mm
|
inch
|
mm
|
inch
|
Front insert
|
121 mm |
4.75" |
120 mm |
4.7188" |
Back insert
|
150 mm |
5 29/32" |
117 mm |
4 5/8" |
7. THE CUTTING
Use a steel ruler and a sharp knife to cut out the inserts. If you printed
them on relatively thin paper, let’s say 80 grams, it is best to support them
with the original inserts in the jewel case. If you printed them on 120 grams
paper, they will be stiff enough to stay in place.