Discussion
Here is a schematic sent to me by W1FB many years ago. It is very similar to a 6M two-stage preamp that he published in QST in the mid eighties. Doug really favored the grounded gate FET for narrow band preamps. His published work is replete with examples of them on just about every band. I built that amp and remember getting about 10 dB gain, which is all that I wanted for the 6M direct conversion receiver using a diode ring detector that I was building. The great feature of the amp is that it combines a bandpass filter and preamp in one. I lost the original schematic that Doug sent me but was delighted to see that I made a bitmapped drawing of it on a floppy disk that was recently re-discovered when we were moving an old desk.The shield shown in the schematic was a small piece of grounded ,double sided PC board in which, I made a small chamferred hole in to pass the lead going to the T2 tap. The shield, along with very short component leads will help minimize parasitic oscillations. The T2 tap is 3 turns down from the end of the T2 main winding that connects to the variable capacitor.
Doug specified T37-10 cores for the inductors, but I substituted T37-6 cores and used the same number of windings as specified for the T37-10 core inductors. It worked fine.
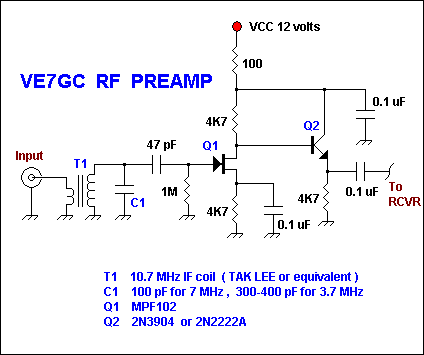
VE7GC Popcorn RF Preamp
Here is an easy RF preamp by Dick Pattinson, VE7GC. It uses a single tuned circuit at the
front end and can connect directly to a mixer or product detector in a simple receiver
project. Note how Dick provided adjustable RF gain control for this circuit in his Wee
Willy project on this website.
Making the Norton amps requires some planning to keep all component leads as short as
possible. The transistor leads and any connecting components should be trimmed as short as
practical to promote stability. Sketch the component layout on a piece of paper and modify
it until you are satisfied you have designed a good layout. I usually use a terminal strip
piece to support the transformer and to attached the positive voltage wire to. The ferrite
beads on the transistor collector aid in stability and should be used to preserve the noise
figure by squashing any oscillations should they develop. The 22 uH choke can be the little
epoxy coated units that are color coded and look somewhat like resistors. Do not use a
choke less than 22 uH.
Discussion
If you can not find Tak Lee green 10.7 MHz IF coils, probably any other brand of 10.7 MHz
slug tuned IF transformer would work. The Mouser catalog number is 421F123 . If your 10.7
MHz IF coil has a built in capacitor at the base , remove it. A fixed inductor may also be
wound using a powdered iron toroid core and then all or a portion of the C1 capacity would
be made variable.
The input impedance is 50 ohms and the output impedance is low due to the Q2 emitter
follower stage.
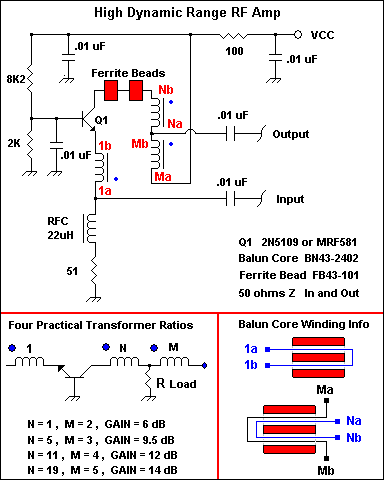
A Low Noise, High Dynamic Range Broadband RF Amp
Discussion
Winding and Construction Hints
Before winding, the builder must first decide how much gain is needed from the amp. For an
RF preamp, the stage should have gain equal to or greater than the passive stages after it.
Also there will be losses in the transformer, so the theoretical gain of the Norton amp
maybe 1 dB off and will need to be factored in.
For the purposes of discussion, a 9.5 dB amp is desired , so N = 5 and M = 3. The first
step is to mark one side of the core with a dab of liquid paper, paint or a small piece of
tape. This will allow you to keep track of the transformer later. To mark, hold the core so
that both channels are parallel to the floor, one on top of the other. Apply your dab of
paint to the top of the core and use the marked top to denote the A windings. 1a, Ma and Na
will all start from the top channel in the balun core.
Using 32 AWG wire for all three windings, start with winding 1 and wind the single turn
from point 1a to 1b. Cut off the leads so thay are shorter than 2 inches.
Next, wind Ma to Mb three complete turns through the binocular core and trim the leads if
needed. Tie a small knot in the wire at both ends. This will clearly mark this M winding.
Both windings should look like the diagram under the schematic. 1a to 1b are on the left of
the balun core and winding Ma to Mb are on the right side of the core. Mb has a
distingishing knot at the tip of both wire ends. Ma starts from the top of the core which
you have marked with a dab of paint or something.
Finally, wind Na to Nb five complete turns through the core in the same direction as the
previous winding M.
Strip wires Na and Mb (Mb has the knot) , twist together and solder.
Strip the leads VERY gently with sandpaper or your favorite other method. Insert the
transformer in your circuit and cut the leads to their proper length and then solder away.
It maybe preferable to prestrip the leads on winding 1 as it is hard to strip the enamel
off a fine wire that has only one turn and it may accidentally pull out of the core. If it
does, just re-insert it into the balun core on the correct side. Once you have soldered Na
and Mb you can always identify the windings later because you have marked the top of the
balun core which denotes the A windings. Try and make your windings gently tight as if
there is too much slack you may have difficulty getting the last few windings thru the core
channels. A 14 dB gain amp maybe impossible to wind with 32 AWG wire, it may best to use 34
AWG for that amplifier. I have never built one for greater than 12 dB. The transformers are
a bit tedious to wind, however persevere and the results will be well worth it. For HF, you
can substitute 0.1 uF caps for the 0.01 caps shown if you like.
Experimental Norton Amp
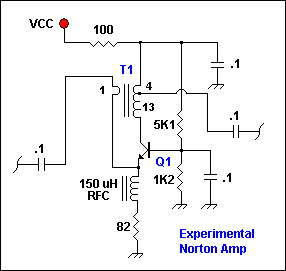
The amp shown in the above schematic experimentally uses a ferrite toroid for the
transformer and has ~10 dB gain. Incidently, it can also be wound on a balun core using 2
windings, a one turn loop and then a second wire with a tap as shown in the above schematic.
A balun core would not be experimental and this amp is very stable with a balun core.
To wind the toroidal version of this amp, wind 13 turns of AWG #26 on a FT37-43 core. Next
wind the 14th loop but leave a generous loop for tapping into. Then wind 3 more close turns
on the coil to finish. You should have 17 turns of wire with a tap 4 from the end, thus
creating the 13 - 4 inductor as shown in the schematic. To complete the coil, wind 1 turn
of wire over the cold end as shown in the schematic. It is tricky, but try to keep the one
turn link as short as possible. A ferrite bead over the transistor collector is also
helpful, but not mandatory. You can try increasing the turns (1:21:5 etc ) to
experimentally obtain more gain from this amp. The toroid version of this amp is good for
understanding how the Norton amp works and maybe an option for builders who do not have
balun core ferrites in their junkbox.