

For this tutorial you will
need Paint
Shop Pro I used 7 but it can be made with 6 also, and this zip file
![]()
Unzip the selections into your PSP selections folder, and open the pictures in your PSP window. The flowerpot I'm using for this tutorial was made using Arizona Kate's tutorial, thank you Kate for the great tutorial.
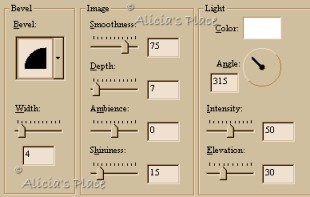
Open a new image 300 x 640 transparent, add a new layer and go to selections>load from disk>aliwindleg.sel flood fill with the color of your choice (I'm using #EBD5CA) go to effects>3D effects>inner bevel with the following settings:
Go to effects>3D Effects>drop shadow: Opacity 56, Blur 3.5, Offset Horizontal and Vertical 1, deselect. Add a new layer and go to selections>load from disk>aliwindarm.sel flood fill with the same color as before and repeat the inner bevel and the drop a shadow, deselect. Add a new layer and go to selections>load from disk>aliwindface.sel flood fill again and add the inner bevel again, no shadow, deselect. Add a new layer, go to selections>load from disk>aliwindleg1.sel flood fill and add the inner bevel and the drop shadow, deselect. Add a new layer, go to selections>load from disk>aliwindarm1.sel flood fill and add the inner bevel and the shadow, deselect.
Open your flowerpot and go to edit>copy, go back to your other image and paste as a new layer, go to image>flip and position the flowerpot, you can look at the graphic on top of this page to see where you'll need to put it, you also need to move that layer under the right arm and right leg layer, add a drop shadow with the same settings, only change the offsets to -1 (minus one)
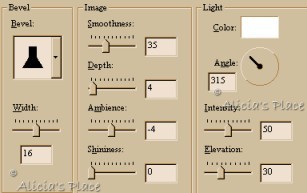
Add a new layer and go to selections>load from disk>aliwindear.sel flood fill with the same color and apply the inner bevel with the following settings:
Duplicate the layer and go to image>rotate and rotate to the right 30°, move this two layers under the head layer.
Go to the top layer and add a new layer, with the draw tool, freehand line, antialias checked, width 2, and foreground color black, draw the face of your bunny, if you want you can load from disk aliwindface2.sel and flood fill with black. Close visibility on layer 1 and merge all layers visible.
Add a new layer and with the rope tube scale 23 draw the rope from the top of the canvas to the head of the bunny. Copy and paste the bow and the heart.
Add a new layer and with the rope tube same settings draw 3 ropes down from the flowerpot in different lengths to add the carrots.
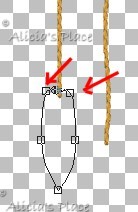
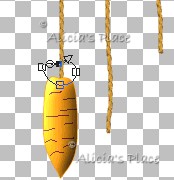
Now for the carrots, with your preset shapes tool, Ellipse, antialias and create as a vector checked, close the foreground color and on your background use #F69B19 and draw an ellipse, click on your object selector tool and on edit node and add 2 nodes on top like shown in the picture and play until you are happy with the shape of your carrot
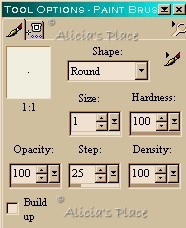
Convert to raster layer, go to selections>select all>float. Using your paint brush, color #6F3030 with the following settings

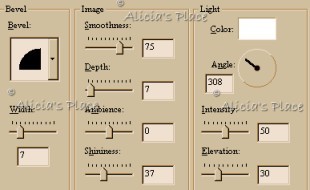
Draw some lines on your carrot as shown on the picture above and add an inner bevel with the following settings
Deselect and go back to your preset shapes tool, same settings as before but change the color to #3C5B5B and draw a small ellipse on top of your carrot, using your node edit again draw the top of your carrot
Convert to raster layer and add an inner bevel using the round preset but change the width to 8, merge these two layers visible. You can copy and paste the same carrot for the other two ropes, or you can draw two more carrots.
Merge all your layers visible, add the background of your choice and your windchime bunny its ready.
I hope you enjoyed this tutorial, if you have any questions or comments please email me
Copyright Terms and Conditions
This Tutorial is solely derived by My Imagination. No Part of this Tutorial shall be Copied - Distributed - Placed on a CD - Sold - or Copied onto another Website.
Webpage, Graphics, and Tutorial are © Alicia's Place - March/2001
All Rights Reserved