|

For
this tutorial you will need Paint
Shop Pro 7,
and this zip file
 Unzip
the selection to your selection folder. You will also
need Fantastic Machine Paint Engine which can be found
here.
Unzip
the selection to your selection folder. You will also
need Fantastic Machine Paint Engine which can be found
here.
1. Open a new image 365x525, add a new layer
and go to Selections>Load from disk>APboots.sel, flood
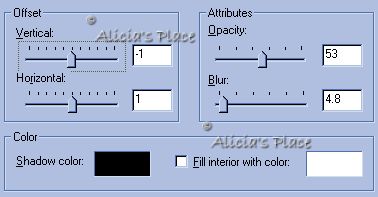
fill with color #816045, add a drop shadow: Color #4C301A, Horizontal and
Vertical -4, Opacity 90 and Blur 0, deselect.
2. Add a new layer and load APbody.sel, flood
fill with color #FCFAB3, go to Selections>Modify>Contract 2 and flood fill
with #F4F1EE, deselect and add a drop shadow, same settings but change the color
to #E7E0D9.
3. Add a new layer and load APhands.sel, flood
fill with color #FCFAB3, go to Selections>Modify>Contract 2 and flood fill
with #F4F1EE, deselect and add a drop shadow, same settings as step 3.
Merge layers visible, name it body and save your work.
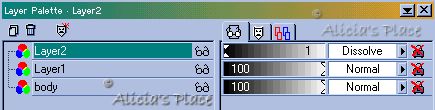
4. Add a new layer and load APjacket.sel,
flood fill with color #911313, duplicate this layer,
flood fill with color #F4F1EE and on your Layer Palette change this layer to
Dissolve and lower the Opacity to 1, deselect and merge this two layers visible
(only the jacket layers, no the body).
Now with your Freehand tool  go around the left part of the jacket and click inside to select that part, add
a drop shadow, same settings as before but change color to #670D0D, deselect.
go around the left part of the jacket and click inside to select that part, add
a drop shadow, same settings as before but change color to #670D0D, deselect.
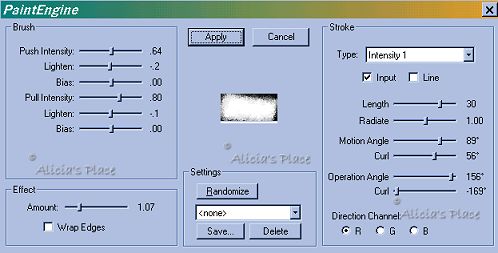
5. Add a new layer and load APjacket1.sel,
flood fill with color white and go to Effects>Plugins>Fantastic
Machines>Paint Engine and apply the following settings:
6. Add a new layer and load APjacket2.sel
flood fill with color white and apply Paint Engine same settings. Turn off
visibility of body layer and merge visible, name this layer jacket and save.
7. Add a new
layer and load APscarf.sel, flood fill with #F4F1EE, change
your color to #087A08, and with your Draw tool  Single line, Width 5, draw some lines on top of the scarf
don't worry if you go out of the scarf, when you have all
your lines go to Selections>Invert and hit the Delete key,
invert selections again add a new layer and apply the following
Cutout:
Single line, Width 5, draw some lines on top of the scarf
don't worry if you go out of the scarf, when you have all
your lines go to Selections>Invert and hit the Delete key,
invert selections again add a new layer and apply the following
Cutout:
8. Add a new layer and load APscarf1.sel,
repeat step 7.
9. Add a new layer and load APscarf2.sel,
repeat step 7. Turn off visibility of body and jacket layers and merge
visible, name this layer scarf and save.
10. Add a new layer and name it head, load
APhead.sel, flood
fill with color #FCFAB3, contract selections by 2 and flood fill with #F4F1EE,
now you can draw your own face or if you want to use mine, load APface.sel and
flood fill with black. For the nose load APnose.sel, flood fill with #EE7412
and add a drop shadow: Color "Black", Vertical "2",
Horizontal "-4", Opacity "50" and Blur "7.1"
11. Add a new
layer and load APhat.sel, flood fill with color #1B1E89, with
you Paint Brush tool  Color #F4F1EE, Shape "Round", Size "5",
Step "25" and all the rest "100" paint
some dots on the hat. Add a new layer and load APhat1.sel,
flood fill with color white and apply Paint Engine same settings
as before. Deselect,
add a new layer and load APhat2.sel, flood fill with color
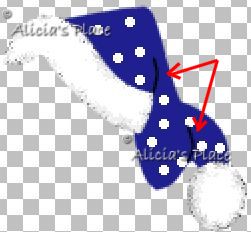
white and repeat the Paint Engine, deselect, with your Draw
Tool
color black, freehand line, width 2 and antialias checked
draw 2 small curves as shown on the following picture:
Color #F4F1EE, Shape "Round", Size "5",
Step "25" and all the rest "100" paint
some dots on the hat. Add a new layer and load APhat1.sel,
flood fill with color white and apply Paint Engine same settings
as before. Deselect,
add a new layer and load APhat2.sel, flood fill with color
white and repeat the Paint Engine, deselect, with your Draw
Tool
color black, freehand line, width 2 and antialias checked
draw 2 small curves as shown on the following picture:
Turn off visibility of body, jacket, scarf and
head layers and merge visible, name this layer hat and save.
12. Add a new layer and load APstar.sel, flood
fill with color #FFFF00, add a drop shadow: color #959711, Vertical
"-1", Horizontal "-4", Opacity "90" and Blur
"0", load APhands.sel go to Selections>Modify>Expand
"1" and hit the Delete key.
13. Go to the body layer and add
a new layer, with your draw tool same settings as before draw a rounded
line for the belt, open the button supplied on the zip file, resize 50%
and copy and paste as a new selection.
14. Add a new layer and draw the
shoelaces with the rope tube Scale 30.
15. To add more dimension, go to
layers: hat, head, scarf and jacket and add a drop shadow to each one:
Color "Black", Vertical "1", Horizontal
"-1", Opacity "50" and Blur "2.4".
Merge all your layers visible and
export as Picture Tube, now you can add text if you want to.

I
hope you enjoyed this tutorial,
if you have any questions
or comments please email
me
I want to thank
Marina for her help testing my tutorial "GRACIAS MARINA!!!"
you can see her snowman here

TUTORIALS
- HOME
Copyright
Terms and Conditions
No Part of this Tutorial
shall be Copied - Distributed - Placed on a CD - Sold - or Copied onto another
Website.
Webpage,
Graphics, and Tutorial are © Alicia's Place - November 11, 2001
All Rights
Reserved
|