|
For
this tutorial you will need Paint
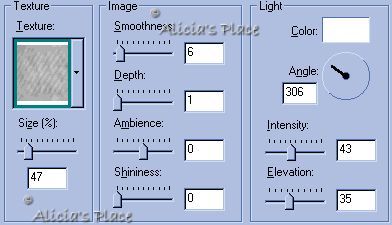
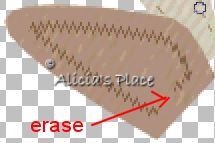
Shop Pro 7, and this zip file NOTE: You can use the plaids I have provided in the zip file or you can make your own following the tutorial here. And I made the bows using Dizzinz Bows Dingbats. Open a new transparent image 420x490, go to selections>load from disk>APantler.sel. 1. Flood fill with color #D5CEBB and go to Effects>Texture effects>Texture and apply the Denim preset with the following settings:
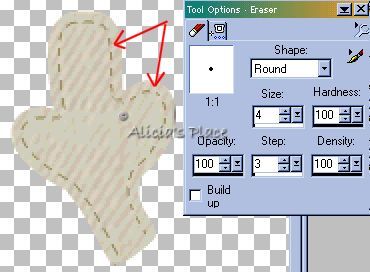
Do not deselect, add a new layer and go to Selections>Modify>Contract 5, flood fill with color #988959, contract selections by 1 and hit the delete key, deselect. Zoom your graphic and with the eraser tool settings shown below erase to make it look like stitches.
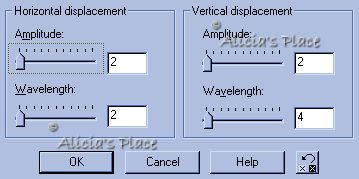
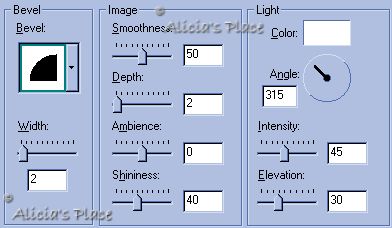
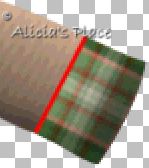
2. Add a new layer and load APantler1.sel and repeat the same as step 1. When you are done merge this four layers visible and name it antlers. 3. Add a new layer and load APear.sel flood fill with color #B3957D and apply the same texture as before. Do not deselect, add a new layer and contract the selections by 10, SAVE THIS SELECTION TO ALPHA CHANNEL, flood fill with color #563D28 contract the selection by 2 and hit the delete key, go to Effects>Geometric effects>Wave and apply the following settings and then erase the "stitches" on the bottom of the ear.
Add a new layer and move it under the stitches layer, load the selection you saved to alpha channel and flood fill with the red fill I've provided on the zip file with the following settings:
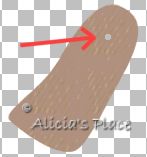
Add a new layer and with the Draw Tool, Color #6C3C16, Freehand line, Width 2 draw 2 lines as shown above, go to Effects>Blur>Gaussian Blur 1.50. 4. Add a new layer and load APear1.sel and repeat the same as step 3, the only thing you will need to change is the Angle on the Pattern to 354. When you are done turn off visibility of antlers layer and merge visible, name this layer ears and save. 5. Add a new layer and load APhead.sel, flood fill with color #B3957D, apply the texture same settings as before, deselect and apply Inner Bevel with the following settings:
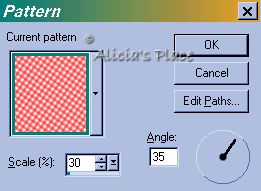
6. Add a new layer and load APface.sel flood fill with the red pattern but this time change angle to 30, deselect and apply Inner Bevel same settings as before, load the same selection again and add a new layer, flood fill with color #563D28 contract selections by 2 and hit the delete key, deselect and go to Effects>Geometric effects>Wave, apply the same settings as in step 3 but change on the Wavelength Horizontal to "4". 7. Add a new layer and load APface1.sel and repeat step 6. 8. Add a new layer and load APface2.sel, flood fill with color #B3957D and apply the texture and then the Inner Bevel same settings as before. 9. On a new layer with
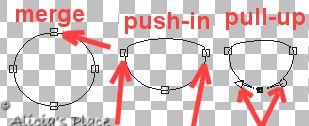
your Preset Shapes tool 10. With the
Preset Shapes tool
11.
Change your Foreground color to black and your Background to null,
add a new layer and with your Draw Tool 12. Go to the ears layer and add a new layer and with the Rope Tube scale 20, add some "hair". Turn off visibility of antlers and ears layers and merge visible, name this layer face and save. 13. Add a new layer and load APtail.sel, flood fill with color #D5CEBB, go to Effects>Texture Effects>Texture and apply the same settings as before, deselect and apply Inner bevel with the following settings:
14. Add a new layer and load APbody.sel, flood fill with color #B3957D and apply the texture, deselect and apply Inner Bevel same settings as step 5, only this time change Angle to "270". Turn off visibility of antlers, ears and face layers and merge visible, name this layer body and move it under the face layer, save. 15.
Go to the ears layer and add a new layer, load APleg.sel, flood fill
with color #B3957D and apply the texture, deselect and apply Inner
Bevel same settings as step 5 but change Smoothness to "50"
and Intensity to 45. With your Freehand Tool
16. Add a new layer and load APleg1.sel, repeat the same as step 15, but on the Pattern change the Angle to 330. Turn off visibility of antlers, ears face and body layers and merge visible, name this layer back legs. 17. Go to the body layer and add a new layer, load
APleg2.sel flood
fill with color #B3957D and apply the texture, deselect. With the Eraser Tool
18. Add a new layer and load APleg3.sel, repeat step 17, changing the Angle for the Pattern to 345. 19.
Open the buttons provided on the zip file or you can use your own,
with the Freehand Tool 20.
Add a new layer, change your Foreground to color #6C3C16 and Background
to "null" and and with your Draw Tool 21. Add a new
layer, turn your Foreground to "null" and Background
to color #951D1D and with the Preset Shapes Tool 22. Merge all your layers visible and tube it, then you can add a new layer, send layer to bottom and add your background. I hope you enjoyed this tutorial, if you have any questions or comments please email me
Copyright Terms and Conditions No Part of this Tutorial shall be Copied - Distributed - Placed on a CD - Sold - or Copied onto another Website. Webpage, Graphics, and Tutorial are © Alicia's Place - November 15, 2001 All Rights Reserved
|