|


For
this tutorial you will need Paint
Shop Pro 7,
and this zip file  Unzip the selection to your selection folder, the wood1 in
your PSP Textures folder and open the other images in your
PSP window.
Unzip the selection to your selection folder, the wood1 in
your PSP Textures folder and open the other images in your
PSP window.
1. Open a new image 600x330, add a new layer and
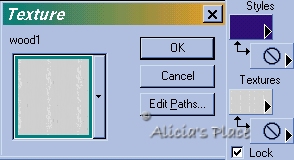
go to Selections>Load from disk>APn1.sel. On your Styles Palette
select color #2F097B on your Foreground and on your Textures Palette select "wood1"
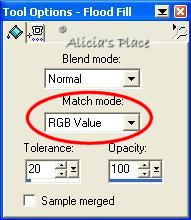
texture, and flood fill the letter N, on your Tool Options make sure you have 'RGB
Value' selected on 'Match mode', add a new layer and flood fill the letter
O, add a new layer and flood fill the letter E, add a new layer and flood fill
the letter L, now each letter have its own layer. Deselect.
NOTE: We will be changing the the color on the
Foreground but the texture will be the same.
2. Go back to the letter "N" layer and
add a drop shadow: Color #220C54, Horizontal and Vertical
"-4", Opacity "60" and Blur "1.2".
3. Repeat step 2 but this time with the letter
"O" and on the drop shadow change the Horizontal to "4"
4. Repeat step 2 with the letter "E"
and drop shadow with same settings.
5. Repeat step 2 with letter "L" and
on the drop shadow change the Horizontal to "0". Turn off
visibility of Layer 1 and merge visible, add a new layer, load APn1.sel again
and flood fill with white, change that layer to Dissolve and lower the opacity
to 1.
6. Add a new layer and go to
Selections>Load from disk>APn2.sel, change your Foreground color to
#065A06 and flood fill the big tree twice, change your Foreground
color to #179F17 and flood fill the small tree twice, deselect, add a drop
shadow: Color #EEEAE1, Vertical "-4" Horizontal "0" Opacity
and Blur remain the same as before.
7. Add a new layer and go to
Selections>Load from disk>APn5.sel, flood fill with color #7B5607, go to
Selections>Load from disk>APn4.sel, change your Foreground color to #D2D40E
and flood fill, change your Foreground color to White and go to
Selections>Modify>Contract "2" and flood fill twice, go to
Selections>Load from disk>APn6.sel and flood fill twice with color #A43232
deselect and add a drop shadow: Vertical "-2" and Horizontal
"4".
8. You can decorate your snowman any way you
want it, for the eyes I used the Paintbrush size 4 shape round, and for the
mouse I used the same but size 2, for the pompon on the hat I used the same in
color white and size 22, then added KPT5 Fiber Optic, in case you don't have
this filter I have added the tube in the zip file :o) The white dots on
the hat are size 2.
9. Add a new layer and go to
Selections>Load from disk>APn7.sel, flood fill twice with color #FFFF00,
add a drop shadow: Vertical and Horizontal "-3".
10. Add a new
layer and go to Selections>Load from disk>APn8.sel,
flood fill with white, go to Selections>Float, change color
to #A43232 and with the Draw Tool  Single Line, Width "14", Antialias Checked draw
some lines crossing, deselect and add a drop shadow same settings
as Step 9.
Single Line, Width "14", Antialias Checked draw
some lines crossing, deselect and add a drop shadow same settings
as Step 9.
11. Add a new layer and go to
Selections>Load from disk>APn9.sel, flood fill twice with color #A43232
and add a drop shadow, same settings.
12. Add a new layer and go to
Selections>Load from disk>APn10.sel, flood fill twice with color #179F17,
go to Selections>Float, change color to white and with the Draw Tool Width "12" draw
the ribbons, add a
drop shadow, same settings, the bow tube comes with PSP I used size 24.
13. With the
Draw Tool
Freehand Line, Width "2", Antialias and Create as
Vector "Checked" Foreground Black, Background Null,
draw an spiral from the sleigh to the gift, click on your
Object Selector Tool  and right click on your vector image and you can fix your
spiral, when you are happy with your spiral go to Layers>Convert
to Raster Layer; if you can't do it you can load APn3.sel
and flood fill with black. Go to Effects>3D Effects>Inner
Bevel and apply the Metallic preset. If you want the
spiral for the snowman load APn3a.sel, don't forget each one
has to be on a separate layer.
and right click on your vector image and you can fix your
spiral, when you are happy with your spiral go to Layers>Convert
to Raster Layer; if you can't do it you can load APn3.sel
and flood fill with black. Go to Effects>3D Effects>Inner
Bevel and apply the Metallic preset. If you want the
spiral for the snowman load APn3a.sel, don't forget each one
has to be on a separate layer.
14. Add a new
layer and go to Selections>Load from disk>APn11.sel,
flood fill twice with color #8D1111, float the selection and
with the Draw Tool
Freehand Line, Width "12" Antialias Checked draw
the borders of the pants and the sleeves, deselect.
15. On the same
layer go to Selections>Load from disk>APn12.sel, flood fill twice with
white, load APn14.sel and flood fill with the same red as the pants, load
APn15.sel and flood fill with the red plaid, Scale 40 and Angle 358, deselect
and add a drop shadow: Vertical "-4", Horizontal "1".
16.
Add a new layer, move it under the Santa layer, turn Foreground
to Null and Background to Black and with your Preset Shapes
Tool  Ellipse, Antialias Checked, draw two ellipses for the hands,
you can move them with your Deformation Tool
Ellipse, Antialias Checked, draw two ellipses for the hands,
you can move them with your Deformation Tool  when you have your hands do the same for the shoes.
17. Add a new layer, load APn16.sel and flood
fill with the fabric pattern provided in the zip file, add a new layer and
invert selections and add a drop shadow: Color Black, Vertical and Horizontal
"6", Opacity "50" and Blur "11.8"; add a new layer
and with your Rope Tube, Scale 15 draw the string for the bag.
18. Open the hinger tube (each one it's on a
different layer) copy and paste as a new layer, position it and then paste as a
new selection.
I
hope you enjoyed this tutorial, if you have any questions
or comments please email
me
TUTORIALS
- HOME
Copyright
Terms and Conditions
No Part of
this Tutorial shall be Copied - Distributed - Placed on a CD -
Sold - or Copied onto another Website.
Webpage,
Graphics, and Tutorial are © Alicia's Place - December 20, 2001
All
Rights Reserved
|