

For this
tutorial you will need Paint
Shop Pro
7 and this zip file ![]() Unzip the selections into your PSP selections folder, and open the pumpkin
in your PSP window.
Unzip the selections into your PSP selections folder, and open the pumpkin
in your PSP window.
1. Open a new image 528x534, go to selections>load from disk>pumpkin.sel, open the pumpkin provided in the zip file, copy and paste into selection.
2. Add a new layer, go to selections>load from disk>arm.sel, flood fill with white, add a drop shadow with the following settings: Color: #D7D5D5, Vertical: "-3", Horizontal: "4", Opacity: "80" and Blur: "2.4"
3. Add a new layer, go to selections>load from disk>leg1.sel, flood fill with white and repeat the drop shadow.
4. Add a new layer, go to selections>load from disk>arm1.sel, flood fill with white and repeat the drop shadow, but this time change Vertical: "-3" and Horizontal: "-4"
5. Add a new layer, go to selections>load from disk>leg.sel, flood fill with white and repeat the drop shadow.
6. Add a new layer, go to selections>load from disk>face.sel, flood fill with white and repeat the drop shadow, but this time change Vertical: "-4" and Horizontal: "0"
7. To decorate your face change your Foreground to "Null" and Background to "Black", and draw the face with the draw tool: Freehand Line, Size "1" Antialias "checked" to me its much easier to do it with Vector checked, but that is up to you. If you want you can use the selections provided (face1.sel and flood fill with black) With the Magic Wand: Feather and Tolerance "0" click inside the mouse, go to Selections>Modify>Expand 2, add a new layer and flood fill with #EED2D1, move this layer under the decorated face layer.
8. Add a new layer and go to selections>load from disk>tie.sel, flood fill with #E0A060, do not deselect, change the color to #F2DC65 and with the Airbrush tool and spray some on the tie.
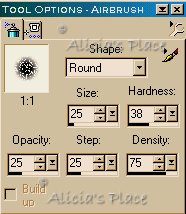
Add a drop shadow: Color #78574E, Vertical "-2", Horizontal "2" Opacity "80" and Blur "2.4", repeat the shadow but this time change Vertical to "2" and Horizontal to "0". With the same color and the Draw tool same settings as before draw some lines for the tie, I also supplied the selections if you want to use them (tie1.sel) and flood fill with the same #78574E.
I hope you enjoyed this tutorial, if you have any questions or comments please email me
Copyright Terms and Conditions
No Part of this Tutorial shall be Copied - Distributed - Placed on a CD - Sold - or Copied onto another Website.
Webpage, Graphics, and Tutorial are © Alicia's Place - September/2001
All Rights Reserved