|
This Tutorial is my result of a Challenge presented to us by an Awesome Graphics Group I am Very Proud to be a member of. The Group - FlyByNight Thank You Donna for presenting the Challenge.
For
this tutorial you will need Paint
Shop Pro 7 and this zip file
1. Open your Autumn picture and duplicate (Shift D) minimize the original. 2. Go to Effects>Texture Effects>Mosaic-Glass with the following settings and apply 2 times.
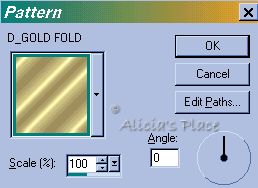
Go to Image>Flip. 3. Add a new layer and flood fill with the gold pattern
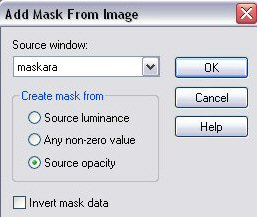
4. Go to Masks>New>From Image and choose Maskara: Source Luminance and Invert Mask data checked, go to Masks>Delete and click Yes. Using your Magic Wand with Feather and Tolerance "0" click inside the Mask and go to Selections>Modify>Expand 2 and save this selection to Alpha Channel, deselect, add a drop shadow: Color "Black", Vertical "1", Horizontal "-1", Opacity "100" and Blur "5.9". Go to Effects>Sharpen>Sharpen. 4a. For PSP 8 or 9, go to Layers>New Mask Layer>From Image and use the following settings:
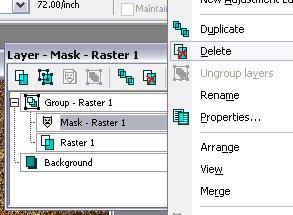
Right click on the Mask Layer, click on "Delete" and click Yes
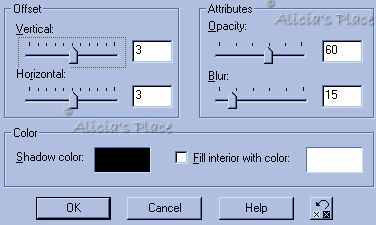
5. Go back to your Background layer and add a new layer, go to Selections>Load from Alpha Channel and click OK on the selection you just saved, open the autumn image and copy and paste "Into" Selection. Layers>Merge>Merge All. 6. Go to Selections>Select All, Selections>Modify>Contract "3", Selections>Invert and flood fill with the gold pattern, go to Selections>Invert, Selections>Float and apply the following Cutout:
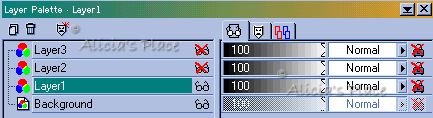
Apply the Cutout again but this time change Vertical and Horizontal to -3, deselect. Sign your image. Go to Selections>Load from Alpha Channel and load the Selection you saved on step 4. 7. Add 3 new layers and with the Picture Tube Tool select the Autumn Leaves at Scale 25 and apply about 8 leaves on each layer (NOT ON THE BACKGROUND LAYER) 8. Highlight Layer 1 and turn off visibility of layer 2 and layer 3, merge visible
9. Go to File>Save Copy As and save number 1 in jpg format, go to Edit>Undo Merge Layers, turn off visibility of Layer 1 and Turn on visibility of Layer 2, make sure you are on Layer 2, merge visible and "Save Copy As" and save number 2 in jpg format (make sure you are not saving with the same name or number) go to Edit>Undo Merge Layers, turn off visibility of Layer 2 and Turn on visibility of Layer 3, make sure you are on Layer 3, merge visible and "Save Copy As" and save number 3 in jpg format. Now you can close your image. 10. Open Animation Shop and go to File>Animation Wizard, Click on "Same size as the first image frame" and then "Next"; "Transparent", Next; "Upper left corner of the frame" and "With the canvas color", Next; "Yes, repeat the animation indefinitely" and on time change to "18", Next; Add Image and Browse for the file where you have your images saved, add your 3 images and click "Next" and then "Finish" 11. Go to View>Animation, go to File>Save As, name your animation and Save, I left mine on "Better Image Quality", click Next, Next and Finish and your Animation is ready. NOTE: If you want to change the time you can right click on each frame and go to Frame Properties. I hope you enjoyed this tutorial, if you have any questions or comments please email me
Copyright Terms and Conditions No Part of this Tutorial shall be Copied - Distributed - Placed on a CD - Sold - or Copied onto another Website. Webpage, Graphics, and Tutorial are © Alicia's Place - November 1, 2001. All Rights Reserved
|