

For this tutorial
you will need Paint
Shop Pro 6 or
7, this zip file ![]() and if you are using PSP6 this is the zip file with the flower tube
and if you are using PSP6 this is the zip file with the flower tube ![]()
Unzip the selections into your PSP selections folder, open the flowers tube and export it as a picture tube with 3 cells across and 2 cells down.
Open a new image 360x520 transparent, I know is big, but you can resize it later. Add a new layer and name it face, go to selections>load from disk>aliconface.sel flood fill with white, add a new layer and go to selections>load from disk>aliconear.sel flood fill with white, go to selections>contract 20 and flood fill with pink, I'm using #F0D2D6, deselect, duplicate this layer, and go to image mirror, turn off visibility on your layer1 and face layer and merge visible the 2 ears layers and name it ears.
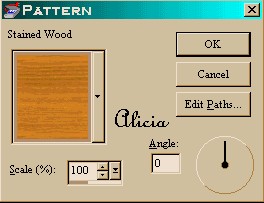
Add a new layer and go to selections>load from disk>aliconpole.sel flood fill with a wood pattern, I'm using the Stained Wood pattern that came with PSP7, with the following settings:
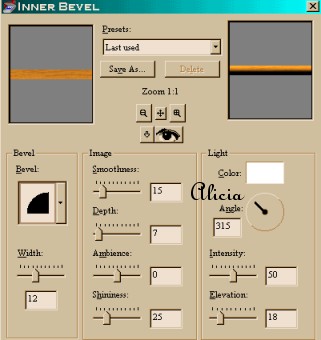
Go to effects>3D Effects>Inner Bevel with this settings:
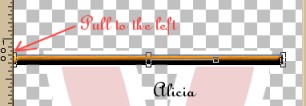
Deselect and with your deformation tool, pull to the left about 6 or 7 pixels and double click to apply the deformation.
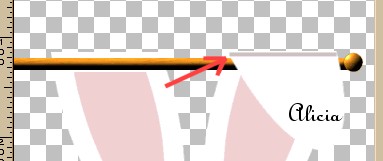
Add a new layer and with your selections tool antialias checked make a circle at this coordinates 346, 118 and make it 19x19 size, flood fill with the wood pattern and apply the same inner bevel, turn off visibility of layer 1, face, and ears layers and merge visible, name this layer pole.
Add a new layer and go to selections>load from disk>aliconear1.sel, flood fill with white, add a new layer, set your foreground color to #CBC1C7 and with your draw tool set at single line, width 4 draw a line on top of the ear like this:
Go to effects>blur>gaussian blur and set the radius to 7, go to selections>load from disk>aliconear1.sel, go to selections>invert and hit your delete key, deselect. Duplicate this layer and go to image mirror, merge these 2 layers visible.
Go to your face layer and add a new layer, go to selections>load from disk>aliconface1.sel, flood fill with black, go again to selections>load from disk>aliconnose.sel and flood fill with same pink we used on the ears. Set your background to black and with your preset tool ellipse, antialias checked draw a small ellipse on top of your nose, and with your paint brush, shape round, size 3, hardness 100 color white, put a dot on the ellipse, go to copy and paste as a new selection, and position the other eye, do the brows with your draw tool single line, black, width 1. To decorate with the flowers use different layers, that make it easy to position them.
Turn off your layer 1 and merge visible all the other layers, you can add a drop a shadow now, go to layer 1 again and flood fill with your background, merge all your layers flatten and your bunny flag its ready.
I hope you enjoyed this tutorial, if you have any questions or comments please email me

Copyright Terms and Conditions
This Tutorial is solely derived by My Imagination. No Part of this Tutorial shall be Copied - Distributed - Placed on a CD - Sold - or Copied onto another Website.
Webpage, Graphics, and Tutorial are © Alicia's Place - Jan/2001
All Rights Reserved