

For this
tutorial you will need Paint
Shop Pro 7,
BladePro
or Super BladePro and this zip file ![]() You'll also need the coppery
gold preset or you
can use any other preset you would like.
You'll also need the coppery
gold preset or you
can use any other preset you would like.
1. Open a new image 412x412, flood fill with black (this is only with the purpose of better view, later you can change your background).
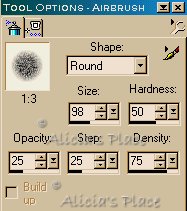
2. Add a new layer and name it dress, go to selections load from disk angeldress.sel, flood fill with white and go to Effects>Plug-in Filters>Super Blade Pro and apply the coppery gold preset, then apply a drop shadow with Color "Black", Horizontal and Vertical "1", Opacity "77" and Blur "3.5", deselect and with the Magic Wand Feather and Tolerance "0" click outside the dress, go to Selections>Invert, Selections>Modify>Contract "3", SAVE TO ALPHA CHANNEL, go to Layer 1 and add a new Layer, flood fill with white, lower the opacity of this layer to 45, "do not deselect", add a new Layer change your foreground to #BFC0D2 and with the Airbrush Tool and the following settings spray some inside the selection.
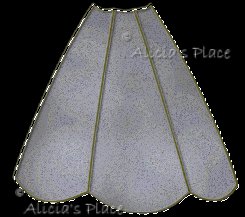
Deselect, go to the dress layer and add a new layer, go to Selections>Load from disk>angeldress1.sel, flood fill with white and apply the same Blade Pro preset and the same shadow, turn off visibility of Layer 1 (the black background) and merge layers visible, name it dress.
NOTE: On the following steps we will be using the same Blade Pro preset and the same settings for the Airbrush and Drop Shadow.
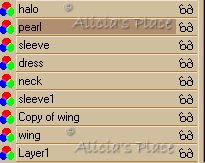
3. Go back to layer 1 and add a new layer, name it wing, go to selections load from disk angelwing.sel, flood fill with white and apply the Blade Pro preset and the shadow, deselect and with your Magic Wand click "inside" the wing, go to Selections>Modify>Expand "4", go back to layer 1 and add a new layer, flood fill with white, lower the opacity to 45, do not deselect and add a new layer, use the Airbrush same as before, deselect. Go to the wing layer and add a new layer, go to Selections>Load from disk>angelwing1.sel, flood fill with white and apply the Blade Pro and shadow, turn off visibility of Layer 1 and dress layer and merge visible, name it wing, go to Layers>Duplicate, and then go to Image>Mirror, now using the Deformation Tool, move the wing to the left and when is in the right position click on the box on the right center and drag in until the wing its about half size, now double click to apply the deformation, and go to Image>Sharpen>Sharpen.
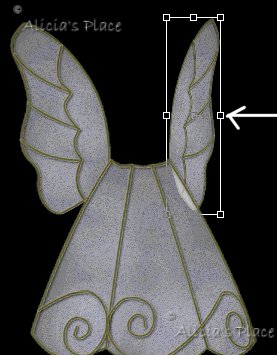
Go to Selections>Load from Alpha Channel and hit the delete key.
4. Go back to the dress layer and add a new layer, name it sleeve, go to Selections>Load from disk>angelsleeve.sel, flood fill with white and apply the Blade Pro and the shadow, with the Magic Wand click outside of the sleeve, go to Selections>Invert, Selections>Modify>Contract "4", go back to the dress layer and add a new layer, flood fill with white and lower the opacity of the layer to "30", add a new layer, change the color and apply the airbrush, click only two times, deselect. Go go the sleeve layer and add a new layer, go to Selections>Load from disk>angelsleeve1.sel, flood fill with white and apply the Blade Pro and the shadow. Turn off visibility of Layer1, dress, wing and copy of wing layers and merge visible, name it sleeve.
5. Add a new layer, go to Selections>Load from disk>angelsleeve2.sel apply the Blade Pro and shadow, with the Magic Wand click outside of the sleeve, go to Selections>Invert, Selections>Modify>Contract "4", go back to the sleeve layer and add a new layer, flood fill with white and lower the opacity of the layer to "45", add a new layer, change the color and apply the airbrush, deselect. Go to Copy of wing Layer, add a layer and go to Selections>Load from disk>angelsleeve3.sel, apply Blade Pro and shadow. Turn off visibility off Layer1, wing, copy of wing, dress and sleeve and merge visible, go to Selection>Load from Alpha Channel and hit the Delete Key, name this layer sleeve2 and move it under the dress layer.
6. Go to the sleeve1 layer and add a new layer, go to Selections>Load from disk>angelneck.sel, flood fill with white and apply the Blade Pro and the shadow.
7. Go to the sleeve layer and add a new layer and add the pearl tube I provided, at 60%. Add a shadow with these settings: Vertical "4", Horizontal "0", Opacity "65" and Blur "7.1"
8. Add a new layer and go to Selections>Load from disk>angelhalo.sel, flood fill with white and apply the Blade Pro and shadow (Change to the first settings)
You should have this so far:

9. Shift-D 3 times, to make copies of what we have to add the music instruments.
10. Now on the original, turn off visibility of layer1 and sleeve layer and merge visible, sleeve should be on top of your merged layer. From your merged layer, add a new layer and go to Selections>Load from disk>angelmusic.sel, flood fill with white, apply the Blade Pro and the shadow, add a new layer and go to your tube tool, using the pearl again, but this time at 18% add five pearls, you may want to add each pearl on a different layer to make it easier to move them, when you finish merge the pearls visible and add a drop shadow.
11. Turn off visibility of Layer1 and merge visible, now you have your first angel.
12. On another copy, turn off visibility of layer1 and sleeve layer and merge visible. From your merged layer, add a new layer and go to Selections>Load from disk>angelmusic1.sel, flood fill with white, apply the Blade Pro and the shadow, your second angel its ready.
13. Open another copy and go to Image>Mirror on the merged layer and on the sleeve layer, go to the merged layer and add a new layer, go to Selections>Load from disk>angelmusic2.sel, flood fill with white, apply the Blade Pro and the shadow, your third angel its ready.
14. On your last copy, repeat step 13 but load angelmusic3.sel.
I hope you enjoyed this tutorial, if you have any questions or comments please email me
Copyright Terms and Conditions
No Part of this Tutorial shall be Copied - Distributed - Placed on a CD - Sold - or Copied onto another Website.
Webpage, Graphics, and Tutorial are © Alicia's Place - September/2001
All Rights Reserved