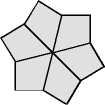
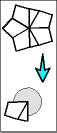
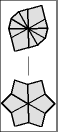
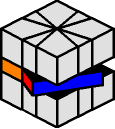
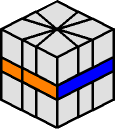
Square 1 is a mixture of small wedges, large wedges, and two trapezoids. The two trapezoids belong in the equator (middle layer) of the puzzle, and must be joined together:
| like this: |
 |
or like that: |
 |
|||||||||||
 |
 |
 |
 |
 |
 |
 |
 |
 |
 |
Note: There is no need to memorize the above table; it is merely an example.
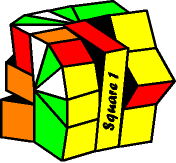
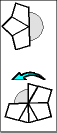
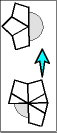
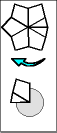
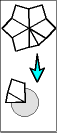
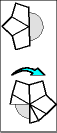
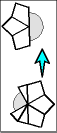
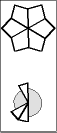
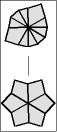
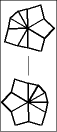
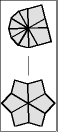
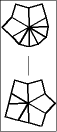
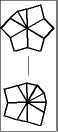
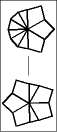
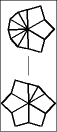
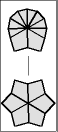
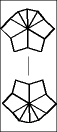
Once one layer is filled with 6 large wedges, then it is time to memorize the chart below to transform the puzzle to its final shape, the CUBE; or at least practice it enough so it becomes second nature.
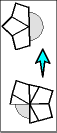
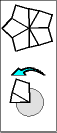
The 5 possible starting postions are shaded in gray. Find your pole position and follow the arrows until you arrive at the finish line. To make a move, start off by setting the top and bottom layers just like one of the diagrams, then give the entire right side a twist. After that, turn the top and/or bottom layer so that they match the next diagram, before doing the twist again.
 |  |
 | |
 | |
 | |
 | |
 | ||||
 |
||||||||||||||
 |
|  |
|  |
||||||||||
|
||||||||||||||
 | |
 | |
 | |
 | ||||||||
||||||
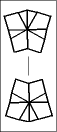
| ...and if the equator still needs fixing... | 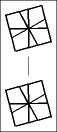 | |||||||||||||
NOTE: The front edges of the top and bottom layers are pointing towards each other in the diagrams.
Meanwhile, the vertical line represents the slice in the equator.
Due to the avalanche of protests and confusion via e-mail, I was forced to re-invent a different kind of notation.
Hopefully, this will be easier to understand...
t- |
Rotate the top layer 30 degrees
(1/12 of-a-turn) to the left. Note: a small wedge is 30 degrees wide. |
t-2 |
Rotate the top layer 60 degrees
(1/6 of-a-turn) to the left. Note: a large wedge is 60 degrees wide. |
t-3 |
Rotate the top layer 90 degrees (1/4 of-a-turn) to the left. |
t6 |
Rotate the top layer 180 degrees (half-way around). |
t+3 |
Rotate the top layer 90 degrees (1/4 of-a-turn) to the right. |
t+2 |
Rotate the top layer 60 degrees (1/6 of-a-turn) to the right. |
t+ |
Rotate the top layer 30 degrees (1/12 of-a-turn) to the right. |
/ |
Twist the entire RIGHT SIDE half-way around! |
b- |
Rotate the bottom layer 30 degrees (1/12 of-a-turn) to the left. |
b-2 |
Rotate the bottom layer 60 degrees (1/6 of-a-turn) to the left. |
b-3 |
Rotate the bottom layer 90 degrees (1/4 of-a-turn) to the left. |
b6 |
Rotate the bottom layer 180 degrees (half-way around). |
b+3 |
Rotate the bottom layer 90 degrees (1/4 of-a-turn) to the right. |
b+2 |
Rotate the bottom layer 60 degrees
(1/6 of-a-turn) to the right. Note: a large wedge is 60 degrees wide. |
b+ |
Rotate the bottom layer 30 degrees
(1/12 of-a-turn) to the right. Note: a small wedge is 30 degrees wide. |
Basically you get the idea: t for top and b for bottom; plus for right and minus for left, followed by the number of increments (1,2,3... etc.); and finally a /slash/ for turning the right-sided chunk of the puzzle half-way around.
Because the Square 1 puzzle has a tendency to mutate into so many bizzare shapes, I will try to keep things as orthogonal as possible; in other words, I almost promise to keep the top and bottom layers square throughout the solution. I also almost promise to keep each move itself at right-angle increments, with the minor exception of the +1 or -1 moves that lead and trail for each sequence.
Once the puzzle is transformed into a cube, you only have to memorize ten sequences to solve the colors, starting right NOW...
Now that we are aquainted with the notation, it is time to learn your first lesson by solving the equator.
 |
|
 |
b- / t6 / t6 / b+ |
This is probably the most important move to memorize, as there will be times when the equator accidentally gets out of shape. After the move is over, the equator is square again, and the top and bottom layers are left exactly as they were before.
NEXT: Solve the Top Corners