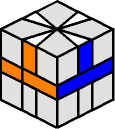

During this section, you must learn 3 other sequences.
It is time to introduce yourself to a new move. The move will be used throughout the first section of this page:
b- / b+ |
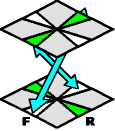 |
What the move does: It swaps the front and back pair of edges between the top and bottom layers; not directly above-and-below, but in a "criss-cross" way. |
Your job is to get 2 adjacent (side-by-side) edges, one at a time, to their correct spots on the top layer; this is very important. There are four color pairs to choose from (of course, each top edge piece also has a white side added to it):
Start off by solving the first top edge. You can choose any color you like...
| MOVE UP: | Set up: | Do the move: | Result: |
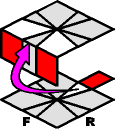 |
Top layer: vacant edge on front. Bottom layer: edge to-go in back. |
b- / b+ |
Now at least one top edge is solved. Go ahead and solve the next top edge (see Step II). |
The first top edge you chose may already be in the top layer but on the wrong side. You must knock it down before moving it back up to the correct spot...
| KNOCK DOWN: | Set up: | Do the move: | Result: |
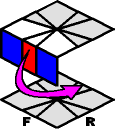 |
Top layer: edge to-go on front. Bottom layer: don't care. |
b- / b+ |
The top edge is now on the bottom layer. Go back and move it up to the top layer. |
Now you can solve the next top edge. With exception, you can choose any color you like, as long as that color is adjacent to the first solved edge...
| MOVE UP: | Set up: | Do the move: | Result: |
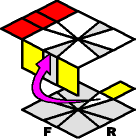 |
Top layer: vacant edge on front. Bottom layer: edge to-go in back. |
b- / b+ |
Bingo! Now there are two adjacent edges solved on the top layer. |
The next top edge you chose may already be in the top layer but on the wrong side. You must knock it down before moving it back up to the correct spot...
| KNOCK DOWN: | Set up: | Do the move: | Result: |
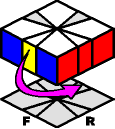 |
Top layer: edge to-go on front. Bottom layer: don't care. |
b- / b+ |
The top edge is now on the bottom layer. Go back and move it up to the top layer. |
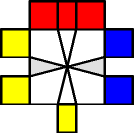 |
ROAD BLOCK! You can choose any color for the first top edge, but you are limited to select the color of the next top edge. For example, look at the diagram... The red top edge is already in place. The yellow top edge is also on the top layer but on the wrong side; which means it needs to be knocked down and moved back up later. However, if you knock down the yellow edge, the red edge goes down as well. Luckily, you still have another top edge to choose from; the blue one. |
Now it is time to introduce yourself to another new move. The move will be used throughout the second section of this page:
b- / b-3 / b+ |
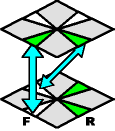 |
What the move does: It swaps the top-front edge with the bottom-front edge, and swaps the top-right edge with the bottom-left edge. |
This time, you do not have to worry about moving the other top edges to their correct spots; just get them both up in the top layer! However, it is important that you do not disturb the two original top edges that are already finished.
| SET UP: | Do the move: | Result: |
| Top Layer: original edges to the left and back. Bottom Layer: white edges to the left and front. 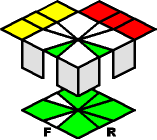 |
b- / b-3 / b+ |
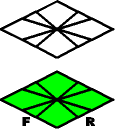 Bingo! All 4 top edges are on the top layer! |
| SET UP: | Do the move: | Result: |
| Top Layer: original edges to the left and back. Bottom Layer: white edges to the left and right. 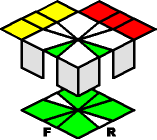 |
b- / b-3 / b+ |
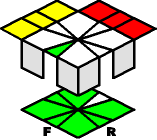 Go to Case IV. |
| SET UP: | Do the move: | Result: |
| Top Layer: original edges to the left and back; with the "extra" white edge at the front. Bottom Layer: single white edge at the right. 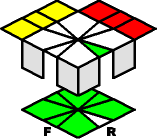 |
b- / b-3 / b+ |
 Go to Case I. |
| SET UP: | Do the move: | Result: |
| Top Layer: original edges to the left and back; with the "extra" white edge at the right. Bottom Layer: single white edge at the back.  |
b- / b-3 / b+ |
 Go to Case I. |
By now, all 4 top edges are on the top layer, with two adjacent edges already in place. The other two may also be in place, but if they are not then swap them by using yet another new move:
| SET UP: | Do the move: | Result: | What the move does: |
| Top Layer: edges to be swapped at the right and the back. Bottom Layer: don't care. 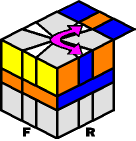 |
b- / b-3 / b+ |
The top layer is solved. | 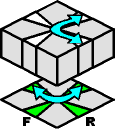 It swaps the back and right edges on the top layer, while swapping the back and left edges on the bottom layer. |
Normally, you would expect to go ahead and solve the Bottom Edges. Unfortunately, Square-1 is the sort of puzzle that can bring up many strange and eerie surprizes. The best thing for you to do is visit the polarizing page next, and then check to find out if you need to put yourself through this kind of carnage. Afterwards/Otherwise, you can go on to solve the bottom edges.
So check and see whether or not you have to...