Move UP:
Move UP:
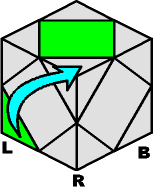
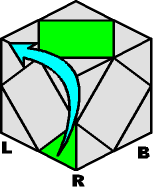
SKEWB... it kind of sounds like a skewed cube; which sort of what it is. While the Rubik's Cube is sliced orthogonally (up&down / left&right), the Skewb is sliced diagonally. The first thing you have to learn about this creature is how to hold it without having it accidentally twist in your hand, causing the critter to fall on the ground. That happens way too many times, if you know what I mean.
There are 8 corners in SKEWB, but we only need to concern ourselves with 3 of them: The bottom front-Left, the bottom front-Right and the bottom Back-right. The first two are in the bottom-front, so all you have to remember is Left and Right. The last one is in the (bottom right)-Back. I tried to avoid using this awkward corner, but just couldn't get around it any other way. On the bright side, you only have to use it once!
To turn a corner, touch onto its 3 neighboring sides and do that twist. It takes only a little more effort than operating a Ouija board.
The first step is to solve all 8 corners; we will exchange the faces later. Choose a favorite color among the 6 faces, and make that the TOP side for now. With the favorite-color-face on the top, move the Top Corners somewhere on the top side. You don't have to worry about them being in the right spot, or even whether they are inverted... just get them on the top side!
Move UP: |
Move UP: |
|
 |
 |
|
|
|
Note: Do NOT move a corner-piece up if the target corner is occupied by another piece that already belongs on top. In a case like that, rotate the entire puzzle (keeping your oh-so-favorite color as the top side) until you can match a pattern that will allow you to move that piece up to an unoccupied corner.
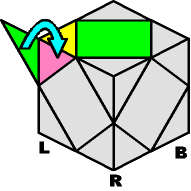
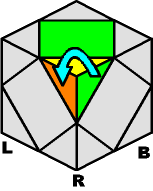
Now that all 4 top corners are on the same side, it is time to turn them around. To twist a top corner CLOCKWISE, rotate the entire puzzle until that corner appears on the (top-front) LEFT. To twist a corner COUNTER-CLOCKWISE, rotate the entire puzzle until that vertice appears on the (top-front) RIGHT. Depending on the case, use one of the following moves:
Turn |
Turn |
|
 |
 |
|
|
|
Are the 4 corners in place? Do the colors of their sides match? If not, then SWAP two opposite corners using the move below. It does not matter which two you swap.
Note: This is the only time you have to use the awkward B+ move. After this sequence is over, you can forget about it.
Swap 2 Opposite |
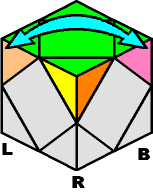 |
|
After swapping the two corners, they are discombobulated and need to be rotated again until all the top colors match. Notice that the OTHER two corners are still OK. To fix the SWAPPED corners, use the same old moves as before:
Turn |
Turn |
|
 |
 |
|
|
|
Now it's time to do the bottom corners. Guess what? By some miracle, they are already in place! This is the great thing about this puzzle: Once the top corners are in place, the bottom corners also in place. But they still might need to be twisted on the spot, so the colors of their sides all match.
What color IS the bottom side, anyway? Well, look at the 4 bottom corners; there is only ONE color in common with all four of them, and THAT is the color of the bottom face. Believe it or not, there are only 2 possible configurations to worry about. Below are diagrams of the 2 configurations, along with a sequence of moves to make. Make sure the patterns are EXACTLY like the diagrams below before attempting to make a single move:
Case #1: |
Case #2: |
What the move does: |
||
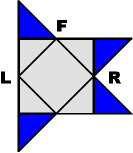 Bottom View |
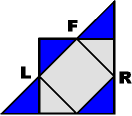 Bottom View |
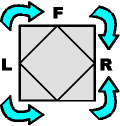 Bottom View |
||
L+ R- L+ R-
|
L+ R- L+ R-
|
It rotates the two |
The bad news is, there are many cases of swapping at this point. The good news is, you only need to memorize ONE sequence of moves for all of them. Here is the sequence:
What the move does:
It swaps the front face with the bottom face,
and swaps the left face with the right face.
The first thing to do is try to finish at least 2 faces. The top face should already be done. If the other 5 are not in place, then:
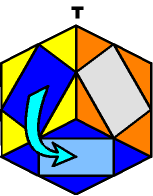 |
Moving the front face |
Now at least 2 faces are finished. From this point on, the top side loses its status as ANY side can become the top side. The important thing is that the swapping (or exchanging) pattern matches with one of the 7 remaining cases in the table diagrams.
So... rotate the enire puzzle around until the faces that need to be swapped (or exchanged) are positioned exactly as shown in the table diagrams. The left column labels the Case Number, along with an abbreviated nickname I made up. The right column is the result AFTER doing the Swapping Sequence. You may have to jump from Case to Case to solve the SKEWB, but you should only have to use the Swapping Sequence 3 times max.
Case I:Chair A/O |
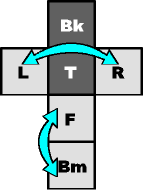 |
Result: |
||
Case II:Chair A/A |
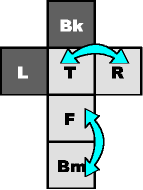 |
Result: |
||
Case III:Hoop O/O |
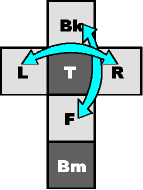 |
Result: |
||
Case IV:Hoop A/A |
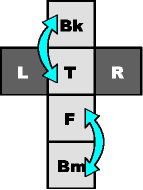 |
Result: |
||
Case V:Mitt CW |
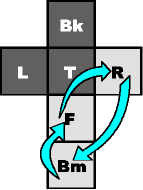 |
Result: |
||
Case VI:Mitt CCW |
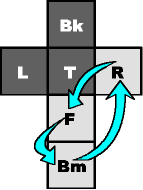 |
Result: |
||
Case VII:Clamp |
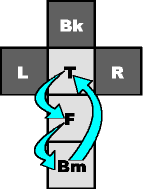 |
Result: |
Note: the arrows indicate where each face must travel in order to complete the puzzle.